Building Envelope Commissioning Guide
The building envelope is the single most important system in any structure. It is the barrier between inside and outside, and when it fails, everything behind it suffers. Water gets in. Energy gets out. Mold grows. Finishes deteriorate. And somebody gets a phone call they do not want to receive.
Building envelope commissioning (BECx) is the process of making sure that barrier actually works. It is not a single inspection or a one-time test. It is a quality assurance program that starts during design and continues through construction, verifying at every stage that the roof, walls, windows, doors, and all the joints between them will perform the way they are supposed to.
For contractors, understanding BECx matters whether you are the one installing the envelope, managing the project as a GC, or responding to commissioning observations on your scope of work. This guide covers the full process: what gets tested, how testing works, what the commissioning agent is looking for, and how to build envelope work that passes with flying colors.
Why Building Envelopes Fail
Before we talk about commissioning, it helps to understand what goes wrong. Building envelope failures generally come down to three things: water, air, and heat. Or more precisely, the uncontrolled movement of water, air, and heat through the building shell.
Water Intrusion
Water is the number one enemy of buildings. It causes more damage, more litigation, and more expensive repairs than any other building performance issue.
Water gets into buildings through:
- Bulk water penetration: Rain driven through gaps, cracks, and failed joints by wind pressure
- Capillary action: Water wicking through porous materials like concrete, mortar, and brick
- Condensation: Warm, moist air contacting a cold surface inside the wall assembly
- Vapor diffusion: Moisture moving through materials from high humidity to low humidity
Every one of these mechanisms can be controlled with proper design and installation. The problem is that controlling all of them simultaneously requires attention to detail at every joint, transition, and penetration in the envelope. One missed sealant joint, one improperly lapped membrane, one flashing detail that was done backward can let enough water in to cause serious damage.
Air Leakage
Uncontrolled air movement through the building envelope wastes energy, creates comfort problems, and can transport moisture into wall cavities where it causes condensation and damage.
A typical commercial building without a properly installed air barrier can lose 25 to 40 percent of its heating and cooling energy through air leakage. That is money literally going out through the walls.
Air leaks also create pressure imbalances that affect how other building systems perform. A building that leaks air in unexpected places may have humidity problems on one floor, drafts in another area, and doors that are hard to open because of pressure differences.
Thermal Bridging
A thermal bridge is any element of the building envelope that conducts heat significantly better than the surrounding materials. Steel studs, concrete slab edges, shelf angles, and window frames are all common thermal bridges.
Thermal bridges reduce the effective insulation value of the wall assembly, create cold spots where condensation can form, and contribute to uneven temperatures inside the building. They show up clearly on thermal imaging, which is one of the reasons infrared cameras are such a valuable commissioning tool.
What Building Envelope Commissioning Includes
BECx is a multi-phase process that covers the entire life of the envelope from design through occupancy. Here is what each phase involves.
Phase 1: Design Review
The commissioning agent reviews the envelope design documents before construction begins. This is not a full redesign; it is a focused review of:
- Air barrier continuity. Is there a continuous air barrier defined on every detail? Does it transition properly at roof-to-wall connections, wall-to-foundation connections, window and door openings, and penetrations?
- Water management strategy. Are flashings, drainage planes, and weep systems properly detailed? Is there a clear path for any water that gets past the outer layer to drain out without contacting moisture-sensitive materials?
- Vapor control. Is the vapor retarder in the right location for the climate zone? Are there materials in the assembly that could trap moisture?
- Thermal performance. Does the insulation strategy meet code requirements? Are major thermal bridges addressed?
- Material compatibility. Are all adjacent materials compatible? Will sealants adhere to the substrates they are applied to? Will membranes work with the primers and adhesives specified?
The design review produces a list of observations and recommendations. Addressing these during design is orders of magnitude cheaper than fixing them in the field.
Phase 2: Pre-Construction
Before envelope work begins, the commissioning agent:
- Develops a commissioning plan specific to the project
- Identifies key inspections and tests, including when they need to occur in the construction sequence
- Reviews product submittals and shop drawings for envelope components
- Attends preconstruction meetings with the envelope subcontractors
- Establishes testing criteria and acceptance standards
This phase is about making sure everyone knows what is expected before the first piece of membrane goes on the wall.
Phase 3: Field Observations
This is where most of the commissioning work happens. The commissioning agent makes periodic site visits during envelope construction to observe:
Air barrier installation:
- Substrate preparation and priming
- Membrane application (temperature, coverage, laps)
- Sealing at penetrations, transitions, and terminations
- Continuity of the air barrier at all connections
Water management:
- Flashing installation sequence (shingling, laps, end dams)
- Through-wall flashing integration with the drainage plane
- Window and door installation and flashing
- Sealant joint preparation and application
- Drainage cavity maintenance (keeping weeps clear, mortar dams in place)
Insulation:
- Proper installation without gaps, compressions, or voids
- Continuous insulation attachment and joint treatment
- Insulation coverage at transitions and details
General workmanship:
- Material storage and handling
- Compliance with manufacturer’s installation requirements
- Protection of completed work from damage by subsequent trades
Field observations are documented with photos, descriptions, and references to the relevant design details. Issues are reported to the contractor and design team for resolution.
Phase 4: Performance Testing
Testing verifies that the installed envelope actually performs. The specific tests depend on the building type, design, and specification requirements.
Air Barrier Testing Methods
Whole-Building Air Leakage Testing (Blower Door)
The most definitive test of air barrier performance is a whole-building pressurization test. Large fans are mounted in exterior doorways and used to pressurize (or depressurize) the building to a target pressure, typically 75 Pascals (0.3 inches of water column).
The volume of air required to maintain that pressure is measured and expressed as an air leakage rate, usually in CFM per square foot of envelope area. Common targets:
- U.S. Army Corps of Engineers: 0.25 CFM/ft² at 75 Pa
- ASHRAE 189.1 (green buildings): 0.40 CFM/ft² at 75 Pa
- IECC 2021: 0.40 CFM/ft² at 75 Pa for most building types
Lower numbers mean a tighter building.
Practical considerations:
- Testing must happen before the envelope is finished on the inside (so you can find and fix leaks) but after the air barrier is substantially complete
- All intentional openings (exhaust fans, fresh air intakes, plumbing vents) must be temporarily sealed
- The building needs to be substantially enclosed. Missing windows, open stairwells, or incomplete sections will skew results.
- Weather conditions matter. High winds can affect results.
- Multiple fans may be needed for large buildings
Window Water Testing (ASTM E1105)
Field water testing of installed windows and curtain walls verifies their resistance to water penetration under simulated wind-driven rain conditions. The test involves:
- Building a spray rack that covers the test specimen
- Spraying water at a controlled rate (typically 5 gallons per hour per square foot)
- Applying air pressure behind the water to simulate wind
- Observing the interior side for any water penetration over a 15-minute test period
This test catches installation deficiencies that factory testing of the window itself would not reveal. Improper shimming, missing sealant, backward flashing, and membrane integration problems all show up during field water testing.
Roof Flood Testing
For flat and low-slope roofs, flood testing involves plugging all drains and flooding the roof with 2 to 4 inches of water for 24 to 48 hours. Any leaks through the roofing membrane will show up on the underside of the roof deck.
Flood testing is simple but effective. It should be done after the roofing membrane is complete but before any insulation, ballast, or finishes are applied over the membrane.
Electrical Capacitance or Impedance Scanning
For roofs and walls, electronic scanning methods can detect moisture beneath the surface without destructive testing. These methods use the fact that wet materials conduct electricity differently than dry materials. A technician scans the surface with a probe, and the instrument identifies areas of elevated moisture content.
This is particularly useful for identifying roof leaks that may not be visible from the interior or for checking wall assemblies after a suspected water event.
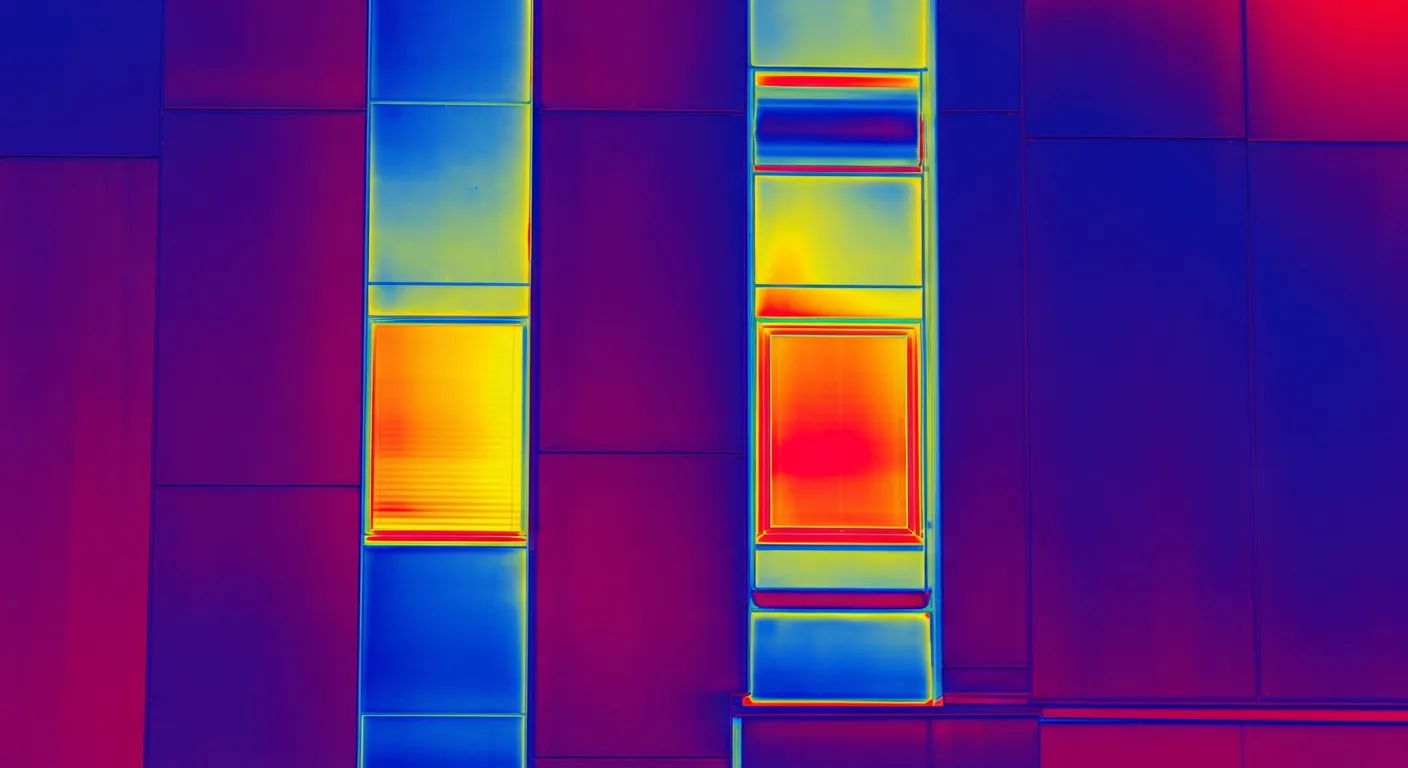
Thermal Imaging: What It Reveals and How It Works
Infrared thermography is one of the most powerful tools in the commissioning agent’s kit. A thermal camera detects surface temperature variations that are invisible to the naked eye, revealing problems hidden inside the wall or roof assembly.
What Thermal Imaging Can Find
Insulation deficiencies: Missing, compressed, or improperly installed insulation shows up as warm spots (in winter) or cool spots (in summer) on the building’s exterior surface. Even small gaps in insulation are visible on a thermal image.
Air leaks: Air leaking through the envelope carries heat with it, creating temperature patterns that show up clearly on thermal cameras. Common leak locations include window perimeters, wall-to-roof connections, penetrations, and joints in the air barrier.
Thermal bridges: Structural elements that bypass the insulation layer show up as lines or patterns of heat transfer on the thermal image. Steel studs behind exterior insulation, concrete slab edges, and shelf angles are easily identified.
Moisture: Wet materials have different thermal properties than dry materials. Moisture in roofing assemblies, wall cavities, and behind cladding can often be detected with thermal imaging, especially when conditions create evaporative cooling on the wet surface.
When to Conduct Thermal Imaging
The best results come when:
- There is at least a 15 to 20 degree Fahrenheit temperature difference between inside and outside
- The building is heated or cooled (mechanical systems running)
- Weather has been stable for several hours (no recent rain, cloud changes, or wind shifts)
- Exterior scans are done before sunrise (to avoid solar heating effects) or after sunset
- Interior scans can be done at any time as long as the temperature difference exists
Interpreting Thermal Images
Thermal imaging requires trained interpretation. Not every temperature variation indicates a problem. Surface emissivity differences, reflected heat from nearby objects, and normal thermal patterns from structural elements can all create false readings.
A qualified commissioning agent knows the difference between a genuine insulation void and a reflective surface artifact. They correlate thermal findings with the building’s design, construction details, and other test results before drawing conclusions.
Moisture Management Strategies
Effective moisture management is not a single product or technique. It is a system of strategies that work together to keep water out and manage any moisture that does get in.
The Rain Screen Principle
Most modern commercial wall systems use some version of the rain screen principle. The basic concept is:
- An outer cladding layer (the rain screen) deflects most bulk water
- A drainage cavity behind the cladding allows any water that penetrates the cladding to drain down and out
- A weather-resistant barrier (WRB) behind the drainage cavity acts as the final line of defense against water
- Flashings at every horizontal joint, transition, and penetration direct water outward
The key insight is that no cladding system is 100 percent waterproof. The rain screen approach accepts this reality and manages the water that gets past the outer layer instead of relying on a single barrier to keep everything dry.
Flashing Details That Matter
Flashings are where most water problems start. They occur at every transition point in the envelope: window heads and sills, roof-to-wall intersections, shelf angles, floor lines, penetrations, and the base of the wall.
Critical flashing principles:
- Shingle laps: upper layers always overlap lower layers, so water flows down and out
- End dams: flashings must have turned-up ends at termination points to prevent water from running off the edge and into the wall
- Integration with the WRB: flashings must tie into the weather-resistant barrier in the correct sequence
- Kick-out flashings: at the bottom of roof-to-wall intersections, a kick-out flashing directs water away from the wall and into the gutter
Getting flashing details right requires understanding the sequence of installation. Materials must be applied in the correct order, and each layer must overlap the previous one in a way that directs water outward. The commissioning agent pays close attention to these details during field observations.
Sealant Joints
Sealant joints are necessary at many points in the building envelope, but they are also one of the most common failure points. Proper sealant joint performance depends on:
- Joint design: Correct width-to-depth ratio (typically 2:1), proper backing materials, and bond-breaker tape at the back of the joint
- Substrate preparation: Clean, dry, primed surfaces
- Material selection: The right sealant for the substrates and movement expected
- Application: Proper tooling to ensure full contact with both sides of the joint, no voids, and smooth finish
- Environmental conditions: Most sealants have minimum and maximum temperature requirements for application
A commissioning agent reviews sealant joint design during the design review phase and observes application in the field to verify that proper procedures are followed.
What Contractors Need to Know About Working with a Commissioning Agent
If a commissioning agent is on your project, here is how to make the relationship productive rather than adversarial.
They Are Not the Enemy
A good commissioning agent is a quality assurance partner, not a quality police officer. Their job is to help ensure the building performs as designed, which is in everyone’s interest. The earlier issues are caught, the cheaper they are to fix.
Expect Observations
The commissioning agent will document observations during field visits. These are not necessarily deficiencies; they may be requests for clarification, suggestions for improvement, or items to watch as construction progresses. Respond professionally and address items promptly.
Coordinate Timing
Many commissioning activities are sequence-dependent. The commissioning agent needs to observe certain work before it is covered up. Air barrier inspections must happen before cladding goes on. Flashing observations must happen before the next layer is installed. Build these inspections into your schedule and give the commissioning agent adequate notice.
Document Your Work
Good documentation protects you. Photos of completed work before it is covered, records of material certifications, and evidence of compliance with manufacturer’s installation requirements all support your position if questions arise later.
Projul’s photo documentation and daily log features make it easy to capture this information as part of your normal workflow. When the commissioning agent asks for evidence that a detail was installed correctly, you can pull it up in seconds.
The Business Case for Commissioning
Building envelope commissioning costs money, but it saves more than it costs. Here is the math:
Avoided moisture damage: A single water intrusion event can easily cause $50,000 to $500,000 in damage to a commercial building, depending on the extent and how long it goes undetected. BECx catches the conditions that lead to water intrusion before the building is occupied.
Reduced warranty claims: Contractors who build envelope systems under the watchful eye of a commissioning agent see fewer warranty callbacks because problems are caught and corrected during construction.
Lower energy costs: A building that meets its air leakage targets and has properly installed insulation performs as designed, which means the energy model used to size the HVAC system is actually accurate. Oversized HVAC systems due to excessive air leakage waste capital and operating costs.
Legal protection: Commissioning documentation provides evidence that the building was constructed in accordance with the design and specifications. If a problem develops years later, this documentation helps establish whether the issue is a construction deficiency, a design issue, or a maintenance failure.
Code compliance: Energy codes increasingly require air barrier testing and commissioning. Having the process in place from the start avoids scrambling for compliance at the end of the project.
Common Commissioning Failures and How to Avoid Them
Talk to any commissioning agent with ten or more years of experience and they will tell you the same thing: most envelope failures are not exotic. They are the same handful of mistakes repeated across projects, climates, and building types. Knowing what these patterns look like gives you a head start.
Missed Transitions at Roof-to-Wall Connections
The junction where a roof meets a wall is one of the most failure-prone details on any building. The air barrier on the wall needs to connect to the air barrier on the roof, and the water management layers need to do the same. In practice, these transitions involve multiple trades, sometimes working weeks apart, and the handoff between them is where things fall apart.
What typically goes wrong: the wall air barrier gets installed and terminated at the top of the wall, and the roofing crew installs their membrane separately without tying into what is already there. A gap of even half an inch at that connection will show up on a blower door test and will eventually let water in.
The fix is coordination. Before either trade starts their work, the GC or project manager needs to define who owns that transition, what the detail looks like, and in what order materials go down. A pre-installation meeting with both trades and the commissioning agent present can save weeks of rework. If you are using construction scheduling software to sequence your work, flag these transition points as milestone inspections so they do not get buried under everything else.
Air Barrier Breaches at Penetrations
Every pipe, conduit, duct, and structural member that passes through the building envelope creates a hole in the air barrier. On a typical commercial building, there can be hundreds of these penetrations, and each one needs to be sealed.
The pattern that commissioning agents see over and over is that the air barrier itself gets installed well, but the sealing around penetrations is inconsistent. Sometimes the sealant is the wrong type for the substrate. Sometimes the opening around the penetration is too large for sealant alone and needs a membrane patch or a pre-formed boot. Sometimes the penetration gets sealed once, and then another trade comes through, removes the seal to do their work, and never puts it back.
The best approach is to assign one person or crew to be responsible for all penetration sealing. This is their scope, their responsibility, and their checklist. They do a final walkthrough after all MEP rough-in is complete and before interior finishes begin. That single accountability point eliminates the “I thought someone else was doing that” problem.
Sealant Applied to Wet or Dirty Substrates
Sealant only works if it bonds to both sides of the joint. If the substrate is dusty, oily, wet, or frosted, the sealant will appear to be in place but will pull away from the surface under the first thermal cycle. This is called adhesive failure, and it is one of the most common sealant deficiencies found during commissioning.
The solution is simple but requires discipline: follow the manufacturer’s surface preparation requirements every time. Clean the substrate, apply primer where required, and do not apply sealant in the rain, in freezing temperatures, or on wet surfaces. A five-minute prep step can save a callback six months later.
Insulation Gaps at Electrical Boxes and Framing
Even on projects where the insulation crew does good work on the field of the wall, the areas around electrical boxes, junction boxes, and framing intersections often get shortchanged. The insulation gets compressed, cut poorly, or simply left out in these tight spots.
These gaps are small, but thermal imaging will find every single one of them. On a blower door test, they may also be air leakage paths if the air barrier is on the warm side of the insulation. The fix is training: show your insulation crews what these gaps look like on a thermal image, and they will understand why it matters.
Climate Zone Considerations for Envelope Design
The building envelope is not a one-size-fits-all system. What works in Phoenix does not work in Minneapolis, and what works in Miami will fail in Denver. Climate zone drives almost every decision about vapor control, insulation placement, and air barrier location.
Hot and Humid Climates (Zones 1 and 2)
In hot, humid climates like Houston, Miami, and the Gulf Coast, the primary moisture concern is humid outdoor air reaching cool, air-conditioned interior surfaces. The vapor drive is from outside to inside for most of the year.
Key considerations:
- Vapor retarder placement: On the exterior side of the insulation, or use a wall assembly that can dry to the interior. Never put a vapor retarder on the interior side in these climates, or you will trap moisture inside the wall.
- Air barrier importance: Critical. Hot, humid air leaking into an air-conditioned building causes condensation on cool interior surfaces and inside wall cavities.
- Insulation strategy: Continuous exterior insulation keeps the structural framing warm and dry. Interior cavity insulation alone can create condensation problems if the air barrier is not perfect.
- Mold risk: Very high. Any moisture that gets into the wall needs a drying path, and it needs to dry quickly. Wall assemblies in these climates should be designed to be vapor-open in at least one direction.
Cold Climates (Zones 5, 6, and 7)
In cold climates like Chicago, Minneapolis, and New England, the vapor drive reverses. Warm, moist indoor air wants to move outward through the wall assembly toward the cold exterior. If it reaches a surface that is below the dew point, condensation forms inside the wall.
Key considerations:
- Vapor retarder placement: On the interior (warm) side of the insulation, or use enough exterior continuous insulation to keep the condensation plane warm enough to prevent condensation.
- The “ratio rule”: Many building scientists recommend that at least 40 to 60 percent of the total wall R-value should be outboard of the structural framing in cold climates. This keeps the sheathing warm enough to avoid condensation regardless of interior vapor retarder performance.
- Ice dam prevention: At roof-to-wall transitions, proper insulation and air sealing prevent warm air from reaching the roof deck, which causes ice dams in snowy climates.
- Winter construction challenges: Many air barrier products have minimum application temperatures. Cold weather slows adhesive curing and can prevent proper bonding. Plan envelope work around weather windows, and use products rated for cold application when necessary.
Mixed Climates (Zones 3 and 4)
Mixed climates present the hardest envelope design challenge because the vapor drive changes direction seasonally. In winter, moisture wants to move outward. In summer, especially in humid areas, moisture wants to move inward.
Key considerations:
- Avoid vapor traps: Do not use low-permeance materials on both sides of the wall assembly. The wall needs to dry in at least one direction, and in mixed climates, that direction changes with the seasons.
- Smart vapor retarders: Variable-permeance membranes (sometimes called “smart” vapor retarders) adjust their permeability based on humidity levels. They are more restrictive when indoor humidity is high in winter and more open when exterior humidity is high in summer.
- Testing is especially important: Because these assemblies are designed to manage bidirectional moisture, any deficiency in the air barrier or insulation can create problems that would be tolerated in a climate with a single dominant vapor drive. Commissioning testing catches these deficiencies before they cause damage.
Tracking and Managing Envelope Work on Complex Projects
On a mid-size or large commercial project, envelope work involves multiple subcontractors, dozens of material products, hundreds of inspection points, and a testing schedule that has to sync with the overall construction sequence. Managing all of that with spreadsheets, email, and a clipboard is a recipe for missed inspections and lost documentation.
Organizing Inspection Schedules
Every commissioning plan includes a list of hold points and inspection milestones. These are specific moments in the construction sequence where the commissioning agent needs to observe the work before it gets covered up. Miss one, and you are either ripping off cladding for an inspection or asking the commissioning agent to accept the work without seeing it. Neither option is good.
The most reliable approach is to build these hold points into your construction project management workflow as scheduled tasks with dependencies. The cladding crew cannot start until the air barrier inspection is complete. The interior framing cannot close the wall until the insulation inspection is done. These are not suggestions; they are gates in the schedule.
If your PM software supports task dependencies and notifications, use them. The air barrier sub finishes a section, marks it complete, and the system automatically notifies the commissioning agent that the area is ready for inspection. That is faster and more reliable than phone calls and emails that get buried.
Photo Documentation That Actually Helps
Everyone takes photos on the jobsite. The question is whether those photos are useful six months later when someone has a question about a specific flashing detail on the third floor.
Useful photo documentation means:
- Location tagged: Every photo is tied to a specific area of the building. Floor, elevation, grid line, or room number.
- Date and time stamped: Automatically, not scribbled on a sticky note.
- Captioned: A brief description of what the photo shows and why it was taken.
- Organized: Filed by building area, trade, or inspection milestone, not dumped in a single camera roll with 4,000 other images.
Projul’s daily log and photo features handle all of this. Your field team takes photos through the app, and they are automatically dated, organized by project, and available to anyone on the team who needs them. When the commissioning agent requests documentation that a specific detail was installed correctly, you pull it up in seconds instead of scrolling through a phone gallery.
Handling Commissioning Observations and Punchlist Items
During the project, the commissioning agent will issue observation reports. Each report contains a list of items that need attention, ranging from minor documentation requests to critical deficiencies that must be corrected before the next phase of work proceeds.
Treat these observation items like any other punchlist. Assign them to the responsible party, set a due date, track completion, and close them out with documentation showing the corrective action taken. Some items will require re-inspection by the commissioning agent after correction.
A project management system that handles punchlist tracking makes this straightforward. Each observation gets logged as a task, assigned to the sub who owns the scope, and tracked to completion. The commissioning agent can see the status of their items without calling you every week asking for updates.
Final Documentation and Turnover
At the end of the project, the commissioning agent produces a final report that summarizes all observations, testing results, and the overall performance of the building envelope. This document becomes part of the building’s permanent record and is referenced during warranty periods and future maintenance.
As a contractor, your contribution to this documentation includes material certifications, installation records, test reports, warranty information, and evidence of corrective actions taken during construction. Having this information organized and accessible from the start of the project makes turnover smooth instead of a frantic document chase in the last week before substantial completion.
Building Your Envelope Quality Program
Whether or not your projects have a formal commissioning requirement, you can apply commissioning principles to improve the quality of your envelope work.
-
Review details before you build. Spend time understanding the envelope design before breaking ground. Identify complex transitions and details that need extra attention.
-
Train your crews. Make sure the people installing air barriers, flashings, and waterproofing understand why these details matter, not just how to install them.
-
Document your work. Photo documentation of envelope details before they are covered creates a record that protects you during warranty periods and beyond.
-
Self-inspect. Walk your own work with a critical eye before the commissioning agent sees it. Catch and fix problems yourself.
-
Learn from testing results. If a blower door test reveals more leakage than expected, use the results (along with thermal imaging) to find and fix the problems. Every test is a learning opportunity.
-
Use your project management tools. Tracking envelope work, inspections, and testing in your project management software keeps everything organized and accessible for the entire team.
Building envelopes that work requires attention to detail from the first design review through the last sealant joint. It is not glamorous work, but it is the work that determines whether a building stands up to weather, time, and the expectations of the people inside it.
Want a better way to manage quality documentation, field photos, and project communication? See what Projul can do for your team or check our pricing plans.
Frequently Asked Questions
What is building envelope commissioning?
When should building envelope commissioning start?
What is a blower door test and why is it used on commercial buildings?
How does thermal imaging work for building envelope inspections?
What is the difference between air barriers and vapor barriers?
How much does building envelope commissioning cost?
Is building envelope commissioning required by code?
Who performs building envelope commissioning?
Related Articles

Concrete Tilt-Up Construction: A Contractor's Complete Field Guide
Tilt-up construction accounts for roughly 15 percent of all industrial and commercial buildings in North America. This...
Read More →
How to Implement Construction Software Without Losing Your Mind
Most construction software rollouts fail. Not because the software is bad, but because the rollout was rushed. Here are...
Read More →
How Selections Can Pay for Themselves in Three Easy Steps
Most contractors lose thousands each year on wrong material orders, slow client decisions, and missed upsell chances....
Read More →