Concrete Crack Repair and Injection: A Complete Construction Guide | Projul
Understanding Concrete Cracks
Every concrete structure cracks. That is not an exaggeration or a pessimistic view. It is a fundamental property of the material. Concrete is strong in compression but weak in tension, and when tensile stresses exceed the concrete’s tensile strength (which is only about 10 percent of its compressive strength), it cracks.
The question is never whether concrete will crack, but rather how significant the cracks are, what caused them, and what (if anything) needs to be done about them. Some cracks are purely cosmetic. Others indicate serious structural problems. Some allow water infiltration that leads to reinforcing steel corrosion and progressive deterioration. Telling the difference is the first and most important skill in concrete crack repair.
This guide covers the full range of crack diagnosis, repair methods, and material selection so you can make informed decisions on your projects.
Types of Cracks and Their Causes
Plastic Shrinkage Cracks
These cracks appear while the concrete is still fresh, typically within the first few hours after placement. They happen when the surface of the concrete dries faster than the bleed water can replenish it, causing the surface to shrink and crack.
Plastic shrinkage cracks are usually shallow (less than 2 inches deep), irregular in pattern, and range from a few inches to a few feet in length. They are most common on hot, windy days when evaporation rates are high, or on large flat surfaces like slabs and pavements.
Prevention is the best approach: use evaporation retarders, wind breaks, fog misting, and proper curing procedures. Once they occur, plastic shrinkage cracks are generally not structural but may need sealing to prevent water infiltration.
Drying Shrinkage Cracks
As concrete cures and loses moisture over the first several months and years, it shrinks. On a typical slab, drying shrinkage is about 0.04 to 0.08 percent of the total length. That does not sound like much, but on a 100-foot slab, it translates to roughly half an inch to a full inch of total shrinkage.
If the concrete is restrained from shrinking freely (by foundations, other slabs, dowels, or friction against the subgrade), tensile stresses build up until the concrete cracks. This is why control joints (tooled or saw-cut grooves) are placed at regular intervals: they create intentional weak planes where the concrete cracks in a controlled, straight line rather than randomly.
When control joints are spaced too far apart, placed in the wrong locations, or saw-cut too late, drying shrinkage cracks appear in unplanned locations. These cracks are typically through the full slab depth, roughly parallel, and spaced at intervals related to the slab thickness.
Structural Cracks
Structural cracks result from loads or forces exceeding the design capacity of the concrete member. They include:
Flexural cracks in beams and slabs appear on the tension face (usually the bottom) and run roughly perpendicular to the span direction. Small flexural cracks in reinforced concrete are expected and accounted for in the design. Cracks wider than the design allowance (typically 0.013 inches for interior members and 0.007 inches for exterior members) may indicate overloading.
Shear cracks appear as diagonal lines in beams, usually near the supports where shear forces are highest. These are more serious than flexural cracks because shear failures can be sudden and catastrophic.
Settlement cracks result from differential settlement of the foundation. They typically appear in walls as diagonal cracks radiating from corners of windows and doors, or as stair-step cracks in masonry.
Corrosion-Related Cracks
When reinforcing steel corrodes, the rust (iron oxide) occupies about six times the volume of the original steel. This expansion creates enormous internal pressures that crack and eventually spall the concrete cover. Corrosion cracks follow the line of the reinforcing steel, often appearing as longitudinal cracks on beam soffits or slab surfaces directly above the rebar.
Corrosion-related cracking is particularly dangerous because it indicates the reinforcing steel is actively deteriorating, reducing the structural capacity of the member. Simply repairing the surface without addressing the corrosion will not solve the problem.
Freeze-Thaw Damage
In cold climates, water in concrete pores freezes and expands, creating internal pressure. Over repeated freeze-thaw cycles, the concrete surface deteriorates, starting with scaling (loss of the surface layer) and progressing to deeper cracking and disintegration.
Proper air entrainment during batching (typically 4 to 7 percent air content) creates microscopic air voids that give the freezing water room to expand without damaging the concrete matrix. Concrete placed without adequate air entrainment in freeze-thaw environments will eventually fail.
Crack Evaluation and Diagnosis
Measuring and Documenting Cracks
Before selecting a repair method, document the crack thoroughly:
Width: Use a crack comparator card (available from concrete supply houses) or a calibrated magnifying lens. Measure at multiple points along the crack because width often varies. Record the maximum width.
Depth: A wire probe or dental pick can estimate depth on accessible cracks. For critical assessments, ultrasonic pulse velocity testing or ground-penetrating radar can map crack depth without destructive investigation.
Length and pattern: Document the full extent of the cracking. Take photos with a scale reference. Mark the crack ends with paint and a date so you can monitor whether the crack is growing.
Activity: Is the crack still moving? Install crack monitors (simple adhesive gauges that measure movement across the crack) and read them over several weeks or months. A crack that is stable can be repaired with rigid materials. A crack that is actively moving requires a flexible repair or a fundamentally different approach.
Water infiltration: Is water coming through the crack? Active water leaks require different materials and techniques than dry cracks.
Determining the Cause
Repairing a crack without understanding why it occurred is setting yourself up for a callback. The cause drives the repair selection:
If the cause has stopped (one-time overload, completed settlement, completed shrinkage), a rigid structural repair like epoxy injection is appropriate.
If the cause is ongoing (continued settlement, thermal cycling, structural overloading), a flexible repair or a combination of structural reinforcement plus crack repair is needed.
If the cause is environmental (corrosion, freeze-thaw, ASR), the repair must address the environmental factor as well as the visible damage. This might include cathodic protection for corrosion, waterproofing membranes, or in severe cases, full-depth removal and replacement.
Repair Methods
Surface Sealing
Surface sealing is the simplest repair method and is appropriate for fine, stable, non-structural cracks where the goal is to prevent water or chemical ingress.
Gravity-fed crack sealers are low-viscosity epoxies or methacrylates that are poured or brushed over the crack and allowed to penetrate by gravity. They work best on horizontal surfaces (slabs and decks) where the material can pool over the crack and seep in. Penetration depth depends on crack width and material viscosity but is typically limited to 1 to 3 inches.
Procedure: Clean the crack with compressed air or vacuum. Apply the sealer in multiple coats, allowing each coat to soak in before applying the next. Cover the sealed area with sand to provide a non-slip surface while the material cures.
Methacrylate sealers have lower viscosity than epoxy and penetrate finer cracks more effectively. They are commonly used on bridge decks and parking garage slabs. They also cure faster than epoxy (30 to 60 minutes vs. several hours) which minimizes downtime.
Routing and Sealing
Routing and sealing is used for cracks that are moving or where a gravity-fed sealer cannot penetrate adequately. The technique creates a reservoir along the crack that holds a flexible sealant.
Procedure: Use a concrete saw or router to cut a groove along the crack, typically 1/4 to 3/4 inch wide and 1/2 to 1 inch deep. The groove creates a consistent channel even if the crack is irregular. Clean the groove thoroughly, install a backer rod (closed-cell foam rope) at the bottom of the groove, and fill with a flexible sealant such as polyurethane or silicone.
Sealant selection depends on the expected movement, exposure conditions, and whether the surface will be coated or covered. Polyurethane sealants offer the best combination of adhesion, flexibility, and durability for most construction applications. Silicone sealants resist UV and temperature extremes better but have poor adhesion to concrete unless a primer is used.
The width-to-depth ratio of the sealant bead should be approximately 2:1 (twice as wide as it is deep). This geometry allows the sealant to stretch properly without developing excessive internal stress at the bond line.
Epoxy Injection
Epoxy injection is the primary method for structural repair of cracks in concrete. When done correctly, it fills the crack completely with a material that bonds the crack faces together with strength exceeding the original concrete.
When to use: Stable, non-moving cracks where structural restoration is required. Typical applications include cracked beams, columns, walls, and slabs where the crack reduces the member’s load-carrying capacity.
Procedure:
-
Surface preparation: Clean the crack and surrounding concrete of dirt, oil, and loose material. The crack faces must be sound and free of contaminants for the epoxy to bond properly.
-
Surface seal (cap): Apply a paste-grade epoxy along the surface of the crack to seal it and prevent the injection epoxy from leaking out. Leave injection ports open at regular intervals (typically 6 to 12 inches apart, or approximately the thickness of the member being repaired).
-
Injection ports: These are small plastic or metal fittings bonded to the surface at intervals along the crack. They provide connection points for the injection equipment.
-
Injection: Starting at the lowest port (for vertical or inclined cracks) or at one end (for horizontal cracks), inject low-viscosity epoxy under pressure. Use enough pressure to push the epoxy through the full depth of the crack without creating new cracks (typically 20 to 100 psi). When epoxy appears at the next port, cap the current port and move to the next one. Continue until all ports show epoxy flow.
-
Curing: Allow the epoxy to cure per the manufacturer’s specifications, typically 24 to 72 hours at room temperature. Do not load the repaired member until the epoxy reaches full strength.
-
Cleanup: After curing, remove the surface seal and injection ports by grinding flush with the concrete surface.
Epoxy selection: Injection epoxies come in different viscosities and gel times. Use lower viscosity for finer cracks (under 0.02 inches) and higher viscosity for wider cracks. In cold weather, use a faster-gelling epoxy to prevent the material from running out of the crack before it sets.
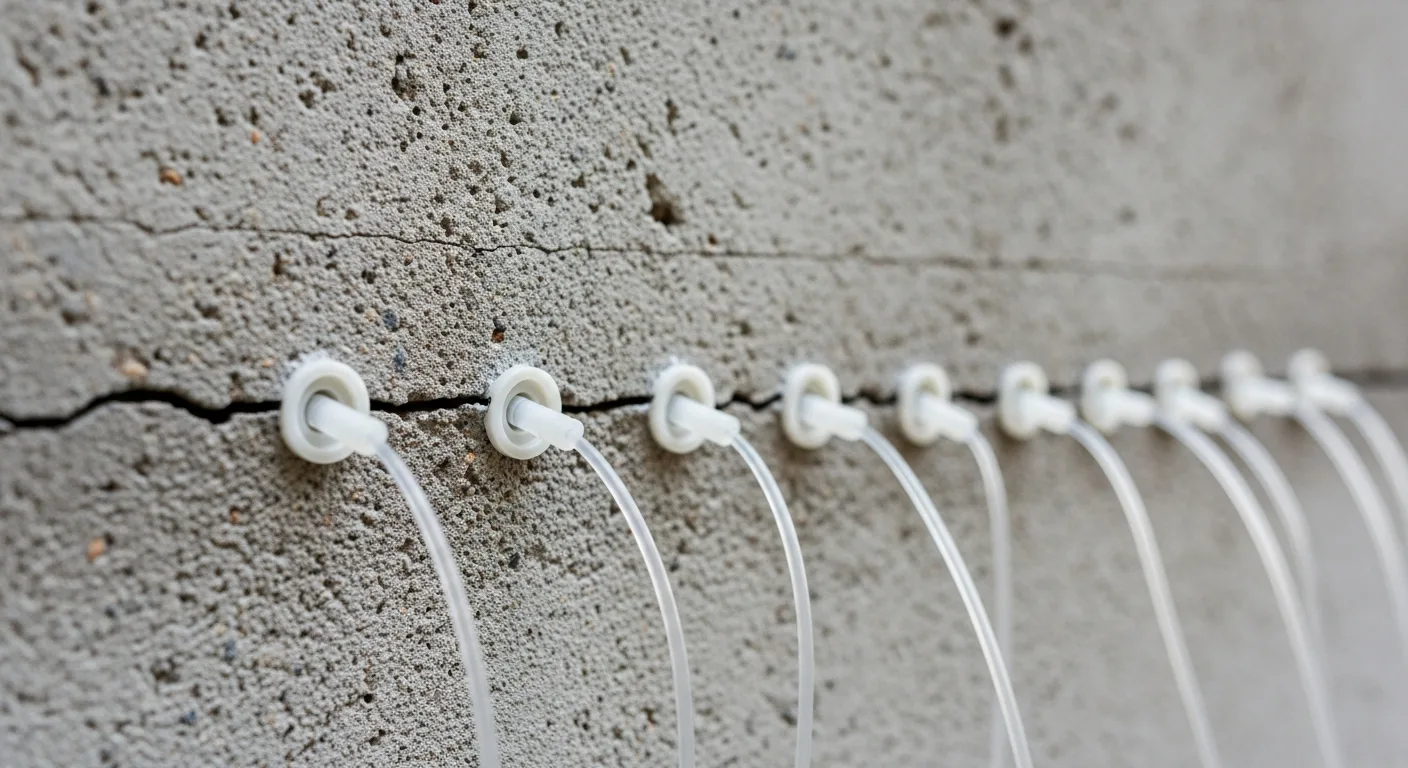
Polyurethane Injection
Polyurethane injection is the go-to method for stopping active water leaks through concrete cracks. Unlike epoxy, polyurethane reacts with water to create an expanding foam that fills and seals the crack.
When to use: Actively leaking cracks where the primary goal is waterproofing. Common applications include basement walls, tunnel linings, water treatment structures, and below-grade parking structures.
How it works: Single-component hydrophilic polyurethane reacts with water in the crack. As it reacts, it expands (typically 3 to 10 times its original volume depending on the product) and forms a flexible, closed-cell foam that fills the crack and blocks water flow.
Procedure:
-
Drill injection holes at a 45-degree angle into the crack, spacing holes 6 to 12 inches apart. The drill holes should intersect the crack at roughly the midpoint of the concrete thickness.
-
Install mechanical injection packers (small valves) in the drilled holes.
-
Inject polyurethane resin through the packers using a piston pump or cartridge gun. As the resin contacts water in the crack, it begins to react and expand.
-
Monitor the adjacent packers. When resin appears at the next packer, the crack between those two points is filled.
-
After the resin cures (typically 15 minutes to a few hours), remove the packers and patch the drill holes.
Two-component polyurethane systems mix a resin and catalyst at the injection point. They react faster than single-component products and do not require water to cure, making them suitable for both wet and dry applications. Two-component systems are more expensive and require specialized dual-cartridge injection equipment.
Full-Depth Structural Repair
When cracks are too wide for injection, when the concrete is severely deteriorated, or when corrosion has compromised the reinforcing steel, a full-depth repair may be necessary.
Procedure:
-
Sawcut boundaries: Cut a clean perimeter around the repair area to create vertical edges (no feathered edges, which will debond and fail).
-
Remove deteriorated concrete: Use pneumatic chipping hammers, hydrodemolition, or a combination. Remove all unsound concrete and expose the reinforcing steel with at least 3/4 inch clearance all around the bars.
-
Prepare the reinforcing steel: Clean corroded bars by sandblasting to near-white metal. If more than 25 percent of a bar’s cross-section is lost, splice or add supplemental reinforcement per the structural engineer’s design.
-
Apply bonding agent: Coat the existing concrete substrate with an epoxy bonding agent (for epoxy-modified repairs) or wet the surface (for cementitious repairs) to ensure adhesion between old and new concrete.
-
Place repair material: Use a repair mortar or concrete designed for the specific application. Options include polymer-modified cementitious mortars, epoxy mortars, and regular concrete for large-volume repairs. The repair material should have compatible thermal expansion and modulus of elasticity with the existing concrete.
-
Cure: Proper curing is critical for cementitious repairs. Use wet burlap, curing compounds, or plastic sheeting per the material manufacturer’s recommendations.
Material Selection Guide
Choosing the right repair material is as important as choosing the right repair method:
Epoxy injection resins: Available in viscosities from 10 cps (very thin, for hairline cracks) to 1,000 cps (for wider cracks). Gel times range from 10 minutes to several hours. Use faster gel times in cold weather or when the epoxy might run out through the back side of the crack. Key brands: Sikadur, MasterInject (BASF), and Simpson Strong-Tie.
Polyurethane injection resins: Available as single-component (hydrophilic, requires water) or two-component (does not require water). Expansion ratios vary from 3x to 20x. Higher expansion products fill wider voids but have lower density and lower strength. Key brands: Avanti International, Prime Resins, and De Neef.
Flexible sealants: Polyurethane sealants (Sikaflex, NP-1) offer the best all-around performance for construction applications. Movement capacity typically ranges from plus or minus 25 to 50 percent of the joint width.
Cementitious repair mortars: Polymer-modified portland cement mortars are the workhorse of concrete repair. They are easy to apply, relatively inexpensive, and compatible with existing concrete. Key brands: SikaTop, MasterEmaco, and Quikrete.
Quality Control and Verification
Testing Injection Effectiveness
After epoxy injection, how do you know the crack is actually filled?
Core sampling: The most definitive method. Take a core through the injected crack and examine whether the epoxy fills the full depth. This is standard practice for critical structural repairs.
Ultrasonic testing: Pulse velocity testing before and after injection shows whether the crack has been filled. A filled crack transmits sound waves similarly to uncracked concrete; an unfilled section shows a significant velocity drop.
Visual inspection: On through-cracks, check the back side for epoxy seepage. If epoxy reached the back side, you know the full depth was filled. Apply a clear sealant to the back side before injection to confirm flow without making a mess.
Common Causes of Repair Failure
Poor surface preparation: Dust, oil, or laitance on the crack faces prevents epoxy or bonding agents from adhering. Clean, clean, and clean again.
Wrong material for the application: Rigid epoxy on a moving crack. Low-viscosity material in a wide crack where it runs out before curing. Surface sealer on a crack that needed full-depth injection.
Insufficient injection pressure or patience: Rushing the injection process leaves voids. Let the material flow and fill, moving to the next port only when you see full penetration at the current one.
Ignoring the root cause: The crack reappears within months because the settlement, overloading, or corrosion that caused it was never addressed.
Cost Considerations and Bidding
When estimating concrete crack repair work, consider these cost factors:
Access and logistics: A crack in an exposed slab at ground level is straightforward. The same crack on the soffit of a beam 40 feet in the air requires scaffolding or a man lift, adding significant cost.
Crack quantity and distribution: Mobilization for injection work has a fixed component (equipment setup, material mixing, surface preparation). A single 10-foot crack costs more per foot than 200 feet of cracks on the same project.
Testing and documentation requirements: Structural repairs on bridges, parking structures, and other engineered structures typically require core samples, testing, and detailed reports. Budget for this work in your estimate.
Warranty expectations: Some owners require a 5 or 10-year warranty on crack repair work. Your material selection and application quality need to support whatever warranty you offer.
Managing concrete repair projects requires careful tracking of quantities, materials, and labor. Projul helps contractors organize repair project details, track costs against estimates, and keep clients informed throughout the repair process. When your crew documents crack conditions, repair methods, and completion photos in one system, warranty questions five years later are easy to answer.
Frequently Asked Questions
What causes cracks in concrete?
When should I use epoxy injection vs. polyurethane injection?
Can you repair a crack in concrete that is still moving?
How much does concrete crack repair cost?
How do I know if a concrete crack is structural?
What is the difference between crack sealing and crack injection?
How long does a concrete crack repair last?
Related Articles

BIM Clash Detection: How to Catch Conflicts Before They Cost You on the Jobsite
BIM Clash Detection: How to Catch Conflicts Before They Cost You on the Jobsite Every contractor has a story about the...
Read More →
Asphalt Paving and Compaction Guide: Mix Types, Laydown Temperatures, and Quality Testing
Asphalt paving looks straightforward from a distance. A truck dumps material, the paver lays it down, and rollers...
Read More →
Construction Jobsite Wi-Fi & Connectivity Guide: Setting Up Reliable Internet in the Field
A practical guide to getting reliable internet on construction job sites. Learn about cellular hotspots, mesh networks,...
Read More →