Stamped Concrete Guide: Techniques, Patterns, Coloring, and Sealing | Projul
The Art and Science of Stamped Concrete
Stamped concrete is one of those trades where experience separates the professionals from the pretenders. A crew that knows what they are doing can turn a plain gray slab into something that looks like hand-laid stone, brick, or wood plank at a fraction of the cost. A crew that does not know what they are doing ends up with a mess that cannot be fixed without tearing it all out.
The margin for error is slim. Once the concrete is placed, the clock starts ticking. You have a limited window to color, stamp, and detail the surface before it sets up. There are no do-overs on a stamped slab.
This guide breaks down the entire process, from sub-base preparation to final sealing, with practical tips from crews who have been doing this work for years.
Planning the Job
Good stamped concrete starts long before the truck shows up. Planning saves you from the scramble that leads to mistakes.
Site Assessment
Walk the site and figure out what you are dealing with. Check the existing grade, drainage patterns, and soil conditions. Stamped concrete is still concrete, which means it needs a solid, well-compacted sub-base just like any other slab.
Look for underground utilities, tree roots, and anything else that could complicate the pour. Note the sun exposure; a slab in full sun will set up faster than one in the shade, and that affects your stamping window.
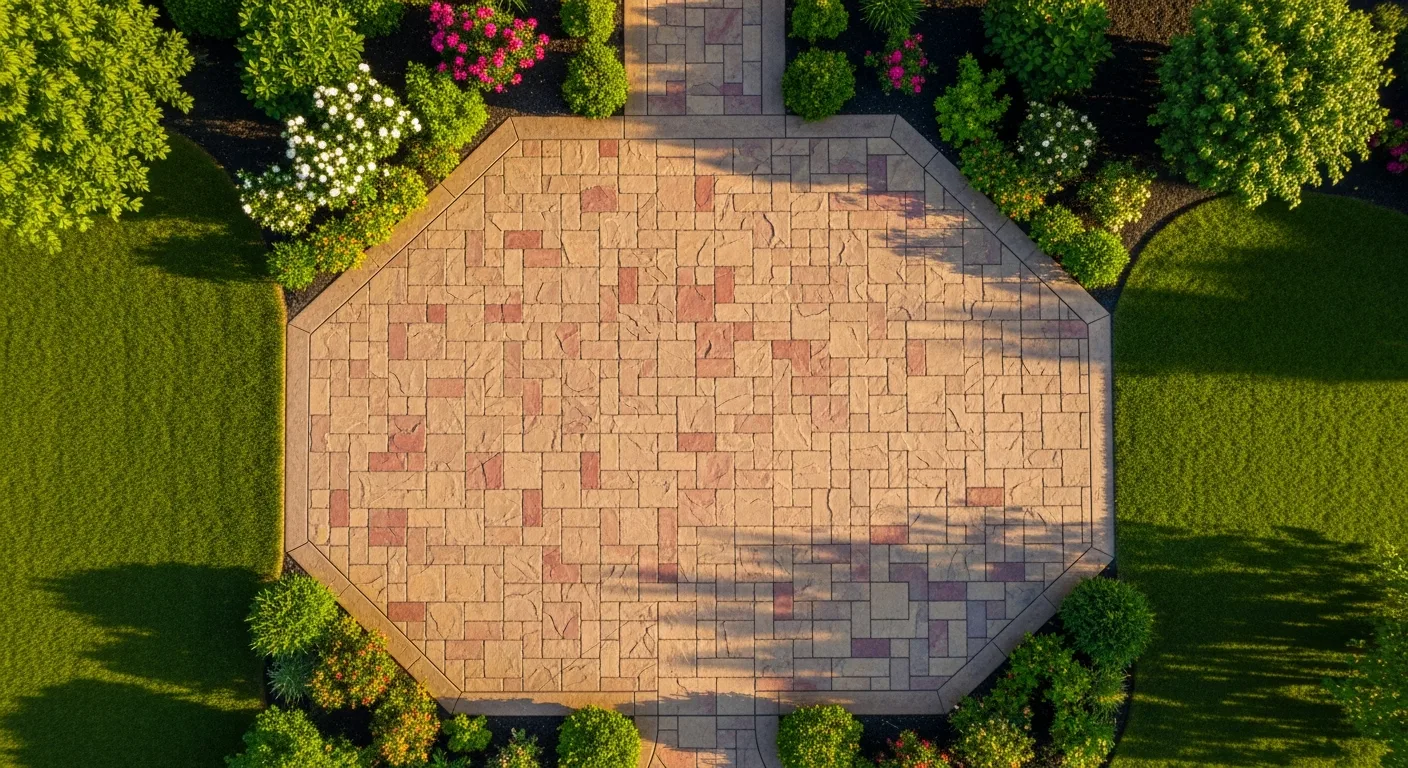
Pattern and Color Selection
Work with the homeowner or designer to finalize the pattern and color scheme before the job starts. Bring physical samples, not just photos. Colors look different on a screen than they do in real life, and the last thing you want is a customer who does not like the color after it is on the ground.
Common pattern categories include:
- Stone patterns: Ashlar slate, random stone, European fan, flagstone
- Brick patterns: Running bond, herringbone, basket weave
- Wood patterns: Wood plank, boardwalk
- Tile patterns: Large format tile, slate tile
- Custom patterns: Hand-carved details, medallions, borders
For colors, most jobs use a combination of a base color (integral color or color hardener) and an accent color (release agent). The contrast between the two gives the finished surface its depth and realism.
Layout and Joint Planning
Plan your control joints before the pour. Stamped concrete needs joints just like any other slab, but you want them to fall along pattern lines where they will be less visible. A joint that cuts through the middle of a “stone” looks wrong. A joint that follows a grout line disappears.
Use the stamp pattern dimensions to plan your slab layout. Mark joint locations on the forms so the finishing crew knows where to cut.
Sub-Base Preparation
The sub-base is the foundation of the entire job. Skip this step, and you will have cracks, settling, and callbacks.
Excavation and Grading
Remove topsoil and organic material. Excavate to the required depth for your sub-base material plus the slab thickness. For most residential flatwork, that is 4 inches of compacted gravel plus 4 inches of concrete.
Grade the sub-base to direct water away from structures. A minimum slope of 1/8 inch per foot is standard for most applications.
Compaction
Compact the sub-base in lifts using a plate compactor or roller. Each lift should be no more than 4 to 6 inches of loose material. Test compaction with a proof roll; if you see deflection under the weight of a loaded truck or compactor, you need more passes.
Forms
Set your forms to the correct grade and pitch. Use rigid forms for straight runs and flexible forms for curves. Stake forms every 3 to 4 feet and check your elevations with a laser or string line. Crooked forms mean a crooked slab, and there is no fixing that after the pour.
Concrete Mix Design
Not all concrete is created equal. For stamped work, the mix needs to be workable enough to take the stamp impression but strong enough to hold the pattern detail.
Recommended Specs
- Strength: 4,000 PSI minimum (some contractors prefer 4,500 PSI for driveways)
- Slump: 4 to 5 inches (too wet and the pattern will not hold; too stiff and you cannot stamp it)
- Air entrainment: 5% to 7% for freeze-thaw resistance in cold climates
- Fiber reinforcement: Optional but helpful for crack control
Admixtures
Talk to your ready-mix supplier about the conditions on pour day. In hot weather, a retarder gives you more working time. In cold weather, an accelerator keeps the set moving. Water reducers can improve workability without adding extra water, which weakens the mix.
Do not add water on site to make the concrete easier to work. Every gallon of water you add drops the strength and increases the chance of surface defects. If the slump is too low, send the load back or use a water reducer.
Coloring Methods
Color is what separates stamped concrete from plain gray flatwork. There are several ways to get color into the slab, and most jobs use a combination of methods.
Integral Color
Integral color is pigment added to the mix at the batch plant or on site. It colors the entire slab all the way through, so chips and scratches do not show a different color underneath.
Integral color gives you a uniform base tone. It works best when combined with a colored release agent that adds contrast and highlights the stamp pattern.
Pros: Consistent color throughout, low maintenance, good for high-traffic areas. Cons: Limited color intensity at the surface, more expensive than surface-applied methods alone.
Color Hardener
Color hardener is a dry-shake powder broadcast onto the surface of freshly placed and bull-floated concrete. It contains pigment, cement, and hard aggregate that strengthen the surface while adding rich, concentrated color.
Apply color hardener in two passes. Broadcast the first coat evenly, let it absorb moisture from the concrete, then trowel it in. Apply the second coat at a 90-degree angle to the first for even coverage. The typical application rate is 60 to 80 pounds per 100 square feet.
Pros: Rich color, increased surface hardness, more abrasion-resistant. Cons: Color concentrated at the surface; deep chips may show a different color underneath.
Release Agent
Release agent serves double duty. It prevents the stamps from sticking to the concrete, and it adds an accent color that settles into the joints and texture of the pattern. This creates the shadow and depth that make stamped concrete look realistic.
Release agents come in two forms:
- Powder release: Broadcast onto the surface just before stamping. Easier to apply but creates more dust and can be affected by wind.
- Liquid release: Sprayed or rolled onto the stamps and the concrete surface. Cleaner to work with and easier to control, but may not provide as much color contrast.
Choose a release color that is a few shades darker than your base color. This creates natural-looking shadowing in the grout lines and texture details.
The Stamping Process
This is where the job comes together or falls apart. Timing is everything.
Checking Readiness
After placing, screeding, bull-floating, and applying color hardener (if used), you need to wait for the concrete to reach the right firmness for stamping. Too soft, and the stamps sink in and blur the pattern. Too firm, and you cannot get a clean impression.
The finger test is your best friend. Press your finger into the surface with moderate pressure. If it leaves an impression about 3/16 inch deep without the concrete sticking to your finger, you are in the stamping window.
On a big pour, the concrete nearest the starting point will be ready first. You may need to start stamping on one end while the other end is still being finished.
Placing the Stamps
Lay your stamps out in sequence along the starting edge. Most stamp sets come in groups of 6 to 8 pieces, with each piece slightly different to avoid a repeating pattern. Some sets include flex mats for edges and tight spots.
Place the first stamp tight against the form or edge and press it into the concrete. Step on the stamp or use a tamper to drive it down evenly. Each subsequent stamp should interlock with or butt tight against the previous one.
Keep the stamps clean. Concrete buildup on the stamp face will blur the pattern. Wipe or wash stamps as needed between uses.
Stamping Sequence
Work in one direction across the slab. Have your best guys on the stamps and keep extra hands available to move stamps, clean tools, and mix release agent.
Do not stop in the middle. Once you start stamping, the crew needs to keep moving until the entire slab is done. Any delay risks having part of the slab set up before you can stamp it, which creates a visible transition line.
Touch-Up and Detail Work
After stamping the main field, go back and touch up the joints and edges with a texture roller or hand tools. Grout lines that did not stamp cleanly can be re-cut with a groover or margin trowel. Edges along forms often need hand texturing because the stamps do not reach all the way to the edge.
This detail work is what separates a good stamped job from a great one. Do not rush it.
Curing
Stamped concrete needs to cure properly, just like any other concrete. However, you cannot use standard wet curing methods (plastic sheeting or wet burlap) because they can stain or discolor the surface.
Instead, apply a curing and sealing compound after the concrete has set enough to walk on, usually the next day. The sealer acts as both a curing membrane and a protective coating. Some contractors wait 24 to 48 hours before sealing; others seal as soon as the surface is firm enough. Follow the sealer manufacturer’s recommendations.
Sealing
Sealing is not optional on stamped concrete. The sealer protects the color, enhances the appearance, and provides a barrier against moisture, stains, and freeze-thaw damage.
Types of Sealers
Acrylic sealers are the most common for decorative concrete. They are available in solvent-based and water-based formulas. Solvent-based acrylics give a richer, wetter look. Water-based acrylics are lower in VOCs and easier to apply but may not enhance the color as much.
Polyurethane and epoxy sealers provide more protection and chemical resistance but are more expensive and harder to apply. They are better suited for interior or commercial applications.
Penetrating sealers soak into the concrete and protect from within. They do not change the appearance of the surface, which makes them a poor choice for decorative work where you want the color to pop.
Application
Apply sealer with a roller or sprayer in thin, even coats. Two thin coats are better than one thick coat. Thick applications can trap solvent, create bubbles, or turn white (blushing). Let the first coat dry completely before applying the second.
Add a non-slip additive to the final coat on surfaces that will be walked on when wet. Driveways, pool decks, and walkways all need traction, especially when the sealer gives the surface a glossy finish.
Estimating Stamped Concrete Jobs
Stamped concrete is a premium product, and your pricing should reflect the skill, equipment, and risk involved. Underbidding stamped work is a fast way to lose money.
Cost Factors
- Pattern complexity: Simple patterns with large repeating elements are faster to stamp. Intricate patterns with small details and multiple borders take longer.
- Number of colors: Single-color jobs are straightforward. Multi-color work with hand-stained accents takes more time and material.
- Site access: Can the concrete truck get close to the pour area, or do you need a pump? Pumping adds cost.
- Slab size and shape: Large, rectangular slabs are efficient. Small, irregular shapes with lots of edges require more detail work.
- Sealer and maintenance plan: Some contractors include the first re-seal in their price as a way to build in a future touchpoint with the customer.
Tracking Your Numbers
Accurate job costing is the difference between profitable stamped concrete work and the kind that keeps you busy but broke. Track your material costs (concrete, color, release, sealer), labor hours, equipment rental, and overhead on every job.
Projul’s job costing features make this easy by letting you assign costs to individual jobs in real time. After a few projects, you will have solid data on what each type of stamped job actually costs, which makes your future estimates tighter and more profitable. Take a look at Projul’s pricing to see how it works for concrete contractors.
Common Problems and How to Fix Them
Even experienced crews run into issues. Here is how to handle the most common ones.
Stamp Lines
Visible lines between stamp placements happen when stamps are not butted tightly together or when the concrete is too firm. To fix minor stamp lines, use a texture skin or roller to blend the area while the concrete is still workable. On cured concrete, a light grinder followed by stain touch-up can minimize them.
Color Inconsistency
Uneven color usually comes from inconsistent application of color hardener or release agent. It can also result from variations in the concrete mix, curing conditions, or sealer application. Remediation options include staining, tinting the sealer, or applying a colored overlay.
Surface Crusting
Crusting happens when the surface dries out faster than the interior, usually on hot, windy days. The top layer becomes stiff while the concrete underneath is still soft, making it impossible to get a clean stamp impression. Prevent crusting by using an evaporation retarder on the surface during finishing.
Efflorescence
White, powdery deposits on the surface are calcium carbonate leaching out of the concrete. Efflorescence is more common in cool, wet conditions. It usually goes away on its own over time, but you can remove it with a mild acid wash. Make sure the concrete is fully cured before treating.
Wrapping Up
Stamped concrete is a high-skill, high-reward trade. When you get it right, the finished product speaks for itself and generates referrals without much effort. When you get it wrong, the evidence is literally set in stone.
Focus on the fundamentals: solid sub-base, proper mix design, good color application, precise timing on the stamps, and quality sealer. Build your crew’s skills through practice, and do not take on patterns or techniques you have not practiced on sample slabs first.
If you are ready to get better visibility into your stamped concrete jobs, from the initial estimate to the final seal coat, book a demo with Projul and see how it fits your workflow.
Frequently Asked Questions
How long after pouring can you stamp concrete?
What is the best stamped concrete pattern for driveways?
How much does stamped concrete cost per square foot?
Does stamped concrete crack?
How often does stamped concrete need to be resealed?
Can you stamp existing concrete?
What is the difference between integral color and color hardener?
Can stamped concrete be done in cold weather?
Related Articles

BIM Clash Detection: How to Catch Conflicts Before They Cost You on the Jobsite
BIM Clash Detection: How to Catch Conflicts Before They Cost You on the Jobsite Every contractor has a story about the...
Read More →
Asphalt Paving and Compaction Guide: Mix Types, Laydown Temperatures, and Quality Testing
Asphalt paving looks straightforward from a distance. A truck dumps material, the paver lays it down, and rollers...
Read More →
Construction Jobsite Wi-Fi & Connectivity Guide: Setting Up Reliable Internet in the Field
A practical guide to getting reliable internet on construction job sites. Learn about cellular hotspots, mesh networks,...
Read More →