Hillside Drainage: Curtain Drains and Swales Guide
Building on a hillside is some of the most rewarding and most challenging work in construction. The views are great, but the water is relentless. Every rainstorm sends groundwater flowing downhill through the soil, and if you do not have a plan to deal with it, that water ends up in basements, under slabs, behind retaining walls, and washing out slopes.
This guide covers the drainage systems and erosion control methods that actually work on sloped building sites. We will go through curtain drains, French drains, interceptor drains, surface swales, and the erosion control measures that keep everything in place during and after construction.
Understanding Water Movement on Hillsides
Before you design a drainage system, you need to understand how water moves through a sloped site. There are two types of water flow to manage: surface runoff and subsurface flow.
Surface Runoff
Surface runoff is the water that flows over the ground during and after rainfall. On steep slopes, it moves fast and picks up energy as it goes. Concentrated surface runoff is the primary cause of erosion on construction sites. It carves rills, cuts gullies, and deposits sediment wherever it slows down.
The amount of surface runoff depends on rainfall intensity, slope angle, slope length, soil type, and vegetative cover. Disturbed construction sites generate far more runoff than vegetated sites because the soil surface is compacted, exposed, and unable to absorb water at its natural rate.
Subsurface Flow
Subsurface water moves through the soil along permeable layers, following the slope of the underlying geology. When this water hits an impermeable layer like clay or bedrock, it flows laterally along that boundary. On hillsides, this lateral flow can be significant, especially during wet seasons.
Subsurface flow is what fills basements, saturates backfill behind retaining walls, and creates wet spots in yards. It is invisible until it causes a problem, which makes it easy to ignore during design but expensive to fix after the fact.
Soil Investigation
Before designing drainage for a hillside site, you need a geotechnical report or at least some test pits to understand the soil profile. Key information includes:
- Depth to bedrock or impermeable layers
- Soil permeability at different depths
- Seasonal high water table elevation
- Location and depth of springs or seeps
- Soil classification (sand, silt, clay, or mixtures)
This data determines where to place drains, how deep to install them, and what types of systems will work for the site conditions.
Curtain Drains
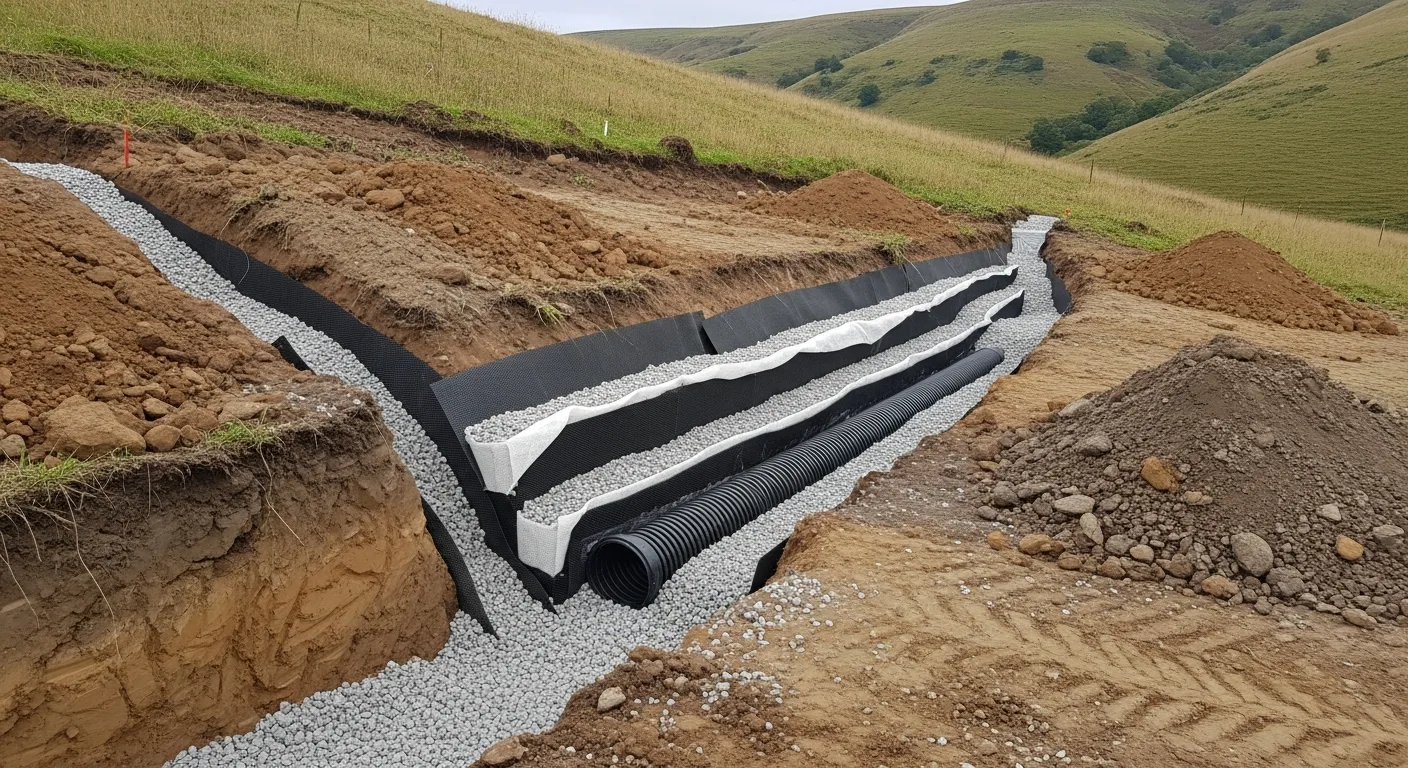
A curtain drain is a subsurface drainage trench installed perpendicular to the direction of groundwater flow on a hillside. Its job is to intercept water moving through the soil and redirect it to a safe discharge point before it reaches the building or structure you are protecting.
How Curtain Drains Work
Think of a curtain drain as a wall of gravel in the ground. Water flowing downhill through the soil encounters the high-permeability gravel trench and drops into it because gravel is far easier to flow through than the surrounding soil. Once in the trench, the water enters a perforated pipe at the bottom and is carried by gravity to a discharge point at a lower elevation.
The “curtain” name comes from the drain’s function of hanging across the slope like a curtain, intercepting flow across its entire width.
Design and Installation
Trench dimensions: Typical curtain drains are 12 to 24 inches wide and 18 to 48 inches deep. The depth depends on how deep the subsurface flow is occurring. The trench must extend down to the impermeable layer or at least to the depth where the majority of lateral flow occurs.
Pipe selection: Use 4-inch perforated HDPE or PVC pipe with a sock filter or wrapped in filter fabric. The pipe sits at the bottom of the trench with the perforations facing down (for rigid pipe with two rows of holes) or uniformly distributed (for corrugated pipe with full perforation).
Gravel fill: Fill the trench with clean, washed 3/4-inch to 1-1/2-inch crushed stone. The gravel must be clean because fines will clog the system over time. Do not use crusher run, road base, or any aggregate with significant fines content.
Filter fabric: Wrap the entire gravel column in non-woven geotextile filter fabric. The fabric prevents soil particles from migrating into the gravel and clogging the drain. Some installers wrap the pipe separately, then wrap the entire gravel column. Either method works if the fabric coverage is complete.
Slope: The pipe must slope at a minimum of 1 percent toward the discharge point. Steeper is fine. Flat or negative slopes will cause the system to fail.
Discharge: The pipe must daylight at a lower point on the site where the water can discharge safely. This could be a storm drain, a natural drainage way, or a dissipation area at the toe of the slope. Never terminate a curtain drain without a positive outlet.
Placement
Install the curtain drain uphill from the structure you are protecting, typically 10 to 25 feet away. The exact distance depends on the slope angle and soil conditions. The drain should extend laterally beyond the building footprint by at least 10 feet on each side to catch water that might flow around the ends.
On long hillsides, you may need multiple curtain drains at different elevations, especially if there are multiple subsurface flow paths or if the slope is very long.
French Drains
The term “French drain” gets used loosely in the industry to describe any gravel-filled trench with a perforated pipe. Technically, a French drain collects water from the surrounding area and channels it to a discharge point, while a curtain drain specifically intercepts lateral flow on a hillside.
Foundation French Drains
The most common application of a French drain in hillside construction is along the foundation of a building. This drain collects any water that makes it past the curtain drain (or supplements the curtain drain on the downhill side) and prevents hydrostatic pressure from building against the foundation wall.
A foundation French drain sits at the base of the footing, typically on the exterior. It consists of:
- A perforated pipe bedded in gravel at or just below the bottom of the footing
- Gravel backfill extending up the wall to at least 12 inches below grade
- Filter fabric wrapping the gravel column
- A solid (non-perforated) pipe carrying the collected water to a discharge point
Interior French Drains
For existing buildings where exterior drainage is not practical, interior French drains (also called perimeter drains) can be cut into the basement slab along the interior wall. These drains collect water that seeps through or under the foundation and route it to a sump pit with a pump.
Interior French drains are a retrofit solution, not a first choice for new construction. If you are building new on a hillside, design the exterior drainage properly from the start.
Interceptor Drains
An interceptor drain is similar to a curtain drain but is typically larger, deeper, and designed to handle higher volumes of subsurface water. Interceptor drains are common in commercial and civil projects where significant groundwater flow threatens roads, buildings, or infrastructure.
Key Differences From Curtain Drains
- Interceptor drains are often 3 to 6 feet deep, deeper than typical curtain drains
- They may use 6-inch or 8-inch pipe instead of 4-inch
- The trench is wider, sometimes 3 to 4 feet, to provide more collection area
- They are often used in conjunction with dewatering systems during construction
When to Use an Interceptor Drain
Use an interceptor drain when:
- Geotechnical investigation reveals significant groundwater flow at depth
- Springs or seeps are present on the hillside
- The building has deep foundations or below-grade spaces that need protection
- Surface evidence (wet spots, soft ground, vegetation patterns) indicates high subsurface flow
Tracking geotechnical reports, drainage designs, and installation inspections is much easier with a project management system like Projul that lets your field crew document conditions in real time.
Surface Swales
Swales are shallow, open channels that collect and redirect surface water. On hillside sites, swales work in combination with subsurface drains to manage the complete water picture.
Types of Swales
Diversion swales run across the slope (perpendicular to the fall line) to intercept surface runoff and redirect it to a safe discharge point. They function like surface-level curtain drains.
Collection swales run downhill (parallel to the fall line) to carry concentrated flow from higher elevations to a discharge point at the bottom of the slope.
Bioswales are vegetated swales designed to slow water, filter sediment, and promote infiltration. They are common in stormwater management plans and low-impact development designs.
Swale Design
A properly designed swale should:
- Have a trapezoidal or parabolic cross-section
- Be wide and shallow enough to convey the design storm without overtopping
- Have side slopes no steeper than 3:1 (horizontal to vertical) for stability and maintenance access
- Be lined with vegetation, riprap, or turf reinforcement mat depending on flow velocity
- Have a minimum longitudinal slope of 1 percent and a maximum slope that keeps flow velocity below erosive thresholds
For grassed swales, the maximum allowable velocity is typically 4 to 6 feet per second depending on the grass type and soil. For lined swales with riprap or turf reinforcement, velocities up to 10 to 15 feet per second may be acceptable.
Energy Dissipation
When swales discharge at the toe of a slope, the water has significant energy that can cause erosion at the outlet. Use energy dissipation measures such as:
- Riprap aprons at the discharge point
- Level spreaders that convert concentrated flow to sheet flow
- Stilling basins or plunge pools for high-energy discharges
- Check dams within the swale to reduce flow velocity on steep reaches
Erosion Control During Construction
Hillside construction sites are erosion machines. Stripped vegetation, exposed soil, concentrated runoff, and steep slopes are a recipe for massive sediment loss. Erosion control is not just good practice; it is regulated under the Clean Water Act, and most jurisdictions require a Stormwater Pollution Prevention Plan (SWPPP) for any site that disturbs more than one acre.
Erosion Control Best Practices
Minimize disturbance. Only clear and grade the area you need to work on right now. Phase your site work to limit the amount of exposed soil at any given time.
Stabilize slopes quickly. Every day that a slope sits bare is a day that erosion is happening. Apply temporary stabilization (erosion control blankets, hydromulch, or temporary seeding) as soon as grading is complete on any section.
Control concentrated flow. Runoff that concentrates into channels is far more erosive than sheet flow. Use diversions, check dams, and slope drains to prevent concentrated flow from developing on exposed slopes.
Protect the toe of slope. The bottom of a hillside is where eroded sediment accumulates and where offsite discharge is most likely. Install sediment barriers (silt fence, fiber rolls, or sediment basins) at the toe of all disturbed slopes.
Common Erosion Control Measures
Silt fence is a fabric barrier supported by posts, installed at the toe of slopes to filter sediment from sheet flow. It is not designed for concentrated flow and should not be placed across channels or swales.
Erosion control blankets (ECBs) are rolled products made from straw, coconut fiber, or synthetic materials that are staked to the soil surface to protect it from rainfall impact and surface runoff. They are effective on slopes up to about 2:1 and decompose over time as vegetation establishes.
Turf reinforcement mats (TRMs) are permanent, three-dimensional mats that reinforce vegetation on steep slopes and high-flow areas. They provide long-term erosion protection where vegetation alone is not sufficient.
Hydromulch and hydroseeding apply a slurry of seed, mulch, fertilizer, and tackifier to exposed soil. This is one of the fastest ways to stabilize large areas and is commonly used on steep slopes where traditional seeding equipment cannot operate.
Check dams are small barriers placed across temporary construction channels or swales to reduce flow velocity and trap sediment. They can be built from rock, sandbags, fiber logs, or silt fence supported by gravel.
Slope drains are temporary or permanent pipes that carry concentrated flow down a slope in a controlled manner, preventing it from eroding the slope face. The inlet is typically a flared end section or a formed headwall, and the outlet needs energy dissipation.
Sediment basins are temporary ponds that capture runoff from the site, allowing sediment to settle out before the water is discharged. They are required on most large construction sites and must be sized according to state and local regulations.
Permanent Slope Stabilization
After construction, the hillside needs permanent stabilization to prevent long-term erosion and maintain the drainage systems you installed.
Vegetation
Vegetation is the best long-term erosion control for most slopes. Grass roots hold the top 6 to 12 inches of soil, while deeper-rooted plants like shrubs and trees stabilize the soil to several feet deep.
On steep slopes (steeper than 3:1), use a combination of erosion control blankets or TRMs with appropriate seed mixes. Native plants adapted to local conditions will establish more reliably and require less maintenance than non-native species.
Retaining Walls
Where slopes are too steep for vegetation alone, retaining walls provide structural stabilization. Common wall types for hillside construction include:
- Segmental retaining walls (SRWs) for walls up to 6 to 10 feet
- Mechanically stabilized earth (MSE) walls for larger height changes
- Cast-in-place concrete cantilever walls for heavy loads or surcharge conditions
- Soldier pile and lagging walls for excavation support
Every retaining wall on a hillside needs drainage behind it. A gravel backfill zone with a perforated pipe at the base, discharging through weep holes or to a collection system, prevents hydrostatic pressure from building against the wall face.
Riprap and Armoring
For areas where flow velocity is too high for vegetation, riprap (loose rock) provides durable erosion protection. Common applications include:
- Channel linings for concentrated flow paths
- Slope protection at culvert outlets
- Shoreline or streambank stabilization
- Toe protection at the base of steep slopes
Size the riprap based on the expected flow velocity and slope angle. Undersized rock will wash away in storm events; oversized rock is wasteful and harder to place.
Putting It All Together
A complete hillside drainage plan typically includes:
- Curtain drain(s) uphill from the building to intercept subsurface flow
- Foundation French drain around the building perimeter
- Surface swales to collect and redirect surface runoff
- Erosion control measures during construction
- Permanent slope stabilization with vegetation and/or hard armoring
- A discharge system that carries all collected water to an approved outlet
Each component works with the others. A curtain drain without a surface swale leaves the site vulnerable to runoff. A swale without subsurface drainage does nothing about groundwater. The complete system addresses water both on the surface and below it.
Managing all these components across a hillside construction project takes serious coordination. Excavation crews, pipe installers, geotechnical engineers, and landscape contractors all need to be sequenced correctly. A tool like Projul keeps everyone working from the same plan and makes it easy to document as-built conditions for future reference.
Common Mistakes on Hillside Drainage Projects
-
Not going deep enough with the curtain drain. If the drain does not reach the impermeable layer, water flows under it and the drain accomplishes nothing.
-
Using dirty gravel. Aggregate with fines clogs the system within a few years. Always specify clean, washed stone.
-
Forgetting the filter fabric. Without filter fabric, soil particles migrate into the gravel and eventually clog the pipe. This is the most common cause of French drain failure.
-
Inadequate discharge. The collected water has to go somewhere. Terminating a drain without a positive outlet creates a saturated dead end that can cause more problems than no drain at all.
-
Ignoring surface water. Subsurface drains do not handle surface runoff. You need both surface and subsurface drainage systems working together.
-
Underestimating flow volumes. Hillside drainage volumes can be enormous during heavy rain events. Size pipes and swales for the design storm, not for average conditions.
-
Poor construction sequencing. Installing drainage after backfill and grading is much harder and more expensive than doing it during the initial excavation. Plan the drainage work into the overall construction sequence from the beginning.
Inspection and Maintenance
Hillside drainage systems need periodic inspection, especially after heavy rain events.
Annual Inspection Checklist
- Check all drain outlets for blockage or sediment buildup
- Walk the curtain drain alignment looking for sinkholes or settlement
- Inspect swales for erosion, sediment accumulation, or vegetation damage
- Check retaining wall drainage for flow at weep holes
- Verify that surface grading still directs water away from structures
Maintenance Tasks
- Clear debris from drain outlets
- Remove sediment from swales and catch basins
- Repair erosion damage promptly before it progresses
- Flush perforated pipes with water if flow is reduced
- Re-seed or repair vegetation on slopes as needed
If you are managing multiple hillside projects, Projul’s scheduling and documentation features make it straightforward to track warranty inspections and maintenance items. Check out the pricing to see which plan fits your operation, or request a demo to see the platform in action.
Drainage Material Selection and Cost Estimating
Getting materials right on a hillside drainage job is half the battle. The other half is pricing it so you actually make money. Hillside work has variables that flat-lot drainage does not, and if you do not account for them in your estimate, the job will eat your margin.
Pipe Options and When to Use Each
Corrugated HDPE (High-Density Polyethylene): This is the most common pipe for residential curtain drains and French drains. It is lightweight, flexible, and easy to cut in the field. The corrugated exterior gives it strength, and the smooth interior liner reduces friction and resists sediment buildup. Use single-wall corrugated for shallow, low-volume applications. Use dual-wall (corrugated exterior, smooth interior) for deeper installations and anywhere you need better flow characteristics.
Schedule 40 PVC (perforated): Rigid PVC pipe works well for foundation drains and short runs where you need precise grade control. It is harder to work with on long hillside runs because every direction change requires a fitting, but it resists crushing better than corrugated pipe under heavy backfill loads. Use PVC when the drain will be under a driveway, parking area, or any surface that sees vehicle traffic.
SDR 35 PVC: This is thinner-wall PVC used for gravity sewer and storm drain applications. It is a good option for the solid (non-perforated) discharge pipe that carries water from the drain to the outlet. It handles higher flow volumes than 4-inch corrugated and is available in 6-inch and 8-inch diameters for larger systems.
HDPE smooth-wall (DR 11 or DR 17): For commercial interceptor drains and high-volume applications, smooth-wall HDPE pipe offers the best combination of strength, flow capacity, and longevity. It is heat-fused at the joints, which eliminates infiltration at connections. It costs more than corrugated but lasts longer in demanding conditions.
Gravel: What to Specify and What to Reject
The single most important material decision on any drain installation is the gravel. Bad gravel kills drains. Here is what to look for and what to avoid:
Good choices:
- ASTM No. 57 stone (3/4-inch nominal, clean, washed)
- ASTM No. 4 stone (1-1/2-inch nominal, clean, washed)
- Clean pea gravel (3/8-inch, useful for pipe bedding)
- Washed river rock in the 3/4-inch to 1-1/2-inch range
Bad choices:
- Crusher run or road base (loaded with fines that clog the system)
- Unwashed quarry stone (dust and fines coat the fabric and pipe)
- Recycled concrete aggregate (calcium deposits clog perforations over time)
- Any stone that leaves your hand dirty when you grab a handful
When ordering, specify “clean, washed” on every load. Inspect the first delivery. If you see dust or fines, send it back. One load of dirty gravel can compromise the entire drain.
Filter Fabric Selection
Non-woven geotextile is the standard for drainage applications. The fabric needs to be permeable enough to let water through while fine enough to stop soil particles. For most soils, a fabric with an apparent opening size (AOS) of US Sieve No. 70 to No. 100 works well. In silty or fine sandy soils, use a tighter fabric (No. 100 or finer). In coarse soils, a more open fabric is acceptable.
Avoid woven geotextiles for drainage wrapping. Woven fabrics have a uniform pore structure that clogs faster than the random pore structure of non-woven materials.
Estimating Quantities for Hillside Work
Hillside drainage estimates are tricky because access affects everything. A 200-foot curtain drain on flat ground is straightforward to price. That same drain on a 30-percent slope with limited equipment access is a completely different job.
Factors that inflate hillside costs:
- Equipment access: If a full-size excavator cannot reach the drain alignment, you are hand-digging or using a mini excavator, which doubles or triples excavation time
- Material delivery: Getting gravel, pipe, and fabric up a steep slope may require a track loader, conveyor, or even a crane
- Spoil disposal: Excavated soil on a hillside tends to slide downhill. You may need to haul it offsite rather than spread it
- Dewatering: Active groundwater during installation requires pumps and may slow production significantly
- Erosion control: Regulatory requirements for erosion control on disturbed hillside areas add material and labor costs
- Compaction: Backfilling trenches on slopes requires careful compaction in lifts to prevent settlement, which takes longer than backfilling on flat ground
A rough estimating framework for curtain drains:
- Excavation: 1 to 3 linear feet per minute depending on depth, soil, and equipment
- Pipe installation: 100 to 200 linear feet per hour with a two-person crew
- Gravel placement: Plan for 0.5 to 1 cubic yard of gravel per 10 linear feet of drain (depending on trench width and depth)
- Filter fabric: Order 15 to 20 percent extra beyond calculated area to account for overlap, waste, and wrapping
Build contingency into every hillside estimate. A 10-percent contingency is the bare minimum. For complex sites with unknown soil conditions or difficult access, 15 to 20 percent is reasonable. Nobody ever lost a client over being honest about site complexity, but plenty of contractors have lost money by underestimating it.
Using project management software to track actual costs against estimates on your first few hillside jobs will help you dial in your pricing for future work.
Permitting and Code Requirements for Hillside Drainage
Drainage work on hillsides sits at the intersection of several regulatory areas, and missing a permit can shut down a job or result in fines that wipe out your profit.
Stormwater and Grading Permits
Most jurisdictions require a grading permit for any work that moves more than a few hundred cubic yards of earth. On hillside sites, even modest drainage installations can trigger this threshold because of the linear footage of trenching involved.
The grading permit typically requires:
- A site plan showing existing and proposed grades
- A drainage plan showing where water goes
- An erosion and sediment control plan
- A geotechnical report (often required for slopes steeper than 3:1)
- An engineer’s stamp on the drainage design
In many western states, hillside lots have additional overlay zones with stricter requirements for grading, drainage, and vegetation removal. Check the local zoning code before you start estimating, because these overlay requirements can significantly affect the scope of work.
NPDES and SWPPP Requirements
Under the Clean Water Act, construction sites that disturb one acre or more must obtain coverage under the National Pollutant Discharge Elimination System (NPDES) program. This requires filing a Notice of Intent (NOI) with the state environmental agency and developing a Stormwater Pollution Prevention Plan (SWPPP).
The SWPPP documents all erosion and sediment control measures on the site and requires regular inspections (typically every 7 days and within 24 hours of rainfall events greater than 0.5 inches). On hillside sites, the SWPPP inspector will pay close attention to:
- Temporary and permanent slope stabilization
- Sediment control at the toe of all disturbed slopes
- Protection of drainage channels and outlets
- Concrete washout containment (if any concrete work is involved)
Even if your drainage project alone does not trigger the one-acre threshold, it may be part of a larger construction project that does. Coordinate with the general contractor or site developer to make sure the SWPPP covers your drainage work.
Easements and Discharge Rights
Every drainage system needs an outlet, and on hillside sites the outlet is often on a neighboring property or within a public right-of-way. Before you finalize the drainage design, verify that:
- You have legal authority to discharge at the proposed outlet point
- Any necessary easements are in place for pipes that cross property lines
- The discharge will not increase flow onto a downstream property beyond pre-development conditions
- Local storm drain connections (if applicable) have been approved by the public works department
Failing to secure discharge rights before construction is a common and expensive mistake. The pipe is in the ground, the backfill is done, and then the neighbor or the city says you cannot discharge there. Now you are tearing up completed work to redesign the outlet.
Documentation and As-Built Records
Many jurisdictions require as-built surveys of drainage systems before issuing a certificate of occupancy. Even when they are not required, as-built records are valuable for warranty work and future maintenance.
Document the following during installation:
- Trench depth and width at regular intervals (every 25 to 50 feet)
- Pipe invert elevations at key points (ends, connections, grade changes)
- Location of cleanouts and access points
- Gravel type and fabric specifications actually used
- Photos of the trench before and after gravel placement
- Photos of the pipe before backfill
Keeping this documentation organized across multiple jobs is where a tool like Projul pays for itself. Your field crew can log photos and notes from their phones as the work happens, and everything is tied to the right project when you need it later.
Bidding Hillside Drainage Work
Hillside drainage projects attract two types of contractors: specialists who know what they are doing and general contractors who think drainage is just digging a trench. The bids from these two groups look nothing alike, and clients often choose the cheapest option without understanding why the prices are so different.
How to Scope the Job Accurately
Walk the site before you bid. Not from the truck, not from the driveway. Walk the actual slope where the drain will be installed. Bring a probe rod or tile probe and push it into the soil every 20 to 30 feet along the planned alignment. You are looking for:
- Depth to refusal (bedrock or hardpan)
- Presence of water at any depth
- Soil changes (sandy layers, clay lenses, organic deposits)
- Evidence of previous drainage attempts (old pipe, gravel, fabric)
- Trees and roots in the trench path
- Obstacles like buried utilities, boulders, or old foundations
Each of these findings affects your production rate and material needs. A curtain drain through sandy soil with no obstructions is fast and easy. The same drain through rocky clay with mature tree roots and an active water table is a completely different job.
Presenting Your Bid
When your bid is higher than the competition (and on hillside work it often will be if you are doing it right), you need to explain why. Clients who are building on hillsides are usually investing serious money in their property, and most of them will choose quality over price if you help them understand the difference.
Include these items in your proposal:
- A clear scope description that specifies pipe type, gravel specification, fabric type, and trench dimensions
- A site plan or sketch showing drain locations and discharge points
- The design storm your system is sized for (for example, a 10-year, 24-hour storm event)
- A brief explanation of how the system works and why each component matters
- Your warranty terms
- A timeline that accounts for weather delays (hillside work is weather-sensitive)
Contractors who present professional, detailed proposals win more hillside drainage work even at higher prices. If you are still sending one-page quotes with a lump sum number, you are leaving money on the table. Check out how other contractors handle their estimating process for ideas on presenting your bids more effectively.
Protecting Your Margin
Hillside drainage jobs have a higher risk profile than flat-lot work. Protect yourself with:
Clear change order language. Specify in your contract that unexpected rock, water, soil contamination, or utility conflicts are change-order items. Hillsides are full of surprises, and your base price should cover the expected conditions described in the geotech report, not every possible scenario.
Progress payments. Do not finance a hillside drainage job out of your own pocket. Bill for materials on delivery and for labor weekly or at completion milestones. Long payment cycles on high-material-cost jobs will kill your cash flow.
Weather clauses. Include language that extends the completion timeline for rain days. You cannot install drainage in a trench that is actively filling with water, and you cannot run equipment on saturated hillside soil without causing damage.
Subcontractor coordination. If you are subcontracting to a GC on a hillside build, make sure your contract specifies site access requirements, who is responsible for erosion control on your work areas, and who handles dewatering if groundwater is encountered during your trenching.
For tracking change orders, progress payments, and subcontractor coordination across multiple active jobs, Projul’s job costing features give you real-time visibility into whether each project is making or losing money.
Troubleshooting Failed Drainage Systems
Not every drainage call is new construction. A good chunk of hillside drainage work is diagnosing and fixing systems that are not working. Understanding common failure modes will help you identify problems quickly and propose the right fix instead of guessing.
Symptoms and Causes
Water still appears in the basement or crawlspace after a curtain drain was installed:
- The drain may not be deep enough to intercept the actual flow path. Probe alongside the drain to check if water is moving below the trench bottom.
- The drain may not extend far enough laterally. Water could be flowing around the ends. Check for wet soil beyond the drain endpoints.
- The discharge pipe may be blocked, causing the drain to back up. Check the outlet for sediment, root intrusion, or animal nesting.
Standing water or soggy ground above the drain line:
- The drain trench may have settled, creating a low spot that ponds water on the surface. Re-grade the surface over the trench to restore positive drainage.
- The pipe may be crushed or collapsed, preventing flow. Camera the pipe if accessible, or probe for voids along the alignment.
- Filter fabric may have clogged with fines, preventing water from entering the gravel column. This is common in silty soils where the wrong fabric was specified.
Erosion at the drain outlet:
- The discharge point lacks energy dissipation. Install a riprap apron, level spreader, or splash pad at the outlet.
- Flow velocity in the pipe is too high for the outlet conditions. Consider adding a stilling basin or reducing the pipe slope with a grade break upstream of the outlet.
Sinkholes along the drain alignment:
- Pipe joints have separated, allowing soil to wash into the pipe. This is common with corrugated pipe that was not properly coupled.
- The gravel column is settling because the filter fabric has deteriorated or was never installed, allowing soil migration into the voids.
- Animal burrowing has disturbed the backfill.
Repair vs. Replacement
When diagnosing a failed drain, the first question is whether the existing system can be repaired or needs full replacement. Here is a general guide:
Repair is usually feasible when:
- The problem is limited to a blocked outlet or a single crushed section
- The pipe is still structurally sound but needs flushing
- Surface grading has changed and is directing water into the drain instead of away from it
- A cleanout or access point allows you to jet or camera the line
Replacement is usually necessary when:
- The pipe has collapsed in multiple locations
- Filter fabric has clogged throughout the system (not just one area)
- The drain was installed at the wrong depth and is not intercepting the actual water flow
- Dirty gravel was used and the entire gravel column has silted up
- The drain alignment is wrong (too close to the building, not long enough, wrong angle relative to flow direction)
Replacement is more expensive than repair, but fixing a fundamentally flawed drain is throwing good money after bad. If the original installation missed the water, cleaning the pipe will not change that. Be honest with the client about when a repair is a band-aid versus a real solution.
Camera Inspection
For pipes 4 inches and larger, a sewer camera is one of the most useful diagnostic tools. You can see exactly what is happening inside the pipe: root intrusion, sediment accumulation, crushed sections, separated joints, or pipe deformation. Rent a push camera if you do not own one. The cost of a camera rental is nothing compared to the cost of digging up a drain to find a problem you could have located from the surface.
Some contractors are adding camera inspection as a standard part of their annual maintenance programs. It is a straightforward upsell on existing drainage clients and catches small problems before they become big ones.
Wrapping Up
Hillside drainage is not glamorous work, but it is some of the most important work on any sloped building site. The drains you install today determine whether the building stays dry, the slopes stay stable, and the landscaping survives for decades. Take the time to investigate the site conditions, design the right combination of systems, and build them correctly the first time. Your clients and your reputation will both be better for it.
Frequently Asked Questions
What is the difference between a curtain drain and a French drain?
How deep should a curtain drain be on a hillside?
What slope should a French drain have?
Can you install a curtain drain without a pipe?
How far from a house should a curtain drain be installed?
What type of gravel is best for French and curtain drains?
How long does a French drain last on a hillside?
Do curtain drains need maintenance?
Related Articles

Concrete Tilt-Up Construction: A Contractor's Complete Field Guide
Tilt-up construction accounts for roughly 15 percent of all industrial and commercial buildings in North America. This...
Read More →
How to Implement Construction Software Without Losing Your Mind
Most construction software rollouts fail. Not because the software is bad, but because the rollout was rushed. Here are...
Read More →
How Selections Can Pay for Themselves in Three Easy Steps
Most contractors lose thousands each year on wrong material orders, slow client decisions, and missed upsell chances....
Read More →