Elevated Slab Formwork: Shoring, Reshoring, Pour Sequencing, and Structural Loading | Projul
Pouring a concrete slab six stories in the air is nothing like pouring one on grade. Everything below that slab, the forms, the shores, the reshores on the floors beneath, must work together to carry thousands of pounds per square foot of wet concrete until it can stand on its own. Getting the formwork wrong does not just mean a bad pour. It means a collapse.
This guide covers elevated slab formwork from the ground up: shoring systems, form design, reshoring sequences, pour planning, and the structural loading questions that drive every decision.
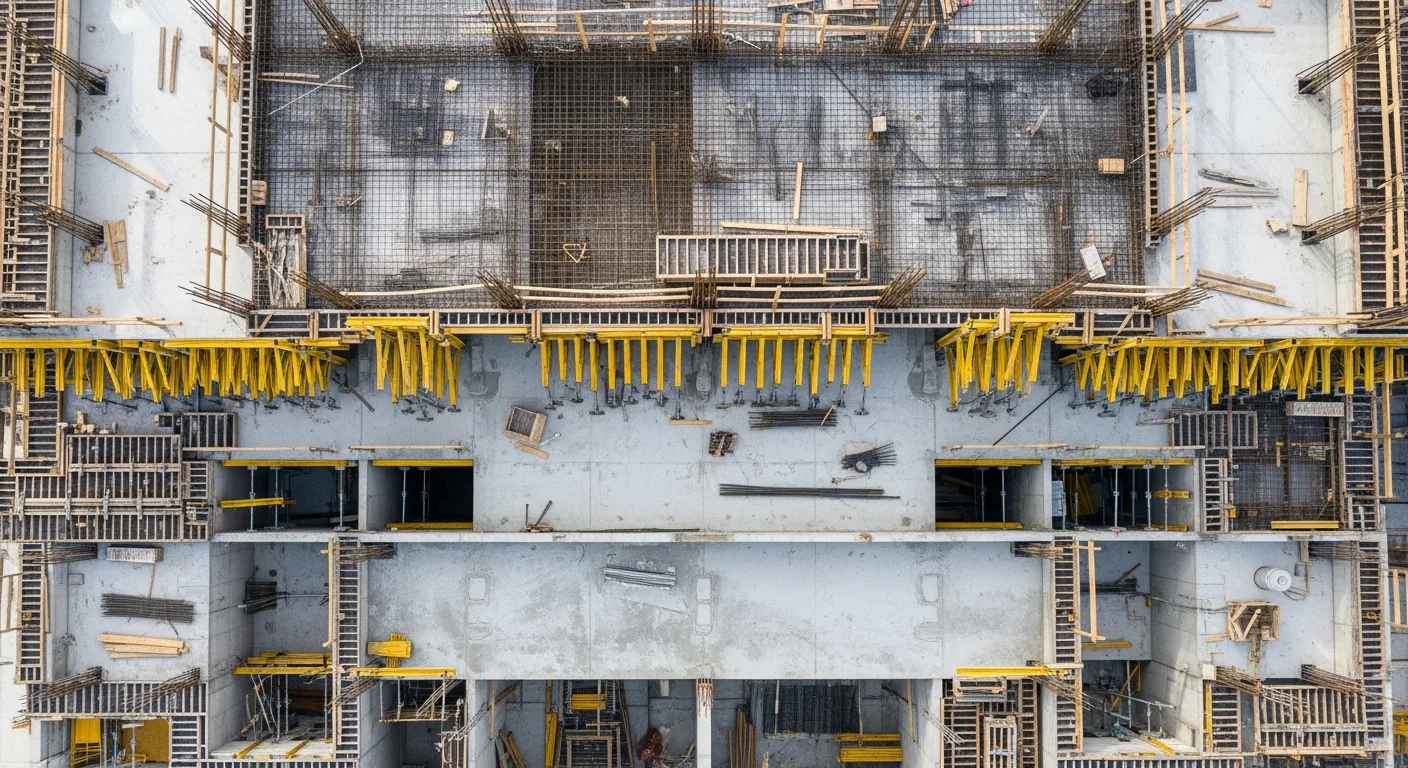
How Elevated Slab Formwork Works
Elevated slab formwork is a temporary structure that holds wet concrete in place and transfers its weight down through the building until the new slab cures. The system has three main components:
- The form deck (also called the soffit form), which creates the bottom surface of the slab
- The shoring (vertical posts or frames) that supports the form deck and transfers load to the floors below
- The reshoring on lower floors that distributes construction loads so no single slab is overloaded
These components must be designed as a system. The form deck, shoring, and reshoring are all interconnected, and a failure in any one element can cause a progressive collapse through multiple floors.
Shoring Systems
Shoring is the vertical support that holds up the formwork and the weight of the wet concrete. There are several types, and the right choice depends on the slab weight, clear height between floors, and how quickly you need to cycle the forms.
Post Shores (Single-Post Shores)
These are individual steel or aluminum posts with adjustable screw jacks at the top and bottom. They are the simplest and most common shoring type for lighter slabs and shorter clear heights.
Advantages:
- Low cost per unit
- Quick to install and strip
- Adjustable height accommodates minor variations in floor-to-floor dimensions
Limitations:
- Individual post capacity is limited (typically 5,000 to 10,000 pounds depending on the manufacturer and extension height)
- Require cross-bracing to prevent buckling
- Not practical for clear heights much above 15 or 16 feet without intermediate bracing
Frame Shores
Frame shores are welded steel frames, typically 5 feet wide and available in various heights, that stack and connect with cross-braces. They offer higher load capacities than single-post shores and are more stable.
Advantages:
- Higher load capacity per unit of floor area
- Built-in bracing connections between frames
- Stack for multi-story shoring without additional engineering for each level
Limitations:
- Heavier to handle than individual posts
- Less flexibility in spacing and layout than post shores
- Require crane or forklift for delivery and placement on upper floors
Scaffolding-Based Shoring (Cup-Lock, Ring-Lock)
Modular scaffolding systems like cup-lock and ring-lock can double as shoring when properly designed. They use vertical standards with rosette or cup connections at regular intervals, allowing horizontal and diagonal bracing in any direction.
Advantages:
- Extremely flexible layout adapts to irregular floor plans
- High load capacity when properly configured
- Components serve double duty for access scaffolding and shoring
Limitations:
- More components to inventory and manage
- Assembly takes longer than frame shores for simple rectangular layouts
- Engineering design is more complex due to the number of possible configurations
Tower Shores (Heavy-Duty Shoring)
For very heavy slabs (post-tensioned slabs over 12 inches thick, transfer slabs, or slabs with heavy equipment loads), tower shores provide capacity that standard frames cannot match. These are engineered systems with heavy steel members and connection hardware designed for loads exceeding 20,000 pounds per leg.
Form Deck Systems
The form deck sits on top of the shoring and creates the bottom surface of the slab. The main options are:
Plywood on Joists
The traditional approach uses plywood sheets (typically 3/4-inch BB-OES or HDO plywood) supported by wood or aluminum joists (stringers), which sit on wood or aluminum beams (ledgers), which rest on the shores.
This system is versatile and can accommodate nearly any slab geometry, including steps, drops, and irregular edges. The plywood surface produces a smooth concrete finish, and HDO (high-density overlay) plywood can be reused many times with proper care.
Aluminum Panel Systems
Pre-engineered aluminum form panels snap together and rest directly on aluminum beams and shores. They are lighter than plywood systems, faster to erect, and can be reused hundreds of times.
These systems work best for repetitive floor layouts with minimal variation. They struggle with complex geometry, but for a standard flat plate or flat slab, they are extremely efficient.
Flying Table Forms
Flying forms are large, pre-assembled units consisting of a form surface, supporting trusses, and a rolling carriage. After stripping, the entire table rolls to the edge of the building and is crane-lifted to the next floor.
Flying forms are justified on projects with at least 5 identical floors, where the labor savings from eliminating repeated assembly and disassembly offset the higher initial cost. They require careful planning for crane access and a building geometry that allows the tables to be extracted from each floor.
Reshoring: Why It Matters and How It Works
Here is the core problem: when you strip the shores from under a freshly cured slab and immediately begin pouring the next floor above, the slab you just stripped must now support the full weight of the new pour plus the formwork. A young concrete slab at 7 or 14 days old may not have the strength to handle that load.
Reshoring solves this by distributing construction loads across multiple floor levels.
The Reshoring Sequence
A typical reshoring cycle works like this:
- Level 1 (ground floor) is poured on grade. No shoring issues.
- Level 2 formwork and shoring are erected on Level 1. Level 2 is poured. Shoring transfers the load to Level 1 slab and then to the ground.
- Level 2 gains strength. After reaching the specified strength (confirmed by cylinder tests), the Level 2 shores are stripped.
- Reshores are immediately installed under Level 2. These reshores are snug but not jacked tight. They do not lift the slab or introduce new forces. They simply provide support if the slab deflects under additional load.
- Level 3 formwork and shoring are erected on Level 2. The load from the Level 3 pour passes through Level 2 and is shared between Levels 1 and 2 via the reshores.
- This pattern continues upward. As each new floor is poured, reshores on the lower floors distribute the cumulative construction load.
How Many Levels of Reshoring?
The structural engineer determines the required number of reshoring levels based on:
- Slab thickness and self-weight
- Concrete strength gain curve (related to mix design and curing temperature)
- Construction live loads (workers, equipment, material storage)
- The capacity of each slab at its current age
- Construction schedule (how fast you are cycling floors)
A typical residential or office building with 8-inch flat slabs might require 1 level of shoring plus 2 levels of reshoring. A heavier structure with 14-inch post-tensioned slabs or transfer beams might need additional levels.
Common Reshoring Mistakes
Jacking reshores tight. Reshores should be snug, not loaded. Jacking them tight introduces forces into the slab that were not accounted for in the original structural design.
Removing reshores too early. Reshores must remain in place until the structure above no longer needs the load distribution. The engineer specifies when each level of reshoring can be removed.
Storing materials on reshored slabs. Stacking rebar, bundles of conduit, or pallets of block on a reshored slab can overload it. Material staging must be planned and controlled.
Pour Sequencing for Elevated Slabs
Large elevated slabs are rarely placed in a single continuous pour. Instead, they are divided into manageable sections with construction joints at engineered locations.
Factors That Determine Pour Sequence
Construction joint locations. The structural engineer specifies where joints are acceptable, typically at points of low shear and low bending moment. You cannot place a construction joint wherever it is convenient for your crew.
Concrete delivery rate. The batch plant’s production capacity and the number of trucks in the delivery cycle determine how much concrete you can place per hour. The pour must be planned so that fresh concrete is always placed against concrete that has not yet reached initial set.
Crew size and equipment. The number of finishers, the reach of the concrete pump, and the placement of the pump line all affect how much slab area you can cover in a shift.
Weather conditions. Hot weather accelerates set time, giving you less working time. Cold weather slows strength gain, affecting when you can strip. Wind increases evaporation from the fresh surface, creating plastic shrinkage cracking risks.
Time limits. Most concrete specifications require that successive lifts be placed within 60 to 90 minutes of each other to avoid cold joints. This time constraint drives the practical maximum pour size.
Planning the Pour
A good pour plan includes:
- A drawing showing the pour boundaries and sequence
- Construction joint locations and details (keyways, dowels, or roughened surfaces)
- Pump location and boom reach coverage
- Concrete delivery schedule (trucks per hour, batch plant distance)
- Crew assignments (placement, vibration, screeding, floating, finishing)
- Contingency plans for pump breakdown, weather delays, or delivery interruptions
- Target start time, expected duration, and latest acceptable finishing time
Structural Loading During Construction
One of the most overlooked aspects of elevated slab construction is the difference between the loads a slab will carry when the building is complete and the loads it must carry during construction.
Construction Loads Often Exceed Service Loads
Consider a typical 8-inch concrete slab designed for a 50 psf live load in an office building. During construction, that slab might simultaneously support:
- Its own dead load (100 psf)
- A level of shoring above, carrying the weight of the next slab being poured (another 100 psf plus formwork)
- Workers and equipment (50 psf or more)
- Stored materials on the slab (additional point loads)
The total construction load can easily reach 250 to 300 psf, far exceeding the 150 psf (dead plus live) the slab was designed for in service. This is exactly why reshoring and construction load analysis are so important.
The Engineer’s Role
ACI 347R provides guidance for analyzing construction loads on multistory structures. The structural engineer must verify that each slab, at its expected strength on the day it will be loaded, can safely carry its share of the construction loads. This analysis considers:
- Concrete strength gain over time (based on mix design, curing conditions, and cylinder test data)
- Load distribution through the shoring and reshoring system
- The number of floors being loaded simultaneously
- The maximum construction live load at any point during the schedule
If the analysis shows that a slab will be overloaded, the engineer has several options: increase the number of reshoring levels, slow the construction cycle to allow more strength gain, specify a higher early-strength concrete mix, or increase the slab thickness.
Formwork Inspection and Quality Control
Formwork failures almost always result from human error, not material deficiency. Inspection at every stage catches problems before they become disasters.
Before the Pour
A qualified person should inspect the following before any concrete placement:
- Shore alignment. All posts and frames must be plumb. Leaning shores have dramatically reduced capacity.
- Bearing surfaces. Shores must sit on stable, level surfaces capable of supporting the concentrated loads. Mudsills, steel plates, or the structural slab below must be adequate.
- Bracing. All required cross-bracing must be installed and connected. Missing or loose braces are the single most common cause of shoring collapse.
- Connections. Wedges, pins, and screw jacks must be properly seated and tightened.
- Form deck. The plywood or panel surface must be continuous, properly lapped, and free of gaps or damage that would cause concrete leaks.
- Elevation and camber. Verify that the form deck is at the correct elevation, including any specified camber (upward deflection built into the forms to account for expected slab deflection under load).
- Embeds and blockouts. Confirm that all embedded plates, anchor bolts, sleeves, and blockouts are installed per the structural and MEP drawings before concrete placement.
During the Pour
Monitor the formwork throughout the pour for:
- Deflection or movement of shores
- Concrete leaks through form joints
- Lateral displacement of the shoring assembly
- Unusual sounds (creaking, popping) that might indicate overstress
If any sign of distress appears, stop the pour immediately and evaluate before continuing.
Managing Formwork Operations with Software
Elevated slab formwork involves tight coordination between the concrete supplier, pump operator, forming crew, iron workers, MEP trades, and the inspection team. A missed inspection hold, a late concrete delivery, or a scheduling conflict between trades can delay a pour and cost thousands of dollars.
Projul helps contractors manage the scheduling, crew coordination, and documentation that formwork operations demand. Tracking pour dates, cylinder break schedules, reshoring removal approvals, and inspection sign-offs in one system keeps the concrete cycle on track and gives you a record of every decision.
Common Elevated Slab Formwork Mistakes
Not engineering the formwork. Guessing at shore spacing or using rules of thumb instead of engineering calculations is the most direct path to a collapse. Every formwork layout should be designed or reviewed by a qualified engineer.
Ignoring construction loads. Treating the slab as if it only needs to support its own weight, without accounting for the floors being built above, leads to overloading and cracking.
Stripping too early. Pressure to maintain schedule pushes crews to strip forms before the concrete has reached adequate strength. Always verify with cylinder tests.
Reusing damaged components. Bent shores, cracked frames, and delaminated plywood all have reduced capacity. Inspect every component and reject damaged ones.
Poor bearing conditions. Setting shores on loose fill, wet soil, or thin plywood over soft material creates settlement that unloads some shores and overloads their neighbors.
Wrapping Up
Elevated slab formwork is a temporary structure that must be engineered with the same care as the permanent building. The shoring and reshoring system carries loads that often exceed the building’s design service loads, and it does so on a structure that gains strength day by day. Getting the design right, inspecting the installation, monitoring during the pour, and following the reshoring sequence are what separate a smooth concrete cycle from a catastrophic failure.
Plan it, engineer it, inspect it, and document it. That is the formula for elevated slab formwork done right.
Frequently Asked Questions
What is the difference between shoring and reshoring?
How many levels of shoring and reshoring are typically required?
When can you strip formwork from an elevated slab?
What are the most common shoring systems for elevated slabs?
How do you determine the pour sequence for a large elevated slab?
What loads must the formwork system support?
What is flying formwork and when is it used?
How do you prevent formwork failures?
Related Articles

BIM Clash Detection: How to Catch Conflicts Before They Cost You on the Jobsite
BIM Clash Detection: How to Catch Conflicts Before They Cost You on the Jobsite Every contractor has a story about the...
Read More →
Asphalt Paving and Compaction Guide: Mix Types, Laydown Temperatures, and Quality Testing
Asphalt paving looks straightforward from a distance. A truck dumps material, the paver lays it down, and rollers...
Read More →
Construction Jobsite Wi-Fi & Connectivity Guide: Setting Up Reliable Internet in the Field
A practical guide to getting reliable internet on construction job sites. Learn about cellular hotspots, mesh networks,...
Read More →