Roof Tear-Off and Replacement Guide for Contractors
A roof replacement is one of the biggest single expenses a homeowner will face, and it is one of the most common projects for residential contractors. Getting it right means more than just nailing shingles to plywood. It starts with understanding when to tear off versus overlay, knowing how to inspect and repair decking, applying waterproofing membranes correctly, and installing flashing that actually keeps water out for the life of the roof.
This guide covers the full roof replacement process from tear-off through final inspection, with a focus on the details that separate a 30-year roof from a 10-year callback.
Layering Rules: Tear-Off vs. Overlay
The first decision on any roof replacement project is whether to tear off the existing roofing or install the new roof over the top.
What the Code Says
Most building codes (following the IRC) allow a maximum of two layers of asphalt shingles on a residential roof. If the existing roof has one layer of shingles in reasonable condition, you can typically install a second layer directly over it. If there are already two layers, or if the existing layer is wood shakes, tile, or another non-asphalt material, a complete tear-off is required.
Some jurisdictions are more restrictive and limit roofs to a single layer. Always check local code requirements before proposing an overlay.
When Overlay Makes Sense
An overlay can be a cost-effective option when:
- The existing single layer of shingles is lying flat without curling or buckling
- The decking is in good condition (no soft spots, sagging, or visible water damage from the attic side)
- The roof structure can handle the added weight (a second layer of shingles adds 2 to 3 pounds per square foot)
- The existing flashing is in good condition and at the correct height to accommodate the added shingle thickness
- Local codes allow it
When Tear-Off Is the Right Call
Even when codes allow an overlay, a full tear-off is the better choice in most situations. Here is why:
Decking inspection. You cannot see the decking under an existing layer of shingles. Soft spots, rot, delamination, and mold can hide under shingles that look fine from the surface. A tear-off gives you full access to inspect and repair the deck before installing the new roof.
Flashing replacement. Old flashing is a leading cause of roof leaks. During a tear-off, you replace all flashing with new material properly integrated into the new shingle courses. With an overlay, you are stuck working around existing flashing, which is often corroded, poorly sealed, or improperly installed.
Ice and water shield. You cannot install ice and water shield over existing shingles. If the roof is in a climate that requires ice and water shield at the eaves (and most of the northern U.S. does), you need a tear-off to install it properly on the bare deck.
Weight. Two layers of shingles are heavy. On older homes with undersized rafters or trusses, the additional weight can cause structural problems, especially in areas with snow loads.
Warranty. Many shingle manufacturers require installation on a clean deck for their full warranty coverage. An overlay may void or limit the manufacturer’s warranty.
Appearance. Shingles installed over an existing layer tend to telegraph the pattern and imperfections of the layer below. The finished roof does not look as clean or lay as flat as shingles installed on bare decking.
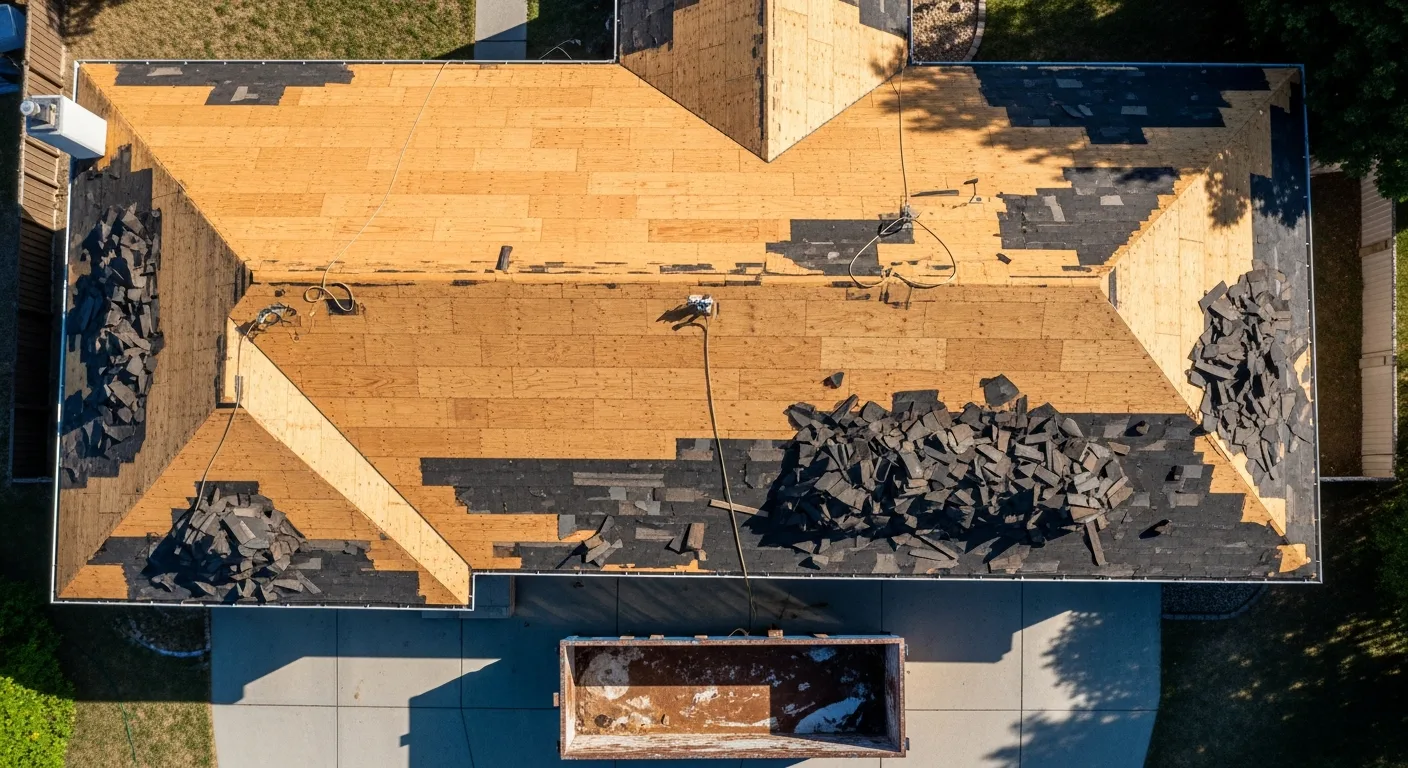
The Tear-Off Process
A clean, efficient tear-off sets the stage for a quality installation. Here is the process:
Protect the property. Before you start, protect landscaping, siding, windows, and outdoor equipment with tarps or plywood. Place dumpsters or dump trailers close to the building for easy disposal. Cover air conditioning units and any ground-level features that could be damaged by falling debris.
Remove ridge caps and hip shingles first. Start at the top and work down. Use roofing shovels (shingle removers) to get under the shingles and pry them loose. Work in sections, keeping the tear-off area manageable so you can get underlayment down before the end of the day.
Remove shingles, underlayment, and old flashing. Take everything off down to bare decking. Remove all nails and staples from the deck surface. A magnetized roller run across the deck picks up stray fasteners that could puncture new underlayment.
Clean up as you go. Use tarps on the ground to catch debris. Have laborers moving debris to the dumpster continuously. A clean job site is a safer job site, and it keeps the homeowner happy.
Decking Inspection and Repair
With the old roofing material removed, you have your one chance to inspect the roof deck before it disappears under new materials for the next 25 to 50 years. Do not rush this step.
What to Look For
Soft spots. Walk the entire deck and feel for areas that give under your weight. Probe suspect areas with a screwdriver or awl. Sound decking resists the probe. Rotted decking lets the tool sink in with minimal pressure.
Delamination. Plywood decking can delaminate (the layers separate) from moisture exposure. Delaminated plywood feels spongy and does not hold fasteners properly. It must be replaced.
Water stains. Dark stains on the top surface of the decking indicate past leaks. Stained areas may or may not be structurally compromised, but they warrant close inspection with a probe.
Mold and fungal growth. Active mold on the decking surface indicates ongoing moisture problems. Identify and correct the moisture source, replace severely affected decking, and treat adjacent areas with a mold-killing primer before installing new underlayment.
Missing or broken sections. Previous repairs, vent pipe relocations, or storm damage may have left gaps or poorly patched areas in the decking. Replace or properly repair any compromised sections.
Board spacing. On older homes with board sheathing (1x6 or 1x8 boards instead of plywood), check the spacing between boards. Some older roofs were sheathed with spaced boards for wood shake installation. If you are installing asphalt shingles, the deck must be solid, so you will need to add plywood or OSB over the spaced boards.
Decking Replacement
When replacing sections of decking:
- Use the same thickness as the existing decking (typically 7/16-inch OSB or 1/2-inch or 5/8-inch plywood).
- Cut the replacement piece so that its edges land on rafter or truss centers for proper support.
- Fasten with 8d ring-shank nails or #8 wood screws spaced 6 inches on center at edges and 12 inches on center in the field.
- Stagger joints from adjacent panels by at least one rafter bay.
- Leave a 1/8-inch gap between panels to allow for expansion.
Structural Issues
While you have the decking exposed, look at the rafters or trusses below. Check for:
- Cracked or split rafters
- Sagging ridge boards
- Water damage or rot at bearing points
- Evidence of prior structural repairs
- Adequate ventilation baffles at the eaves
If you find structural problems, stop and get a structural engineer or experienced framing contractor involved before proceeding. Structural issues are outside the scope of a roofing replacement and require proper engineering evaluation.
Underlayment Installation
Underlayment is the secondary weather barrier between the shingles and the decking. It has two components on most modern roofs: ice and water shield in vulnerable areas, and synthetic underlayment everywhere else.
Ice and Water Shield
Ice and water shield is a self-adhering membrane with a rubberized asphalt adhesive that seals around nail penetrations. It provides a waterproof barrier at the areas most vulnerable to leaks.
Where to install ice and water shield:
- Eaves. In climates where the January mean temperature is 25 degrees Fahrenheit or below, code requires ice and water shield from the eave edge to a point at least 24 inches past the interior wall line. This protects against ice dam leaks. On low-slope sections or in areas with severe ice dam history, extend it further up the roof.
- Valleys. Install a full-width strip (36 inches minimum) centered in each valley. Valleys concentrate water flow and are one of the most common leak locations on any roof.
- Around penetrations. Pipe boots, exhaust vents, and other roof penetrations get ice and water shield collars around them before the field underlayment is installed.
- Skylights. Apply ice and water shield on the deck around the entire skylight opening before installing the skylight flashing kit.
- Chimneys. Apply ice and water shield on the deck around the chimney before installing step flashing and counter flashing.
- Roof-to-wall transitions. Where a lower roof meets a vertical wall (a common detail on additions, dormers, and split-level homes), ice and water shield protects the vulnerable transition.
Installation tips:
- The deck must be clean and dry. Ice and water shield will not adhere to a wet, dusty, or dirty surface.
- Peel the release film and press the membrane firmly onto the deck. Use a hand roller at all laps and edges.
- Overlap horizontal seams by 3 inches minimum. Overlap end laps by 6 inches minimum.
- On steep roofs in hot weather, ice and water shield can become very sticky and difficult to reposition. Work in the cooler morning hours.
- Do not leave ice and water shield exposed to UV for more than the manufacturer’s recommended period (typically 30 to 90 days).
Synthetic Underlayment
Synthetic underlayment covers the rest of the roof deck. It provides a secondary water barrier and a clean, uniform surface for shingle installation.
Installation:
- Start at the eave, overlapping the top edge of the ice and water shield by 4 inches.
- Roll the underlayment horizontally across the roof, working upward toward the ridge.
- Overlap horizontal seams by 4 inches and end laps by 6 inches.
- Fasten with cap nails or cap staples spaced per the manufacturer’s instructions (typically 6 inches at laps and 12 inches in the field).
- Pull the underlayment tight to avoid wrinkles that could telegraph through the shingles.
- Wrap the underlayment over the ridge by at least 6 inches onto the opposite slope.
Drip Edge Installation
Drip edge is an L-shaped metal flashing installed at the eaves and rakes (gable edges) of the roof. It directs water away from the fascia and into the gutter, and it provides a clean, finished edge for the roofing system.
Installation Sequence
The installation sequence for drip edge matters:
- At the eave: Install drip edge directly on the bare decking, before the underlayment. The underlayment laps over the top of the eave drip edge.
- At the rake: Install drip edge over the underlayment. The rake drip edge laps over the eave drip edge at the corners.
This sequence ensures that water running down the underlayment flows over the eave drip edge and into the gutter, while water running down the rake edge flows onto the underlayment rather than under it.
Drip Edge Details
- Use a minimum 2x3-inch drip edge profile. Larger profiles provide better water management.
- Fasten every 12 inches with roofing nails driven through the top flange.
- Overlap end joints by 2 inches. At inside and outside corners, cut and bend the drip edge to wrap the corner.
- Use the same metal material as your other flashing (aluminum or galvanized steel). Mixing metals can cause galvanic corrosion.
Flashing: The Details That Make or Break a Roof
More roof leaks are caused by flashing failures than by shingle failures. Flashing protects the joints and transitions where different roof planes, walls, and penetrations meet. Getting flashing right is the single most important skill in roofing.
With contractor management software designed specifically for the trades, these challenges become much more manageable.
Valley Flashing
Valleys can be flashed with either the “closed valley” method (shingles from both slopes are woven or cut across the valley over ice and water shield) or the “open valley” method (a visible metal valley liner runs down the center with shingles trimmed back from each side).
Open valley advantages: Easier to maintain, handles high water volume better, and is required or recommended by many shingle manufacturers for their warranty.
Closed valley advantages: Cleaner appearance, no exposed metal.
For either method, start with ice and water shield in the valley as your base layer.
Step Flashing and Counter Flashing
Where the roof meets a vertical wall (chimney sides, dormers, additions), step flashing is the standard method.
Step flashing installation:
- Each piece of step flashing is an L-shaped piece of metal, typically 5 inches by 7 inches.
- One piece is installed with each course of shingles, woven into the shingle courses.
- The vertical leg goes up the wall at least 4 inches. The horizontal leg extends at least 4 inches onto the roof, under the shingle.
- Each piece overlaps the one below it by at least 2 inches.
- Fasten each piece with one nail in the upper corner of the horizontal leg, covered by the next shingle course.
Counter flashing covers the top edge of the step flashing and is embedded into the wall:
- On masonry walls (chimneys, brick walls), counter flashing is set into a saw-cut reglet in the mortar joint and sealed with polyurethane sealant.
- On siding walls, counter flashing is installed under the siding, with the siding acting as the counter flash.
- The counter flashing overlaps the step flashing by at least 2 inches.
Chimney Flashing
Chimney flashing is a multi-part system:
- Front apron: An L-shaped piece across the front (downhill side) of the chimney, installed under the shingles.
- Step flashing: Along both sides of the chimney, woven into the shingle courses.
- Back pan (cricket or saddle): A small diverter structure behind the chimney that directs water around it. Required by code on chimneys wider than 30 inches. Even on narrower chimneys, a cricket is good practice.
- Counter flashing: Covers the top edges of the apron, step flashing, and back pan. Set into reglets in the masonry.
Pipe Boot Flashing
Plumbing vent pipes penetrating the roof need pipe boot flashings. These are one-piece flashings with a metal base and a rubber or neoprene collar that seals around the pipe.
Installation:
- Slide the boot over the pipe.
- Shingle courses below the boot go under the base flange. Courses above the boot go over the base flange.
- Apply a bead of roofing sealant around the top of the rubber collar where it meets the pipe.
- Do not rely solely on sealant. The physical overlap of the shingles over the base flange is the primary water management.
Tip: Use split boots or adjustable boots for retrofitting around existing pipes. They are easier to install without disconnecting the plumbing.
Shingle Installation
With the deck prepared, underlayment down, drip edge installed, and flashing in place, you are ready to install shingles.
Starter Course
The starter course is the first row of shingles at the eave. Its purpose is to provide a seal strip behind the cutouts of the first visible course and to protect the edge of the roof.
- Use a manufacturer’s starter strip product or cut the tabs off standard shingles and install the remaining strip with the adhesive strip facing the eave edge.
- Overhang the drip edge by 1/4 to 3/4 inch at the eave and the rake.
- Make sure the starter strip adhesive is positioned to bond with the first course of shingles above it.
Field Shingles
Nailing pattern: Follow the manufacturer’s nailing instructions exactly. Most architectural shingles require 4 nails per shingle in the nailing zone (the specific area marked on the shingle). High-wind areas require 6 nails. Nails placed above or below the nailing zone will not provide proper wind resistance.
Nail type: Use 11 or 12 gauge galvanized roofing nails long enough to penetrate at least 3/4 inch into the decking (or through the decking if less than 3/4 inch thick).
Exposure and offset: Follow the manufacturer’s specifications for exposure (the visible portion of each shingle, typically 5 to 5-5/8 inches for architectural shingles) and offset (the stagger between courses, typically 6 to 7 inches minimum).
Keep courses straight. Snap horizontal chalk lines every few courses to keep the shingle courses running true. On long runs, even a small deviation per course adds up to a visible wave by the time you reach the ridge.
Hip and Ridge Caps
Hip and ridge caps finish the roof at the peaks and hip lines. Use manufacturer’s hip and ridge cap shingles (not field-cut three-tab shingles, which do not provide the same thickness and wind resistance).
- Install ridge caps starting at the end of the ridge opposite the prevailing wind direction, working toward the wind.
- On hips, start at the bottom and work up to the ridge.
- Fasten each cap with two nails, positioned so the next cap covers the nail heads.
- Apply a dab of roofing sealant under the last cap at the ridge peak, since there is no subsequent cap to cover the nail heads.
Ventilation
Proper attic ventilation is critical for roof longevity. Without adequate ventilation, heat and moisture build up in the attic, causing ice dams in winter, premature shingle deterioration in summer, and mold growth year-round.
Balanced Ventilation
The key principle is balanced intake and exhaust. You need roughly equal amounts of ventilation at the soffits (intake) and at the ridge or near the ridge (exhaust).
- Intake: Soffit vents, perforated soffit panels, or eave vents
- Exhaust: Ridge vent (preferred), roof-mounted exhaust vents, or gable vents
Do not mix exhaust vent types on the same roof. For example, do not install both a ridge vent and a power ventilator. Mixing types can create short-circuiting where air flows from one exhaust vent to another instead of drawing fresh air from the soffits.
Ridge Vent Installation
Ridge vent is the standard exhaust ventilation for most residential roofs. To install:
- Cut a slot in the decking along the ridge, typically 1 to 1.5 inches on each side of the ridge board. Stop the cut 6 to 12 inches from each end of the ridge.
- Install the ridge vent product per manufacturer instructions.
- Cap the ridge vent with hip and ridge cap shingles.
Check that soffit baffles (ventilation chutes) are installed in each rafter bay at the eaves to prevent insulation from blocking airflow from the soffit vents into the attic.
Project Management for Roofing Contractors
Roofing is a volume business. Most residential roofing contractors are running multiple jobs per week during peak season. Each job involves a sales visit, measurement (start with a roofing estimate template to keep your bids consistent), material order, delivery coordination, crew scheduling, the actual installation, cleanup, and final inspection. Multiply that by 5 to 10 jobs per week, and the coordination becomes the hardest part of the business.
Projul is built for trade contractors who need to manage a high volume of projects without letting details fall through the cracks. Track every job from lead through completion, schedule crews and material deliveries, manage change orders for decking repair and other surprises discovered during tear-off, and keep homeowners updated on their project status.
When you are running a roofing crew that needs to hit one house per day, having a system that tells everyone where to be, what materials are on site, and what the scope is saves time every single morning. Check out Projul’s pricing or book a demo to see how it works for roofing contractors.
Common Roofing Mistakes to Avoid
Improper nailing. High nailing (placing nails above the manufacturer’s nailing zone) is the most common installation defect found in roofing inspections. High-nailed shingles will blow off in the first windstorm.
Reusing old flashing. Saving $50 on flashing material by reusing corroded step flashing is a guaranteed callback. Replace all flashing on every tear-off job.
Skipping ice and water shield. In climates that require it, ice and water shield at the eaves is not optional. Skipping it to save material costs creates ice dam leaks that damage ceilings, insulation, and drywall.
Not inspecting decking thoroughly. Walking the deck quickly and missing a soft spot means you are installing a new roof over a rotting substrate. Take the time to inspect every square foot.
Poor valley details. Valleys handle concentrated water flow. Sloppy valley flashing, missing ice and water shield, or improperly trimmed shingles in closed valleys will leak.
Inadequate ventilation. A new roof on a poorly ventilated attic will not last as long as it should. Address ventilation deficiencies during the replacement while you have access to the roof structure.
Wrapping Up
A roof replacement done right protects a home for 25 to 50 years. Done wrong, it creates leaks, callbacks, and warranty claims that eat into your profit and your reputation. The difference between the two comes down to the details: thorough decking inspection, proper ice and water shield placement, correct flashing installation, and following the manufacturer’s shingle installation instructions to the letter.
Take the time to do each step correctly, keep your projects organized with a solid management system like Projul, and build the kind of reputation that keeps your phone ringing.
Frequently Asked Questions
Can you put a new roof over an existing roof?
How long does a roof tear-off and replacement take?
How do you know if roof decking needs to be replaced?
Where is ice and water shield required?
What is the difference between step flashing and counter flashing?
Should you replace flashing when replacing a roof?
What type of underlayment should you use under shingles?
How much does a roof replacement cost?
Related Articles

Concrete Tilt-Up Construction: A Contractor's Complete Field Guide
Tilt-up construction accounts for roughly 15 percent of all industrial and commercial buildings in North America. This...
Read More →
How to Implement Construction Software Without Losing Your Mind
Most construction software rollouts fail. Not because the software is bad, but because the rollout was rushed. Here are...
Read More →
How Selections Can Pay for Themselves in Three Easy Steps
Most contractors lose thousands each year on wrong material orders, slow client decisions, and missed upsell chances....
Read More →