Soffit and Fascia Installation Guide for Contractors
Why Soffit and Fascia Matter More Than Most People Think
If you have been in construction for any amount of time, you know that soffit and fascia are the kind of work that does not get a lot of attention until something goes wrong. A homeowner does not call you excited about their new soffit. They call you when squirrels are nesting in their attic, water is running down the inside of their walls, or their fascia boards are rotting off the house.
That is exactly why getting this work right matters. Soffit and fascia protect the roof structure, manage attic ventilation, keep pests out, and give the exterior a finished look. When installed correctly, they are invisible. When installed wrong, they create expensive callbacks and unhappy customers.
This guide covers everything you need to know about soffit and fascia installation, from material selection to ventilation calculations to the most common mistakes contractors make in the field.
Understanding the Anatomy of Soffit and Fascia
Before we get into the installation process, let us make sure we are all on the same page about what these components actually do.
Fascia
The fascia board is the long, straight board that runs along the lower edge of the roof. It is mounted directly to the rafter tails or truss ends and serves two main purposes. First, it provides a mounting surface for the gutter system. Second, it seals the end of the rafter cavity, keeping water and animals out of the roof structure.
Fascia takes a beating. It is exposed to rain, snow, sun, and wind year-round. That is why material selection and proper flashing are so important.
Soffit
The soffit is the panel that covers the underside of the roof overhang, running horizontally from the fascia back to the exterior wall. It can be solid or vented. Vented soffit panels have small perforations that allow air to flow into the attic space, which is critical for proper roof ventilation.
Drip Edge and Trim
Do not forget the supporting cast. Drip edge directs water away from the fascia and into the gutter. J-channel and F-channel create clean transitions between the soffit and the wall or fascia. These trim pieces are not optional; they are what make the installation look professional and perform correctly.
Choosing the Right Materials
Material selection depends on the project budget, the climate, and the look the homeowner is going for. Here is a breakdown of the most common options.
Aluminum Soffit and Fascia
Aluminum is the workhorse of the industry. It does not rot, it resists dents better than vinyl, and it comes in a wide range of colors with a baked-on finish. Aluminum soffit is available in solid and vented panels, usually in 12-inch or 16-inch widths.
For fascia, aluminum coil stock can be brake-bent to wrap existing wood fascia boards, giving you a maintenance-free exterior without replacing the structural board underneath.
Best for: Most residential projects, especially in areas with high humidity or heavy rainfall.
Vinyl Soffit and Fascia
Vinyl is the budget-friendly option. It is lightweight, easy to cut, and simple to install. However, it can become brittle in extreme cold and may warp in extreme heat. Color options have improved over the years, but vinyl still does not look as crisp as aluminum or fiber cement.
Best for: Budget-conscious projects in moderate climates.
Wood Soffit and Fascia
Wood gives you the most traditional look, and for historic homes or high-end custom work, nothing else will do. Cedar and redwood are the most popular choices because of their natural resistance to rot and insects. Pine and spruce work too but need more protection.
The downside is maintenance. Wood needs to be primed and painted before installation and repainted every 5 to 10 years. Skipping that step is how you end up back on the job in a few years doing a full replacement.
Best for: Historic renovations, custom homes, and projects where aesthetics are the top priority.
Fiber Cement
Fiber cement, like HardieSoffit, is a step up from vinyl and aluminum in terms of durability and appearance. It resists rot, fire, and insects, and it holds paint extremely well. The trade-off is weight. Fiber cement is heavier than other options, which means you need more support and more hands on the crew during installation.
Best for: Mid-range to high-end residential projects where durability and appearance both matter.
Composite and PVC
Composite and PVC products are gaining ground in the market. They offer the look of wood without the maintenance headaches. They are more expensive upfront but save money over the life of the building. Many composite products can be routed, mitered, and finished just like real wood.
Best for: Projects that want a wood look with zero maintenance.
Ventilation: Getting the Airflow Right
This is where a lot of contractors drop the ball. Soffit ventilation is not just a nice-to-have. It is a code requirement in most jurisdictions, and getting it wrong leads to moisture problems, ice dams, premature shingle failure, and mold in the attic.
How Attic Ventilation Works
The principle is simple. Cool outside air enters through the soffit vents at the eaves, flows up through the attic space, and exits through exhaust vents at or near the ridge. This continuous airflow removes heat and moisture from the attic.
In summer, it keeps the attic cooler, reducing the load on the air conditioning system. In winter, it keeps the roof deck cold, preventing snow from melting and refreezing at the eaves.
Calculating Ventilation Requirements
The standard formula is based on the 1:150 rule. For every 150 square feet of attic floor space, you need 1 square foot of net free ventilation area (NFVA). If you have a balanced system (roughly equal intake and exhaust), many codes allow you to use the 1:300 ratio instead.
Here is a quick example. For a 1,500 square foot attic with balanced ventilation:
- Total NFVA needed: 1,500 / 300 = 5 square feet
- Split 50/50 between intake and exhaust: 2.5 square feet of soffit ventilation
- Convert to square inches: 2.5 x 144 = 360 square inches of NFVA at the soffits
Check the NFVA rating on your soffit panels. A typical 12-inch by 12-foot vented soffit panel might provide 9 to 11 square inches of NFVA per linear foot. Do the math to make sure you are meeting the requirement.
Common Ventilation Mistakes
Blocking soffit vents with insulation. This is the number one issue. If the insulation in the attic extends all the way to the eaves and covers the soffit vents, you have zero intake ventilation. Install proper baffles (also called rafter vents or vent chutes) in every rafter bay to keep insulation from blocking airflow.
Mixing exhaust vent types. Do not combine ridge vents with gable vents or powered attic ventilators. Different exhaust types can create competing airflow patterns that actually reduce ventilation effectiveness. Pick one exhaust method and stick with it.
Skipping ventilation on enclosed soffits. If you are boxing in an open overhang that previously had no soffit, you are also enclosing the rafter bays. Install vented soffit and make sure you have a clear air path from the vents to the attic.
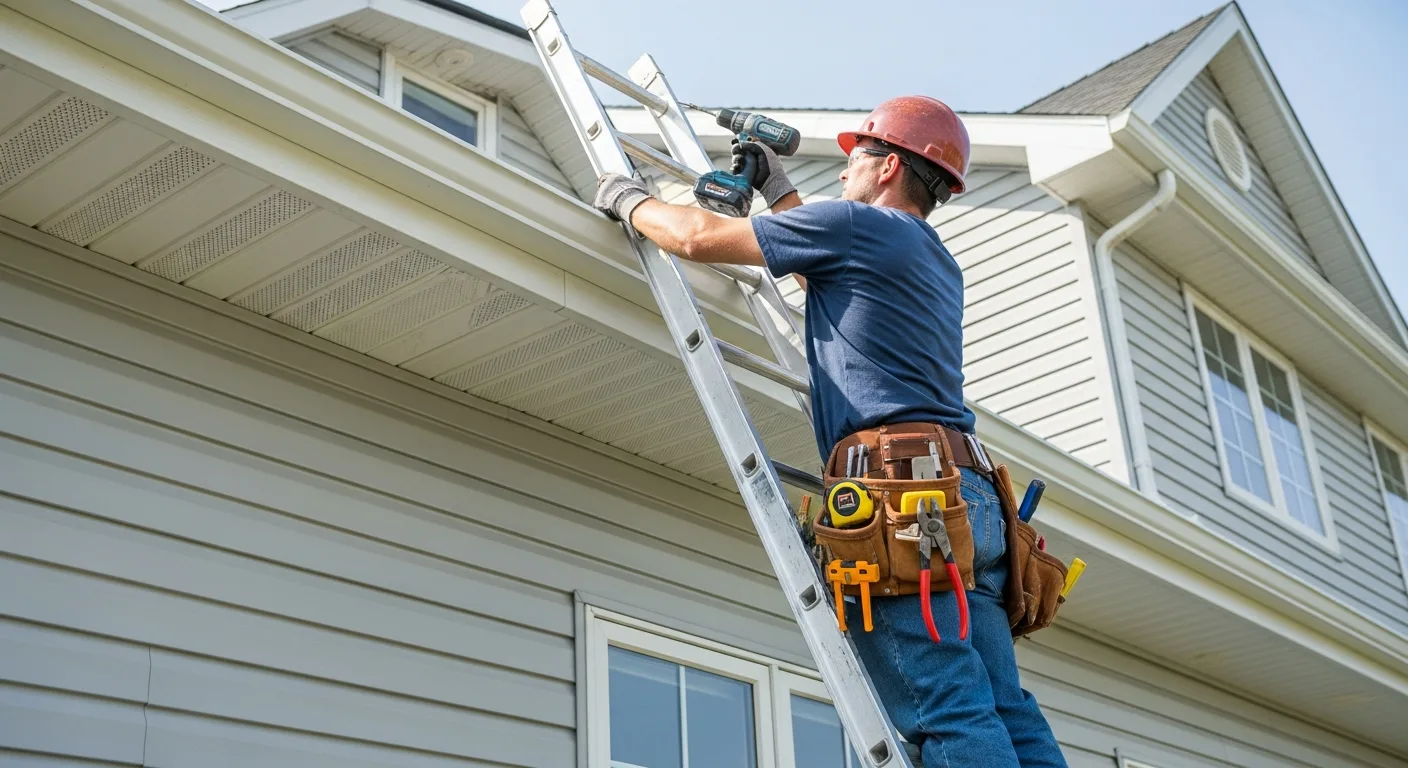
Step-by-Step Installation Process
Now let us walk through a typical soffit and fascia installation. This assumes aluminum materials, which is the most common scenario, but the general sequence applies to other materials as well.
Step 1: Inspect and Prep the Substrate
Before you install anything, look at what is already there. Check the rafter tails for rot. Check the existing fascia for structural integrity. If there is existing soffit, pull a section and inspect the underside of the roof deck for moisture damage or mold.
Fix any structural issues now. Do not cover up problems. If rafter tails are rotted, sister new material alongside them. If the sub-fascia is shot, replace it.
Step 2: Install or Repair the Fascia Board
The fascia goes on first because the soffit terminates at the fascia. If you are wrapping existing wood fascia with aluminum, make sure the wood is solid and straight. Shim any low spots.
For new wood fascia installation, use pressure-treated lumber or a rot-resistant species. Fasten with stainless steel or hot-dipped galvanized ring-shank nails. Pre-prime and paint all six sides of wood fascia before installation. Yes, all six sides, including the back and the cut ends.
For aluminum fascia wrap, brake-bend the coil stock to fit the profile of the fascia board and drip edge. Use aluminum trim nails in a matching color. Start at one end and work your way across, overlapping joints by at least 1 inch in the direction away from the prevailing view.
Step 3: Install the Drip Edge
If you are re-roofing at the same time, install the drip edge over the fascia and under the roofing underlayment at the eaves. The drip edge directs water into the gutter and away from the fascia.
If the roof is staying in place, make sure the existing drip edge is in good condition. A missing or damaged drip edge allows water to wick back under the shingles and rot the fascia from behind.
Step 4: Install the Receiving Channel
The soffit needs something to slide into at both the wall side and the fascia side. On the wall side, install J-channel or F-channel. On the fascia side, you can use J-channel, F-channel, or a dedicated soffit receiving channel built into the fascia cover.
Snap a chalk line to keep the channel straight. Fasten every 12 to 16 inches with screws or nails. Make sure the channel is level; a wavy channel means wavy soffit.
Step 5: Measure and Cut Soffit Panels
Measure from the back of the wall channel to the back of the fascia channel and subtract about 1/4 inch for expansion. Cut panels with tin snips or a fine-tooth circular saw blade installed backwards (for aluminum).
For vented soffit, alternate vented and solid panels as needed to meet your ventilation requirements. Some contractors run all vented panels for maximum airflow, which works fine as long as you do not mind the look.
Step 6: Install Soffit Panels
Slide the first panel into the channels on both sides and fasten through the nailing flange. Do not overdrive the fasteners. Leave about 1/32 inch of play so the panel can expand and contract with temperature changes. Interlock each subsequent panel with the previous one and continue across the span.
At corners, you will need to miter the panels or use a dedicated corner piece. Mitered corners look better but take more time.
Step 7: Final Inspection
Walk the entire perimeter and check for gaps, loose panels, and proper ventilation. Make sure all joints are tight, all channels are secured, and there are no exposed nail heads. Test a few panels by pushing on them; they should feel solid but not rigid.
Common Mistakes Contractors Make
Learning from other people’s expensive lessons is a lot cheaper than making your own. Here are the mistakes we see most often.
Not Accounting for Thermal Expansion
Aluminum and vinyl both expand and contract with temperature changes. If you install panels tight on a hot day, they will buckle. If you install them tight on a cold day, they will pull apart and leave gaps when it warms up. Always leave expansion gaps as specified by the manufacturer.
Skipping the Baffles
We mentioned this already, but it is worth repeating. If the soffit is vented and there are no baffles in the rafter bays, insulation will eventually migrate down and block the vents. This is the single most common reason for attic ventilation failure.
Using the Wrong Fasteners
Galvanic corrosion is real. Do not use steel nails on aluminum soffit. Do not use aluminum nails on steel fascia. Match your fastener material to the material you are fastening, or use stainless steel, which plays well with everything.
Ignoring Water Management
Soffit and fascia are part of the building’s water management system. If the gutter is not draining properly, water backs up behind the fascia. If there is no drip edge, water runs down the face of the fascia and behind the soffit. Think about the whole system, not just the individual component.
Poor Jointing and Overlaps
Visible seams and misaligned overlaps look amateurish. Take the time to plan your layout so joints fall in less visible areas. Overlap in a consistent direction, ideally away from the main viewing angle. A little planning up front saves you from callbacks.
Estimating and Bidding Soffit and Fascia Work
Getting your numbers right on soffit and fascia jobs means measuring carefully and accounting for waste, trim, and the time it takes to work around obstacles like gutters, downspouts, and roof penetrations.
Material Takeoff
Measure the linear footage of fascia and the square footage of soffit separately. Add 10% for waste on straightforward jobs, and up to 15% on complex rooflines with lots of corners and angles. Do not forget to count J-channel, F-channel, and any specialty trim pieces.
Labor Estimates
A two-person crew can typically install 200 to 300 linear feet of soffit and fascia per day on a standard residential job. Complex rooflines, two-story homes, and jobs requiring rot repair will slow that pace significantly.
Pricing
Material costs vary widely depending on the product. Vinyl is the cheapest at $2 to $4 per square foot installed. Aluminum runs $5 to $8. Fiber cement and composite materials can run $8 to $15 or more. These are rough ranges; always price based on your local market and supplier quotes.
Using construction management software like Projul helps you track material costs, labor hours, and profit margins across all your soffit and fascia jobs. Over time, that data makes your estimates more accurate and your bids more competitive. Check out Projul’s pricing to see how it fits your operation.
Maintenance Tips to Share with Homeowners
Part of doing good work is educating your customers on how to maintain it. Here are a few tips you can pass along at the end of every soffit and fascia job.
- Inspect twice a year. Check for cracks, gaps, peeling paint, and signs of pest entry in spring and fall.
- Keep gutters clean. Clogged gutters cause water to back up and damage the fascia.
- Trim nearby trees. Overhanging branches drop debris on the roof and provide a highway for squirrels and raccoons.
- Repaint wood fascia on schedule. Every 5 to 7 years for painted wood, or as soon as you see peeling or bare spots.
- Watch for wasp nests and bee activity. Small gaps in soffit panels are a favorite nesting spot.
Soffit and Fascia Material Comparison: Aluminum vs Vinyl vs Wood vs Fiber Cement
Choosing the right material is one of the most important decisions on any soffit and fascia project. Each option has clear trade-offs in cost, durability, maintenance, and appearance. Here is a detailed comparison to help you guide your customers toward the best fit for their home and budget.
Aluminum: The Industry Standard
Aluminum soffit and fascia dominate the residential market for good reason. The material typically costs $3 to $6 per linear foot for soffit panels and $2 to $5 per linear foot for fascia coil stock, depending on gauge and finish quality.
Durability: Aluminum resists rot, insect damage, and moisture. A quality aluminum installation will last 30 to 40 years in most climates without significant degradation. It does not crack in cold weather like vinyl, and it holds up to UV exposure without becoming brittle.
Maintenance: Virtually none. The baked-on enamel finish resists fading and chalking for decades. If a homeowner wants to change the color, aluminum can be repainted, though it rarely needs it. An occasional rinse with a garden hose is all it takes to keep it looking sharp.
Installation notes: Aluminum is easy to cut with tin snips or a circular saw with a fine-tooth blade installed backwards. It bends cleanly on a brake, which lets you create custom fascia wraps on site. The material is lightweight enough for one person to handle long panels on a ladder.
Drawbacks: Aluminum dents if struck hard, and the dents are difficult to repair without replacing the panel. In coastal environments, salt air can cause surface pitting over time, though this takes many years. It also costs more than vinyl, which can be a hard sell on tight-budget jobs.
Vinyl: Budget-Friendly but Limited
Vinyl soffit and fascia cost $1.50 to $3.50 per linear foot, making it the most affordable option for homeowners on a budget. It is widely available at building supply stores and comes in a decent range of colors and profiles.
Durability: Vinyl holds up reasonably well in moderate climates. Expect 15 to 25 years of service life in temperate regions. However, vinyl becomes brittle in sustained cold (below 0 degrees Fahrenheit) and can warp or sag in extreme heat (above 110 degrees Fahrenheit). It is also more susceptible to impact damage than aluminum.
Maintenance: Like aluminum, vinyl requires minimal maintenance. It will not rot or attract insects. However, the color is molded through the material, which means it cannot be painted easily. If the color fades (and it will, especially darker shades), the only fix is replacement.
Installation notes: Vinyl is the easiest material to work with. It cuts cleanly with a utility knife, fine-tooth saw, or tin snips. It snaps together quickly and does not require special tools. This makes it a popular choice for DIY homeowners, which means some of your customers may have attempted their own vinyl soffit work before calling you.
Drawbacks: Vinyl looks like vinyl. It lacks the crisp, finished appearance of aluminum or fiber cement. It can also rattle in high winds if not installed snugly. In fire-prone areas, vinyl is a concern because it melts and produces toxic fumes. Some jurisdictions have restrictions on vinyl use near fire-rated assemblies.
Wood: Traditional but High-Maintenance
Wood soffit and fascia cost $4 to $10 per linear foot depending on the species. Cedar and redwood sit at the higher end, while pine and spruce are more affordable but less naturally resistant to rot and insects.
Durability: Properly maintained wood lasts 15 to 20 years. Cedar and redwood can push that to 25 years or more thanks to their natural oils. However, “properly maintained” is doing a lot of heavy lifting in that sentence. Wood that is not primed, painted, and resealed on schedule will rot far sooner.
Maintenance: This is where wood falls behind every other option. Wood fascia and soffit need to be primed and painted on all six sides before installation. They need to be repainted every 5 to 7 years, and any cracks, checks, or exposed end grain need to be sealed immediately to prevent moisture intrusion. Most homeowners underestimate this commitment.
Installation notes: Wood is heavier than vinyl or aluminum and requires more fasteners. Use stainless steel or hot-dipped galvanized ring-shank nails to prevent corrosion staining. Pre-drill near the ends to prevent splitting. Wood soffit panels are typically site-built from tongue-and-groove boards or plywood, which adds labor time compared to pre-formed metal or vinyl panels.
Drawbacks: Beyond the maintenance burden, wood is susceptible to carpenter ants, termites, and woodpeckers. It swells and shrinks with humidity changes, which can open joints and allow water intrusion. For most residential projects, wood is only the right choice when historical accuracy or a specific architectural style demands it.
Fiber Cement: The Premium Middle Ground
Fiber cement soffit and fascia cost $5 to $12 per linear foot. Brands like James Hardie (HardieSoffit and HardieTrim) dominate this category. The material is a mix of cement, sand, and cellulose fibers, pressed and cured into panels and boards.
Durability: Fiber cement is arguably the most durable option. It resists rot, fire, insects, and UV degradation. A fiber cement installation can last 30 to 50 years with minimal maintenance. It does not dent like aluminum, crack like vinyl, or rot like wood.
Maintenance: Very low. Fiber cement holds paint exceptionally well and typically only needs repainting every 15 to 20 years. It does not warp, sag, or fade the way other materials do. The main maintenance task is inspecting the caulked joints and resealing as needed.
Installation notes: Fiber cement is heavy. A 12-foot soffit panel can weigh 15 to 20 pounds, compared to 3 to 5 pounds for an equivalent aluminum panel. You need more crew members, stronger scaffolding, and proper dust protection when cutting. Always cut fiber cement with a shear or a saw equipped with a dust-reducing blade, and wear a respirator. The silica dust is a serious health hazard.
Drawbacks: Cost and weight are the main barriers. Fiber cement also requires more careful handling during transport and installation because it can crack if dropped or flexed. It is not a good fit for contractors who want to move fast on high-volume residential work. It is, however, an excellent upsell opportunity for mid-range and custom projects.
Cost Comparison Summary Per Linear Foot
Here is a quick reference for planning estimates:
- Vinyl: $1.50 to $3.50 per LF (material only), 15 to 25 year lifespan, near-zero maintenance cost
- Aluminum: $3 to $6 per LF (material only), 30 to 40 year lifespan, near-zero maintenance cost
- Wood (cedar): $4 to $10 per LF (material only), 15 to 25 year lifespan, $1 to $2 per LF every 5 to 7 years for repainting
- Fiber cement: $5 to $12 per LF (material only), 30 to 50 year lifespan, $0.50 to $1 per LF every 15 to 20 years for repainting
When discussing options with homeowners, frame the conversation around total cost of ownership, not just the upfront price. A vinyl installation that costs $3,000 today but needs replacement in 15 years is not cheaper than an aluminum installation that costs $5,000 and lasts 35 years.
Ventilation Requirements and Soffit Vent Calculations
Proper attic ventilation is not optional. It is required by the International Residential Code (IRC Section R806), and most local building codes follow or exceed those standards. Getting the ventilation calculation right is one of the most valuable things you can do for your customer on a soffit and fascia job.
The Science Behind Attic Ventilation
Warm, moist air rises. In a home, that air migrates from the living space into the attic through ceiling penetrations, recessed lights, attic hatches, and vapor diffusion through the ceiling assembly. If that moisture has nowhere to go, it condenses on the underside of the roof deck, leading to mold growth, wood rot, and premature shingle failure.
In summer, an unventilated attic can reach temperatures of 150 degrees Fahrenheit or higher. That heat radiates down through the ceiling insulation and drives up cooling costs. It also bakes the shingles from below, accelerating their deterioration and potentially voiding the manufacturer warranty.
Proper soffit ventilation solves both problems by establishing a continuous airflow path from the eaves to the ridge.
Step-by-Step Vent Calculation
Here is how to calculate soffit ventilation for any project:
Step 1: Measure the attic floor area. For a simple rectangular footprint, multiply length by width. For complex shapes, break the footprint into rectangles and add them together. Example: A home with a 40-foot by 35-foot footprint has 1,400 square feet of attic floor area.
Step 2: Determine the ventilation ratio. If the system has both soffit (intake) and ridge (exhaust) vents with the intake/exhaust split between 50/50 and 60/40, use the 1:300 ratio. If the system has only soffit vents or only exhaust vents (unbalanced), use the 1:150 ratio.
Step 3: Calculate total NFVA. Divide the attic floor area by the ventilation ratio.
- Balanced system: 1,400 / 300 = 4.67 square feet total NFVA
- Unbalanced system: 1,400 / 150 = 9.33 square feet total NFVA
Step 4: Split between intake and exhaust. For a balanced system, divide the total NFVA in half. In our balanced example: 4.67 / 2 = 2.33 square feet of soffit (intake) ventilation needed.
Step 5: Convert to square inches. Multiply square feet by 144. In our example: 2.33 x 144 = 336 square inches of NFVA at the soffits.
Step 6: Check your soffit panel specs. A typical 16-inch wide vented aluminum soffit panel provides roughly 9 to 12 square inches of NFVA per linear foot. If your panels provide 10 square inches per LF, you need 336 / 10 = 33.6 linear feet of vented soffit panels minimum.
Step 7: Compare to the available soffit run. If the total soffit run on the home is 160 linear feet, 33.6 feet of vented panels is only about 21% of the total. That is achievable even with alternating solid and vented panels. If the calculation shows you need more vented area than you have soffit run, consider continuous vent strips, individual round vents, or increasing the NFVA rating of the panels you are using.
Special Ventilation Scenarios
Cathedral ceilings and vaulted roofs: These require ventilation in every rafter bay from soffit to ridge. Install baffles in each bay to maintain a minimum 1-inch air gap between the insulation and the roof deck. This is more labor-intensive than standard attic ventilation but absolutely necessary.
Hip roofs: Hip roofs have shorter ridge lines, which limits exhaust capacity. You may need to supplement with mushroom vents or power vents along the upper roof area. On the intake side, hip roofs often have soffit on all four sides, which actually makes it easier to get adequate intake ventilation.
Closed soffits with no previous ventilation: If you are adding soffit to an overhang that was previously open, you are enclosing air space that used to breathe freely. This is not the time to install solid panels. Use vented soffit and verify that the rafter bays are open to the attic space above the exterior wall top plate.
Spray foam attics: If the attic has closed-cell spray foam applied directly to the underside of the roof deck, the attic is a conditioned space and does not require soffit ventilation. However, this only applies when the foam creates a complete, unbroken air barrier. If in doubt, consult the foam installer or a building science professional.
Ventilation and Building Code Compliance
Always check the local code before finalizing your ventilation plan. While the IRC 1:300 and 1:150 ratios are the baseline, some jurisdictions have additional requirements. For example, some northern climate codes require a vapor barrier on the warm side of the attic insulation, and some coastal codes have specific requirements for wind-driven rain resistance in soffit vents.
Document your ventilation calculations on the project file. If there is ever a question about whether the installation meets code, having the math on paper protects you and your customer.
Common Soffit and Fascia Installation Mistakes and How to Avoid Them
Every experienced contractor has a list of mistakes they have seen (or made) on soffit and fascia jobs. Here are the most costly and common ones, along with how to prevent them.
Mistake 1: Installing Over Damaged Substrate
This is the most expensive mistake because it guarantees a callback. Covering rotted rafter tails, water-damaged sheathing, or compromised sub-fascia with new material does not fix the problem. It hides it. Within a year or two, the damage will migrate through the new material, and you will be back on the job tearing everything off and starting over.
How to avoid it: Probe every rafter tail and sub-fascia board with an awl or screwdriver before installing anything. If the tool sinks in, the wood is compromised. Replace it. Yes, this adds time and cost to the job, but it is far cheaper than a warranty callback.
Mistake 2: Ignoring Thermal Expansion
Aluminum expands roughly 1/8 inch per 10-foot length for every 50-degree Fahrenheit change in temperature. Vinyl expands even more. If you install panels tight against the receiving channel on a cold morning, those panels will buckle and warp by afternoon on a warm day.
How to avoid it: Always leave the manufacturer-recommended expansion gap. For aluminum, that is typically 1/4 inch at each end. For vinyl, it can be up to 3/8 inch. Do not fully seat the panels in the channel on hot days; leave extra room for contraction when it cools down.
Mistake 3: Overdriving Fasteners
When you crank a nail or screw too tight on a soffit panel, you pin the panel in place and prevent it from sliding during thermal expansion. The result is buckling, oil-canning (wavy appearance), or cracked panels.
How to avoid it: Drive fasteners to 1/32 inch above the nailing flange. The panel should slide freely back and forth on the fastener. If you are using a nail gun, back off the pressure until the nails sit slightly proud.
Mistake 4: Failing to Install Baffles in Rafter Bays
We have mentioned this multiple times in this guide because it is that common and that damaging. Without baffles (also called rafter vents or insulation stops), blown-in or batt insulation will eventually block the soffit vents. Once that happens, the attic loses its intake ventilation, moisture builds up, and problems cascade from there.
How to avoid it: Install a polystyrene or cardboard baffle in every rafter bay that has a vented soffit panel below it. The baffle should extend from the soffit vent area up past the top plate of the exterior wall by at least 6 inches. Staple it to the roof deck to keep it in place.
Mistake 5: Mismatching Fastener Metals
Using steel nails on aluminum panels creates a galvanic corrosion cell. The aluminum around each nail head will corrode, leaving dark stains and eventually loosening the fastener. The same thing happens when you use dissimilar metals in any combination.
How to avoid it: Match the fastener material to the panel material. Aluminum nails for aluminum panels. Stainless steel fasteners work with everything and are the safest universal choice. The small premium for stainless steel is nothing compared to the cost of replacing corroded panels.
Mistake 6: Poor Layout Planning
Starting a soffit run at a random point and ending up with a 2-inch sliver at the corner looks terrible. The same goes for fascia joints that fall right at eye level or in the middle of a visible wall.
How to avoid it: Plan your layout before you cut the first piece. Start from the most visible corner and work toward less visible areas. Center the panels on long runs so any partial pieces fall at the less conspicuous end. For fascia, stagger joints so they do not line up on adjacent courses, and orient overlaps away from the primary viewing angle.
Mistake 7: Neglecting the Drip Edge Connection
The transition between the drip edge and the fascia is a critical water management detail. If water gets behind the drip edge, it runs down the face of the sub-fascia and into the soffit cavity. Over time, this causes rot in the sub-fascia and water staining on the soffit panels.
How to avoid it: Make sure the drip edge extends over the fascia and into the gutter. On re-roofing jobs, install the drip edge over the fascia board and under the ice-and-water shield or underlayment. On soffit-only jobs where the roof is staying, inspect the existing drip edge and replace any sections that are bent, corroded, or improperly lapped.
Mistake 8: Not Communicating with the Homeowner
Many soffit and fascia callbacks are not about workmanship. They are about expectations. The homeowner expected a certain color match, a certain finish look, or a certain level of insect proofing, and the contractor did not discuss those details upfront.
How to avoid it: Walk the project with the homeowner before you start. Show them the materials. Explain what the finished product will look like. Point out any limitations (for example, a perfect color match to 20-year-old siding is not always possible). Set expectations, and document the conversation.
Estimating Soffit and Fascia Jobs: Material Takeoff and Labor Hours
Accurate estimating is the difference between a profitable soffit and fascia job and one that eats into your margins. Here is a detailed framework for building your estimates, whether you are using a spreadsheet, a pen and paper, or construction estimating software like Projul.
Material Takeoff: What to Measure
Fascia linear footage: Measure the total run of fascia around the roofline. Include all eaves, gable ends, and rake edges. Note the width (height) of the fascia board at each location because it may vary. On homes with multiple roof planes, each plane may have a different fascia height.
Soffit square footage: Measure the depth of the overhang (from the wall to the fascia) and multiply by the linear footage of the soffit run. Remember that soffit typically only runs along the eaves, not the rakes, unless the home has a boxed rake detail.
J-channel and F-channel: You need receiving channel on both the wall side and the fascia side of the soffit. Measure the linear footage and add 10% for waste and corner overlaps.
Corner posts and trim: Count the number of inside and outside corners. Each corner requires a mitered joint or a specialty corner piece.
Fasteners: A standard rule of thumb is one fastener per square foot of soffit and one every 12 inches for fascia and channel. Buy extra. Running out of matching nails on a Friday afternoon is a project killer.
Drip edge: If you are replacing or adding drip edge, measure the linear footage along the eaves and rakes separately (they often require different profiles).
Waste Factors
For straightforward rectangular soffits with few corners, plan for 10% material waste. For complex rooflines with multiple hips, valleys, dormers, and bay windows, increase that to 15% or even 20%. Fiber cement waste tends to be higher because the material is less forgiving of cutting errors.
Labor Hours Per Linear Foot
Labor productivity on soffit and fascia jobs depends on the material, the complexity of the roofline, the height of the work, and whether you are doing new installation or tear-off and replacement.
New aluminum soffit and fascia (simple roofline): A two-person crew can typically complete 25 to 35 linear feet per hour, or 200 to 280 linear feet per 8-hour day. This includes measuring, cutting, and installing soffit, fascia wrap, and trim channels.
New aluminum soffit and fascia (complex roofline): Drop to 15 to 25 linear feet per hour. Hips, valleys, dormers, and multiple roof planes add cutting time, ladder moves, and layout complexity.
Vinyl soffit and fascia: Vinyl installs roughly 10% to 15% faster than aluminum because it is lighter and easier to cut. Plan for 30 to 40 linear feet per hour on simple jobs.
Wood soffit and fascia: Wood is the slowest to install because of the additional steps: pre-priming, pre-painting, pre-drilling, and site-building soffit panels from individual boards. Plan for 15 to 20 linear feet per hour on straightforward runs.
Fiber cement soffit and fascia: Similar pace to wood due to the weight and the need for dust control during cutting. Plan for 15 to 25 linear feet per hour depending on panel size and crew experience.
Tear-off and disposal: If you are removing existing soffit and fascia before installing new material, add 0.03 to 0.05 labor hours per linear foot for tear-off, cleanup, and disposal. A 200 LF tear-off job adds 6 to 10 crew hours to the project.
Building the Estimate
Here is a framework for pricing a typical residential soffit and fascia job:
1. Materials: Sum up the cost of soffit panels, fascia stock, channels, trim, fasteners, and drip edge. Apply the appropriate waste factor.
2. Labor: Multiply the linear footage by your labor rate per LF. If your two-person crew costs $120 per hour and installs 30 LF per hour, your labor cost is $4 per LF.
3. Equipment: Include rental costs for scaffolding, boom lifts, or specialty brakes if needed. For most residential jobs, ladders and a portable brake are sufficient and already in your overhead.
4. Overhead and profit: Apply your standard markup. Most contractors target 35% to 50% gross margin on soffit and fascia work, depending on the market.
5. Disposal: If tear-off is involved, include dumpster rental or dump fees. A typical residential soffit and fascia tear-off generates 0.5 to 1 cubic yard of debris.
Tracking Actual vs Estimated Costs
The only way to improve your estimating accuracy over time is to compare your estimates against actual costs on completed jobs. Track the material quantities you actually used, the labor hours you actually spent, and the profit margin you actually achieved.
Projul’s construction estimating features make this easy by letting you build detailed estimates, assign costs to specific line items, and compare budgeted vs actual numbers after the job is complete. Over five or ten jobs, patterns emerge that let you fine-tune your per-LF rates and waste factors for your specific market and crew.
Quick-Reference Estimating Benchmarks
Here are ballpark numbers for planning purposes. Adjust these based on your local market, crew productivity, and material costs:
- Vinyl soffit and fascia (installed): $4 to $8 per LF
- Aluminum soffit and fascia (installed): $8 to $14 per LF
- Wood soffit and fascia (installed): $10 to $18 per LF
- Fiber cement soffit and fascia (installed): $12 to $22 per LF
- Tear-off and disposal (add-on): $2 to $4 per LF
- Rot repair (add-on): $10 to $30 per LF depending on severity
These ranges include materials, labor, overhead, and a reasonable profit margin. Your actual numbers will vary, but these benchmarks give you a starting point for rough estimates and budget conversations with homeowners.
Wrapping Up
Soffit and fascia installation is not the most glamorous work in construction, but it is essential. Done right, it protects the structure, improves energy efficiency, and gives the home a clean, finished appearance. Done wrong, it creates a cascade of problems that are expensive to fix.
Take the time to select the right materials, calculate your ventilation correctly, follow proper installation techniques, and avoid the common mistakes that trip up even experienced crews. Your customers will not call to thank you for their soffit; that is actually the best compliment you can get. It means the work is doing its job.
If you are looking for a better way to manage your exterior projects, from estimates to scheduling to final invoicing, schedule a demo with Projul and see how it works in the field.
Frequently Asked Questions
What is the difference between soffit and fascia?
How much ventilation does a soffit need?
Can you install new soffit over old soffit?
What is the best material for soffit and fascia?
How long does soffit and fascia last?
Do I need a permit to replace soffit and fascia?
How do you prevent ice dams with proper soffit ventilation?
What tools do I need for soffit and fascia installation?
Related Articles

Concrete Tilt-Up Construction: A Contractor's Complete Field Guide
Tilt-up construction accounts for roughly 15 percent of all industrial and commercial buildings in North America. This...
Read More →
How to Implement Construction Software Without Losing Your Mind
Most construction software rollouts fail. Not because the software is bad, but because the rollout was rushed. Here are...
Read More →
How Selections Can Pay for Themselves in Three Easy Steps
Most contractors lose thousands each year on wrong material orders, slow client decisions, and missed upsell chances....
Read More →