Concrete Saw Cutting Guide: Wet vs Dry, Blade Selection, Depth Control, and Joint Timing | Projul
Concrete saw cutting is one of those skills that separates a clean, professional slab from one that cracks in all the wrong places. Whether you are cutting control joints in fresh flatwork, making openings for plumbing, or removing damaged sections of a parking lot, getting it right comes down to choosing the correct method, the right blade, proper depth, and hitting the timing window.
This guide covers everything you need to know about concrete saw cutting, from the basics of wet versus dry methods all the way through joint layout and timing. If you have been doing this work for years, you will still find some useful details here. And if you are newer to flatwork, this will save you from learning the hard way.
Wet Cutting vs. Dry Cutting: When to Use Each
The first decision on any concrete cutting job is whether to go wet or dry. Both methods work, but they are suited for different situations, and choosing wrong can cost you time, blades, and money.
Wet Cutting
Wet cutting uses a constant stream of water directed at the blade during the cut. The water does three things: it cools the blade, flushes out the slurry (the mix of water and concrete dust), and controls airborne silica dust.
Use wet cutting when:
- You are making deep cuts (anything over 2 inches)
- You are cutting reinforced concrete with rebar or wire mesh
- The job requires extended cutting time
- You need to meet OSHA silica dust exposure limits (Table 1 compliance)
- You want maximum blade life
- You are cutting green concrete for control joints
Wet cutting is the go-to method for most professional flatwork operations. Walk-behind flat saws are almost always run wet. The water supply can come from a garden hose, an onboard tank, or a pressurized water system depending on the saw.
The downside is water management. You will have slurry runoff that needs to be contained, especially near storm drains, waterways, or finished surfaces. Many jurisdictions require slurry containment and proper disposal. Plan for this before you start cutting.
Dry Cutting
Dry cutting relies on air cooling from the blade segments and limits cut duration to prevent overheating. It is faster to set up since there is no water supply to deal with.
Use dry cutting when:
- You are making shallow cuts (under 2 inches)
- The cut is short and quick
- You are working indoors where water is a problem
- You need portability and speed over everything else
- You are doing demolition work where cut quality does not matter
With dry cutting, you must manage dust. OSHA’s silica rule (29 CFR 1926.1153) requires either wet methods or a vacuum dust collection system rated for the saw. Most handheld cut-off saws have a vacuum attachment port for this reason.
Dry cutting also wears blades faster. The segments heat up more without water cooling, and the bond holding the diamond particles breaks down quicker at high temperatures. If you are doing a lot of cutting, the blade cost difference adds up fast.
The Bottom Line
For most professional concrete work, wet cutting is the better choice. It is safer, easier on blades, and produces cleaner cuts. Dry cutting has its place for quick, shallow work and situations where water is impractical.
Blade Selection: Matching the Blade to the Job
Choosing the right diamond blade is just as important as choosing the cutting method. The wrong blade will cut slowly, wear out fast, or leave a rough, chipped edge.
Diamond Blade Types
Segmented blades have gaps (gullets) between the diamond segments. These gaps help clear debris and allow air cooling. Segmented blades are the most common choice for general concrete cutting. They cut aggressively and work well for both wet and dry applications. The tradeoff is a slightly rougher cut edge.
Continuous rim blades have no gaps in the diamond edge. They produce the smoothest, cleanest cuts with minimal chipping. Use these when cut appearance matters, like cutting decorative concrete, tile, or stone. They run cooler but cut slower than segmented blades. Best used wet.
Turbo blades have a serrated or wavy continuous rim that combines some of the speed of segmented blades with a cleaner cut than standard segments. They are a solid all-around choice and work well for both wet and dry cutting.
Diamond Bond Hardness
This is where a lot of guys get it wrong. The bond is the metal matrix that holds the diamond particles in the segment. It needs to wear away at the right rate to expose fresh diamonds.
- Hard bond blades wear slowly and last longer. Use these for cutting soft, abite materials like green (uncured) concrete, asphalt, and sandstone.
- Soft bond blades wear faster to expose new diamonds quickly. Use these for cutting hard materials like cured concrete, granite, and hard aggregate.
It sounds backward, but that is how it works. If you use a hard bond blade on hard concrete, the diamonds get polished smooth before the bond wears enough to expose new ones. The blade glazes over and stops cutting. If you use a soft bond on soft material, the bond wears too fast and the blade loses segments prematurely.
Blade Diameter and Arbor Size
Match your blade to your saw. Common sizes:
- Handheld cut-off saws: 12-inch or 14-inch blades with 1-inch or 20mm arbor
- Walk-behind flat saws: 14-inch to 36-inch blades depending on cut depth needed
- Circular saws (for light work): 7-inch or 8-inch diamond blades
Never use a blade rated for a lower RPM than your saw produces. A 14-inch blade rated for 4,400 RPM maximum should not go on a saw that spins at 5,500 RPM. This is a safety issue, not a suggestion.
Blade Quality and Cost
Cheap blades from the big box store will cut concrete. But if you are doing this work regularly, invest in professional-grade blades from manufacturers like Husqvarna, MK Diamond, or Diamond Products. The cost per cut is usually lower because they last significantly longer and cut faster.
A $50 blade that makes 200 linear feet of cuts costs you $0.25 per foot. A $150 blade that makes 1,000 linear feet costs $0.15 per foot. Do the math on your jobs and buy accordingly.
Depth Control: Getting it Right
Cut depth matters more than most people think. Too shallow and the joint does not work. Too deep and you weaken the slab or hit things you did not want to hit.
Control Joint Depth
The standard rule is one-quarter of the slab thickness. For a 4-inch residential slab, that means 1 inch minimum. For a 6-inch commercial slab, cut at least 1.5 inches deep.
This depth creates a weakened plane in the slab. When the concrete shrinks during curing (and it will shrink), the crack forms along this weakened plane, hidden inside the joint, instead of randomly across the surface.
Some engineers spec one-third slab depth for better crack control, especially in slabs with higher shrinkage potential. Follow the project specs if they call for deeper cuts.
Saw Depth Settings
Walk-behind flat saws have adjustable blade depth, usually controlled by a crank or lever. Set your depth before you start and check it periodically during long runs. Blade wear reduces your effective cut depth over time.
For handheld saws, depth control is all about technique. Mark your target depth on the blade guard with tape and watch it as you cut. Take your time and let the blade do the work instead of forcing it deeper.
What is Below the Slab
Before cutting existing concrete, know what is underneath. Post-tension cables, conduit, rebar, radiant heating lines, and utilities can all be hiding in or under the slab. Cutting a post-tension cable is extremely dangerous and can cause catastrophic slab failure.
For post-tensioned slabs, get the cable layout drawings and use ground-penetrating radar (GPR) to verify locations before cutting. This is not optional.
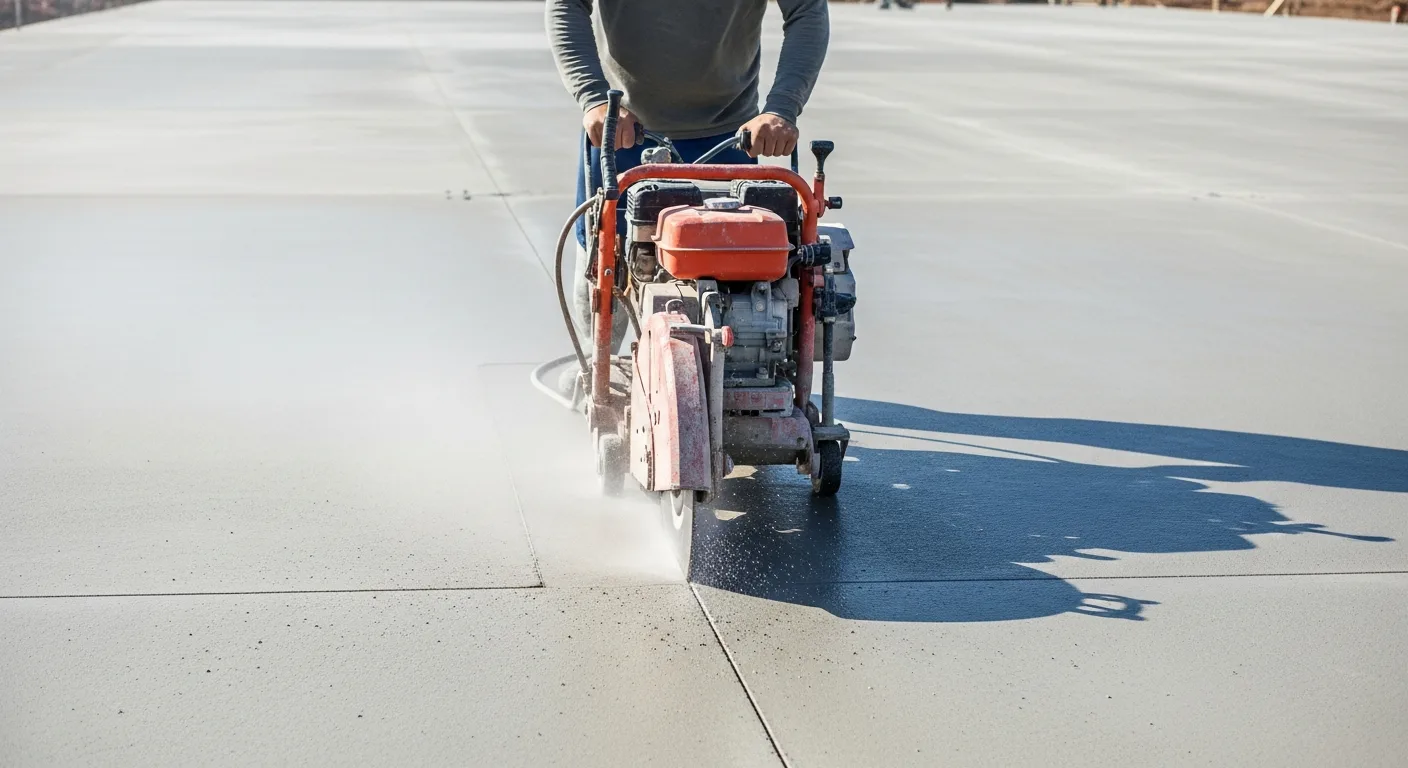
Joint Timing: The Most Critical Factor
You can have the right blade, perfect depth, and the best saw on the market, and still end up with a cracked slab if your timing is off. Joint timing is the single most important factor in successful control joint cutting.
The Cutting Window
Concrete needs to be hard enough to cut without raveling (the aggregate pulling out of the cut edge) but cut before shrinkage cracking begins. This window varies based on:
- Mix design: Higher cement content and lower water-cement ratio means faster setting
- Ambient temperature: Hot weather accelerates curing, cold weather slows it
- Humidity and wind: Low humidity and high wind speed up surface drying
- Admixtures: Accelerators shorten the window, retarders extend it
- Subgrade conditions: A dry, absorptive subgrade pulls moisture from the bottom faster
General Timing Guidelines
| Conditions | Cutting Window |
|---|---|
| Hot weather (above 90F) | 4 to 6 hours after finishing |
| Normal conditions (60F to 80F) | 6 to 18 hours |
| Cool weather (40F to 60F) | 12 to 24 hours |
| Cold weather (below 40F) | 24 to 48 hours (with blankets) |
These are starting points. The real test is the concrete itself.
The Scratch Test
Before firing up the saw, drag a nail or screwdriver across the surface. If the concrete is too soft, it will gouge easily and is not ready to cut. If it is hard enough that the nail barely marks it, you are in the window. If you see hairline cracks already forming, you are late. Cut immediately.
Early Entry Saws
Early entry (Soff-Cut style) saws changed the game for joint timing. These lightweight saws use a skid plate and small-diameter blade to cut joints as early as 1 to 4 hours after finishing, well before traditional flat saws can operate without raveling.
The advantages are significant:
- Cut before cracking starts, even in hot weather
- Lighter equipment means less risk of marking the surface
- Shallower initial cuts (typically 1 inch) are sufficient for crack control
- One person can cut joints much faster
If you are doing flatwork regularly, an early entry saw should be in your trailer. The Husqvarna Soff-Cut and similar models from other manufacturers run between $2,000 and $5,000, and they pay for themselves quickly in reduced callbacks from cracked slabs.
Joint Layout and Spacing
Knowing where to put joints is just as important as when to cut them.
Spacing Rules
The old rule of thumb is that joint spacing in feet should not exceed 2 to 3 times the slab thickness in inches. So a 4-inch slab gets joints every 8 to 12 feet. The American Concrete Institute (ACI) 302 recommends panels be as square as possible, with a length-to-width ratio no greater than 1.5 to 1.
Common spacing:
- 4-inch slab: 8 to 10 feet maximum
- 5-inch slab: 10 to 12 feet maximum
- 6-inch slab: 12 to 15 feet maximum
Closer spacing reduces cracking risk. When in doubt, add more joints.
Joint Layout Tips
- Joints should align with columns, corners, and reentrant corners
- Avoid L-shaped or T-shaped panels; these are cracking magnets
- Joints from one slab section should continue through adjacent sections when possible
- Joints at reentrant corners (inside corners of L-shaped pours) should extend to the nearest edge
- Mark your joint layout with chalk lines before cutting
Matching Existing Joints
When cutting joints adjacent to existing concrete, align your new joints with the existing ones. Misaligned joints create stress concentrations where the slabs meet and almost always result in cracking.
Equipment Maintenance and Safety
Blade Care
- Inspect blades before each use for cracks, missing segments, and uneven wear
- Dress glazed blades by making a few cuts in abrasive material like asphalt or a dressing brick
- Store blades flat or hanging to prevent warping
- Replace blades before they wear down to the steel core
Saw Maintenance
- Check water flow before starting wet cuts
- Inspect belts, guards, and handles before each shift
- Clean the saw after each use, especially the water system
- Keep the blade guard in place at all times
Safety
- Full-face shield or safety glasses with side shields
- Hearing protection (concrete saws run 100 dB or higher)
- Dust mask or respirator rated for silica (N95 minimum for dry cutting, P100 recommended)
- Cut-resistant gloves
- Steel-toe boots
- High-visibility vest on active job sites
OSHA takes silica exposure seriously. If you are dry cutting without proper dust controls, you are looking at citations starting at $16,000 per violation. Set up your dust collection or run wet. It is not worth the risk to your crew’s health or your business.
Tracking Your Cutting Operations
On bigger jobs with multiple pours and cutting schedules, keeping track of when each section was poured, when joints need to be cut, and which areas are complete gets complicated fast. Missed cutting windows mean cracked concrete and expensive repairs.
Construction management software like Projul helps you schedule cutting crews, track pour dates and times, and make sure nothing slips through the cracks (literally). When you have multiple crews working across several job sites, having a system that keeps everyone on the same page saves real money.
If you are still managing cutting schedules with text messages and sticky notes, check out a demo and see how much easier it can be.
Common Mistakes and How to Avoid Them
Cutting too late. This is the number one mistake. If you see cracks forming before you start cutting, you have already lost. Plan your cutting schedule before the pour and have equipment on site and ready.
Wrong blade for the material. Using a hard bond blade on cured concrete is like trying to cut with a butter knife. Match your blade bond to the material hardness.
Inconsistent depth. Control joints that vary between half an inch and two inches deep will not perform consistently. Set your depth and maintain it through the entire cut.
Cutting through post-tension cables. This can cause serious injury or death. Always verify cable locations before cutting post-tensioned slabs.
Ignoring dust control. Beyond the health risks, OSHA fines for silica violations can shut down a small operation. Use wet methods or proper vacuum systems on every cut.
Skipping blade inspection. A cracked or damaged diamond blade can fail catastrophically at operating speed. Ten seconds of inspection before each use is cheap insurance.
Final Thoughts
Concrete saw cutting is straightforward work, but the details matter. Get the timing right, choose the correct blade, maintain proper depth, and use the right method for the job. Do those four things consistently and you will produce clean, professional work that holds up for years.
The difference between a good concrete crew and a great one often comes down to planning and organization. Knowing when each section needs to be cut, having the right blades on site, and coordinating with other trades so your cutting schedule does not get bumped. Those are the details that project management tools handle well.
Keep your blades sharp, your timing tight, and your crew safe. That is how you build a reputation in this business.
Frequently Asked Questions
What is the difference between wet and dry concrete saw cutting?
How deep should you cut concrete control joints?
When should you cut concrete after pouring?
What type of blade is best for cutting cured concrete?
Can you cut concrete with a circular saw?
How do you prevent concrete from cracking during cutting?
What RPM should a concrete saw run at?
How much does concrete saw cutting cost?
Related Articles

Construction Punch List Software Comparison Guide: What Actually Matters
Not all punch list software is built the same. This guide breaks down what construction companies should actually look...
Read More →
Fire Sprinkler System Installation: Wet vs Dry Systems, Pipe Sizing, and Code Requirements
Fire sprinkler systems are one of those building components that nobody thinks about until they are needed. But for...
Read More →
10 Best Construction Management Software in 2026
Picking the right construction management software can save you thousands of hours and dollars every year. Here are the...
Read More →