Elevated Slab Formwork Guide for Contractors
Pouring a concrete slab six stories in the air is nothing like pouring one on grade. Everything below that slab, the forms, the shores, the reshores on the floors beneath, must work together to carry thousands of pounds per square foot of wet concrete until it can stand on its own. Getting the formwork wrong does not just mean a bad pour. It means a collapse.
This guide covers elevated slab formwork from the ground up: shoring systems, form design, reshoring sequences, pour planning, and the structural loading questions that drive every decision.
How Elevated Slab Formwork Works
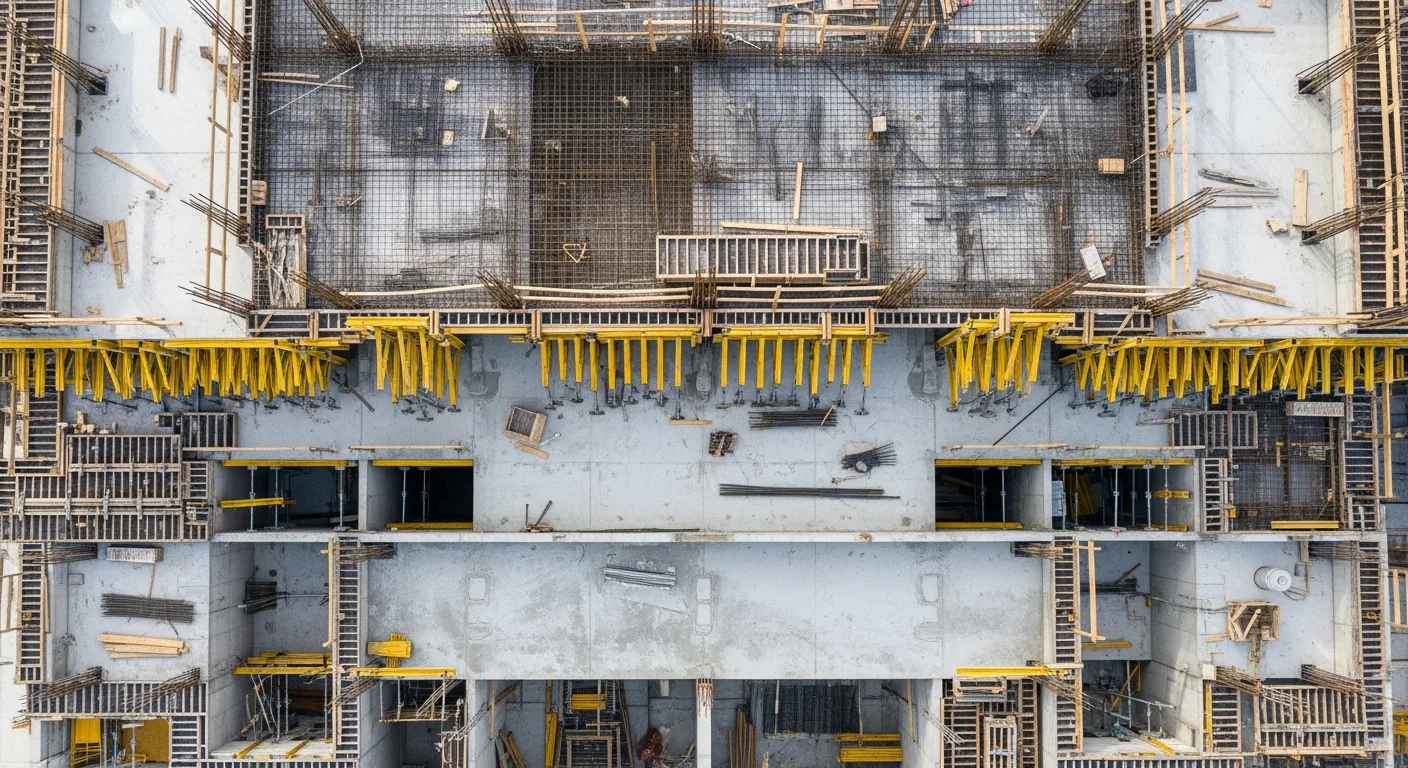
Elevated slab formwork is a temporary structure that holds wet concrete in place and transfers its weight down through the building until the new slab cures. The system has three main components:
- The form deck (also called the soffit form), which creates the bottom surface of the slab
- The shoring (vertical posts or frames) that supports the form deck and transfers load to the floors below
- The reshoring on lower floors that distributes construction loads so no single slab is overloaded
These components must be designed as a system. The form deck, shoring, and reshoring are all interconnected, and a failure in any one element can cause a progressive collapse through multiple floors.
Shoring Systems
Shoring is the vertical support that holds up the formwork and the weight of the wet concrete. There are several types, and the right choice depends on the slab weight, clear height between floors, and how quickly you need to cycle the forms.
Post Shores (Single-Post Shores)
These are individual steel or aluminum posts with adjustable screw jacks at the top and bottom. They are the simplest and most common shoring type for lighter slabs and shorter clear heights.
Advantages:
- Low cost per unit
- Quick to install and strip
- Adjustable height accommodates minor variations in floor-to-floor dimensions
Limitations:
- Individual post capacity is limited (typically 5,000 to 10,000 pounds depending on the manufacturer and extension height)
- Require cross-bracing to prevent buckling
- Not practical for clear heights much above 15 or 16 feet without intermediate bracing
Frame Shores
Frame shores are welded steel frames, typically 5 feet wide and available in various heights, that stack and connect with cross-braces. They offer higher load capacities than single-post shores and are more stable.
Advantages:
- Higher load capacity per unit of floor area
- Built-in bracing connections between frames
- Stack for multi-story shoring without additional engineering for each level
Limitations:
- Heavier to handle than individual posts
- Less flexibility in spacing and layout than post shores
- Require crane or forklift for delivery and placement on upper floors
Scaffolding-Based Shoring (Cup-Lock, Ring-Lock)
Modular scaffolding systems like cup-lock and ring-lock can double as shoring when properly designed. They use vertical standards with rosette or cup connections at regular intervals, allowing horizontal and diagonal bracing in any direction.
Advantages:
- Extremely flexible layout adapts to irregular floor plans
- High load capacity when properly configured
- Components serve double duty for access scaffolding and shoring
Limitations:
- More components to inventory and manage
- Assembly takes longer than frame shores for simple rectangular layouts
- Engineering design is more complex due to the number of possible configurations
Tower Shores (Heavy-Duty Shoring)
For very heavy slabs (post-tensioned slabs over 12 inches thick, transfer slabs, or slabs with heavy equipment loads), tower shores provide capacity that standard frames cannot match. These are engineered systems with heavy steel members and connection hardware designed for loads exceeding 20,000 pounds per leg.
Form Deck Systems
The form deck sits on top of the shoring and creates the bottom surface of the slab. The main options are:
Plywood on Joists
The traditional approach uses plywood sheets (typically 3/4-inch BB-OES or HDO plywood) supported by wood or aluminum joists (stringers), which sit on wood or aluminum beams (ledgers), which rest on the shores.
This system is versatile and can accommodate nearly any slab geometry, including steps, drops, and irregular edges. The plywood surface produces a smooth concrete finish, and HDO (high-density overlay) plywood can be reused many times with proper care.
Aluminum Panel Systems
Pre-engineered aluminum form panels snap together and rest directly on aluminum beams and shores. They are lighter than plywood systems, faster to erect, and can be reused hundreds of times.
These systems work best for repetitive floor layouts with minimal variation. They struggle with complex geometry, but for a standard flat plate or flat slab, they are extremely efficient.
Flying Table Forms
Flying forms are large, pre-assembled units consisting of a form surface, supporting trusses, and a rolling carriage. After stripping, the entire table rolls to the edge of the building and is crane-lifted to the next floor.
Flying forms are justified on projects with at least 5 identical floors, where the labor savings from eliminating repeated assembly and disassembly offset the higher initial cost. They require careful planning for crane access and a building geometry that allows the tables to be extracted from each floor.
Reshoring: Why It Matters and How It Works
Here is the core problem: when you strip the shores from under a freshly cured slab and immediately begin pouring the next floor above, the slab you just stripped must now support the full weight of the new pour plus the formwork. A young concrete slab at 7 or 14 days old may not have the strength to handle that load.
Reshoring solves this by distributing construction loads across multiple floor levels.
The Reshoring Sequence
A typical reshoring cycle works like this:
- Level 1 (ground floor) is poured on grade. No shoring issues.
- Level 2 formwork and shoring are erected on Level 1. Level 2 is poured. Shoring transfers the load to Level 1 slab and then to the ground.
- Level 2 gains strength. After reaching the specified strength (confirmed by cylinder tests), the Level 2 shores are stripped.
- Reshores are immediately installed under Level 2. These reshores are snug but not jacked tight. They do not lift the slab or introduce new forces. They simply provide support if the slab deflects under additional load.
- Level 3 formwork and shoring are erected on Level 2. The load from the Level 3 pour passes through Level 2 and is shared between Levels 1 and 2 via the reshores.
- This pattern continues upward. As each new floor is poured, reshores on the lower floors distribute the cumulative construction load.
How Many Levels of Reshoring?
The structural engineer determines the required number of reshoring levels based on:
- Slab thickness and self-weight
- Concrete strength gain curve (related to mix design and curing temperature)
- Construction live loads (workers, equipment, material storage)
- The capacity of each slab at its current age
- Construction schedule (how fast you are cycling floors)
A typical residential or office building with 8-inch flat slabs might require 1 level of shoring plus 2 levels of reshoring. A heavier structure with 14-inch post-tensioned slabs or transfer beams might need additional levels.
Common Reshoring Mistakes
Jacking reshores tight. Reshores should be snug, not loaded. Jacking them tight introduces forces into the slab that were not accounted for in the original structural design.
Removing reshores too early. Reshores must remain in place until the structure above no longer needs the load distribution. The engineer specifies when each level of reshoring can be removed.
Storing materials on reshored slabs. Stacking rebar, bundles of conduit, or pallets of block on a reshored slab can overload it. Material staging must be planned and controlled.
Pour Sequencing for Elevated Slabs
Large elevated slabs are rarely placed in a single continuous pour. Instead, they are divided into manageable sections with construction joints at engineered locations.
Factors That Determine Pour Sequence
Construction joint locations. The structural engineer specifies where joints are acceptable, typically at points of low shear and low bending moment. You cannot place a construction joint wherever it is convenient for your crew.
Concrete delivery rate. The batch plant’s production capacity and the number of trucks in the delivery cycle determine how much concrete you can place per hour. The pour must be planned so that fresh concrete is always placed against concrete that has not yet reached initial set.
Crew size and equipment. The number of finishers, the reach of the concrete pump, and the placement of the pump line all affect how much slab area you can cover in a shift.
Weather conditions. Hot weather accelerates set time, giving you less working time. Cold weather slows strength gain, affecting when you can strip. Wind increases evaporation from the fresh surface, creating plastic shrinkage cracking risks.
Time limits. Most concrete specifications require that successive lifts be placed within 60 to 90 minutes of each other to avoid cold joints. This time constraint drives the practical maximum pour size.
Planning the Pour
A good pour plan includes:
- A drawing showing the pour boundaries and sequence
- Construction joint locations and details (keyways, dowels, or roughened surfaces)
- Pump location and boom reach coverage
- Concrete delivery schedule (trucks per hour, batch plant distance)
- Crew assignments (placement, vibration, screeding, floating, finishing)
- Contingency plans for pump breakdown, weather delays, or delivery interruptions
- Target start time, expected duration, and latest acceptable finishing time
Structural Loading During Construction
One of the most overlooked aspects of elevated slab construction is the difference between the loads a slab will carry when the building is complete and the loads it must carry during construction.
Construction Loads Often Exceed Service Loads
Consider a typical 8-inch concrete slab designed for a 50 psf live load in an office building. During construction, that slab might simultaneously support:
- Its own dead load (100 psf)
- A level of shoring above, carrying the weight of the next slab being poured (another 100 psf plus formwork)
- Workers and equipment (50 psf or more)
- Stored materials on the slab (additional point loads)
The total construction load can easily reach 250 to 300 psf, far exceeding the 150 psf (dead plus live) the slab was designed for in service. This is exactly why reshoring and construction load analysis are so important.
The Engineer’s Role
ACI 347R provides guidance for analyzing construction loads on multistory structures. The structural engineer must verify that each slab, at its expected strength on the day it will be loaded, can safely carry its share of the construction loads. This analysis considers:
- Concrete strength gain over time (based on mix design, curing conditions, and cylinder test data)
- Load distribution through the shoring and reshoring system
- The number of floors being loaded simultaneously
- The maximum construction live load at any point during the schedule
If the analysis shows that a slab will be overloaded, the engineer has several options: increase the number of reshoring levels, slow the construction cycle to allow more strength gain, specify a higher early-strength concrete mix, or increase the slab thickness.
Formwork Inspection and Quality Control
Formwork failures almost always result from human error, not material deficiency. Inspection at every stage catches problems before they become disasters.
Before the Pour
A qualified person should inspect the following before any concrete placement:
- Shore alignment. All posts and frames must be plumb. Leaning shores have dramatically reduced capacity.
- Bearing surfaces. Shores must sit on stable, level surfaces capable of supporting the concentrated loads. Mudsills, steel plates, or the structural slab below must be adequate.
- Bracing. All required cross-bracing must be installed and connected. Missing or loose braces are the single most common cause of shoring collapse.
- Connections. Wedges, pins, and screw jacks must be properly seated and tightened.
- Form deck. The plywood or panel surface must be continuous, properly lapped, and free of gaps or damage that would cause concrete leaks.
- Elevation and camber. Verify that the form deck is at the correct elevation, including any specified camber (upward deflection built into the forms to account for expected slab deflection under load).
- Embeds and blockouts. Confirm that all embedded plates, anchor bolts, sleeves, and blockouts are installed per the structural and MEP drawings before concrete placement.
During the Pour
Monitor the formwork throughout the pour for:
- Deflection or movement of shores
- Concrete leaks through form joints
- Lateral displacement of the shoring assembly
- Unusual sounds (creaking, popping) that might indicate overstress
If any sign of distress appears, stop the pour immediately and evaluate before continuing.
Managing Formwork Operations with Software
Elevated slab formwork involves tight coordination between the concrete supplier, pump operator, forming crew, iron workers, MEP trades, and the inspection team. A missed inspection hold, a late concrete delivery, or a scheduling conflict between trades can delay a pour and cost thousands of dollars.
Projul helps contractors manage the scheduling, crew coordination, and documentation that formwork operations demand. Tracking pour dates, cylinder break schedules, reshoring removal approvals, and inspection sign-offs in one system keeps the concrete cycle on track and gives you a record of every decision.
Common Elevated Slab Formwork Mistakes
Not engineering the formwork. Guessing at shore spacing or using rules of thumb instead of engineering calculations is the most direct path to a collapse. Every formwork layout should be designed or reviewed by a qualified engineer.
Ignoring construction loads. Treating the slab as if it only needs to support its own weight, without accounting for the floors being built above, leads to overloading and cracking.
Stripping too early. Pressure to maintain schedule pushes crews to strip forms before the concrete has reached adequate strength. Always verify with cylinder tests.
Reusing damaged components. Bent shores, cracked frames, and delaminated plywood all have reduced capacity. Inspect every component and reject damaged ones.
Poor bearing conditions. Setting shores on loose fill, wet soil, or thin plywood over soft material creates settlement that unloads some shores and overloads their neighbors.
Cost Estimation and Budget Control for Elevated Slab Formwork
Formwork is one of the largest cost drivers in any concrete structure. On a typical multi-story building, formwork and shoring can account for 40 to 60 percent of the total concrete cost. Getting your numbers wrong on the estimate does not just eat your margin. It can put the entire project underwater before you finish the second floor.
Breaking Down the Cost Components
Formwork costs fall into four categories, and you need to track each one separately if you want any hope of controlling the budget.
Material costs. This includes the purchase or rental of shoring posts, frames, cross-braces, screw jacks, plywood, stringers, ledgers, form oil, nails, and all the consumables that go into building and maintaining the form system. Rental rates for aluminum panel systems or flying forms can run $2 to $5 per square foot of contact area per month, depending on the market and how long you need the equipment. Purchased plywood gets 3 to 8 uses on a good day, and HDO plywood stretches that to 20 or more uses with proper care and cleaning between pours.
Labor costs. This is where most contractors underestimate. Setting shores, building the form deck, stripping forms, cleaning and oiling panels, moving material between floors, and installing reshores all take labor hours. A skilled forming crew can set 200 to 400 square feet of slab formwork per carpenter per day, depending on the system and the complexity of the layout. Simple flat plates with aluminum panels go fast. Slabs with drop panels, beams, steps, and complex edge conditions slow everything down.
Engineering costs. Every formwork layout needs a design, and that design needs to be stamped by a licensed professional engineer in most jurisdictions. Formwork engineering can run $5,000 to $25,000 per floor depending on complexity, though many forming subcontractors include engineering in their package price. Do not skip this line item. The cost of engineering is a rounding error compared to the cost of a collapse.
Equipment costs. Cranes, forklifts, material hoists, and concrete pumps all factor into the formwork operation. Flying forms need a crane for every move. Even conventional systems require a way to get materials to upper floors. The crane time allocated to formwork operations should be tracked separately so you know what the forms are actually costing you.
Tracking Costs Per Floor Cycle
The real power in formwork cost control comes from tracking your cost per floor cycle and comparing it against your estimate as the building goes up. Your first floor will always be the most expensive because the crew is learning the layout, working out the kinks in the shoring plan, and dealing with the ground-level complications that do not repeat on upper floors.
By the third or fourth floor, your crew should be hitting a rhythm. If costs per floor are not dropping by that point, something is wrong: the layout is too complex, the crew is undermanned, materials are not staged properly, or the shoring system is wrong for the job.
Track these numbers on every floor cycle:
- Total labor hours for erect, strip, and re-erect
- Material waste and replacement cost
- Crane hours dedicated to formwork moves
- Concrete pump costs allocated to each pour
- Cylinder test costs and inspection fees
- Downtime hours from weather, delivery delays, or schedule conflicts
If you are running your projects through construction project management software, you can tag these costs to specific floor pours and compare cycle to cycle. That data becomes your most valuable asset when you are estimating the next multi-story job.
Reducing Formwork Costs Without Cutting Corners
There are legitimate ways to bring formwork costs down that do not involve skipping engineering or overloading shores.
Maximize reuse. The more times you can cycle a form system, the lower your cost per use. This means taking care of the forms: cleaning plywood after each strip, oiling before each set, storing components properly, and rejecting damaged pieces before they cause problems on the next floor.
Simplify the slab design early. Work with the architect and structural engineer during preconstruction to simplify the slab geometry. Every beam, drop panel, step, and edge condition adds forming cost. A flat plate with uniform thickness is the cheapest slab to form. If the structural engineer can eliminate beams by thickening the slab or adding column capitals, the formwork savings often offset the additional concrete cost.
Right-size the shoring system. Using heavy-duty tower shores where post shores would work is wasting money. Using post shores where frame shores are needed is unsafe. Match the system to the actual loads and heights on your project.
Pre-plan material staging. Moving shoring components and plywood around a job site costs labor hours. Plan where materials will be staged on each floor, how they will get there, and in what sequence they need to arrive. A forming crew that spends an hour every morning hunting for cross-braces is a forming crew burning your margin.
If you are working on construction estimating for your first multi-story project, build your formwork budget from actual production rates and rental quotes, not from square-foot allowances pulled from a cost book. The difference between a $12 per square foot formwork cost and a $20 per square foot cost on a 200,000 square foot building is $1.6 million.
Safety Planning for Elevated Slab Formwork Operations
Working at height with heavy materials, wet concrete, and temporary structures is one of the most hazardous activities in construction. Formwork collapses are not minor incidents. They kill people.
OSHA records show that formwork and shoring failures account for a significant percentage of construction fatalities each year. The causes are almost always preventable: missing bracing, overloaded shores, unstable bearing surfaces, or premature stripping. A solid safety plan is not a bureaucratic exercise. It is the thing that keeps your people alive.
Fall Protection
Elevated slab formwork creates open edges at every floor level. Until the slab is poured and the perimeter walls or barriers go up, workers on the form deck are exposed to falls of 10, 20, or 50 feet.
OSHA requires fall protection at 6 feet in construction (29 CFR 1926.501). For elevated slab work, this means:
- Perimeter guardrails installed at every open edge before the forming crew begins work on that level. Cable guardrails attached to the building columns or temporary stanchions are common.
- Personal fall arrest systems (harnesses and lanyards) when guardrails are not yet in place or are impractical for specific tasks like setting edge forms or working near large openings.
- Floor opening covers for stairwells, elevator shafts, and MEP shafts. These covers must be secured, marked, and capable of supporting twice the weight of workers and equipment that could cross them.
- Safety nets below the form deck on some projects, particularly where the clear height is very tall or the form deck has gaps that create secondary fall hazards.
Do not wait until someone falls to install fall protection. It goes up before the forming crew sets foot on the deck. Period.
Shoring Collapse Prevention
A shoring collapse is a catastrophic event. Unlike a fall, which typically involves one worker, a shoring failure can bring down an entire floor and everyone on it, plus the workers on the floors below.
Prevention starts with engineering and ends with inspection:
- Use engineered formwork designs. No improvisation, no guessing, no “we did it this way on the last job.” Every job gets its own design based on the actual loads, heights, and slab geometry.
- Inspect components before every use. Bent posts, cracked welds, stripped screw threads, and worn cross-brace pins all reduce capacity. Pull damaged components out of service immediately.
- Verify bearing surfaces. Every shore base must sit on a surface that can handle the concentrated load. On a structural slab, this usually is not a problem. On grade, you need mudsills or steel plates sized for the soil bearing capacity. Setting a shore on a piece of 2x10 sitting on soft clay is asking for a settlement failure.
- Install all bracing. Cross-bracing prevents lateral displacement, which is the failure mode that causes progressive collapses. Every brace shown on the engineering drawing gets installed. No exceptions.
- Control the pour rate. Placing concrete faster than the formwork was designed for creates hydraulic pressure that can blow out wall forms and overload slab shoring. Follow the design pour rate.
- Assign a competent person. OSHA requires a competent person to inspect formwork before, during, and after concrete placement. This person has the authority to stop the pour if they see anything wrong.
For more on keeping your crews safe during complex operations, see our guide on construction safety best practices.
Emergency Planning
Even with perfect engineering and inspection, you need a plan for when things go wrong. An emergency plan for elevated slab formwork should cover:
- Evacuation routes from upper floors that do not cross the active pour area
- Communication protocol for stopping the pour (air horns, radios, or other immediate signals)
- Rescue procedures for workers who fall into safety nets or are suspended in fall arrest harnesses (suspension trauma is a time-critical medical emergency)
- Medical response including the location of the nearest trauma center and helicopter landing zone for remote sites
- Contact list for the structural engineer of record, formwork engineer, and the general contractor’s safety director
Post the emergency plan where the forming crew can see it. Review it at the pre-pour safety meeting. And do not treat the pre-pour meeting as a paperwork formality. Walk through every hazard specific to that day’s pour.
Toolbox Talks and Pre-Pour Meetings
Before every elevated slab pour, hold a meeting with the entire crew: forming carpenters, iron workers, concrete pump operator, concrete finishers, and any other trades working in the area. Cover:
- The pour plan (sequence, volume, expected duration)
- Weather conditions and how they affect the pour
- Formwork inspection results and any items that were corrected
- Fall protection requirements and what is in place
- The stop-work authority (anyone can stop the pour for safety reasons)
- Emergency procedures and evacuation routes
- Communication plan during the pour
Document who attended and what was discussed. This is not just good practice. It is your defense if OSHA shows up after an incident.
Weather Considerations and Seasonal Planning
Concrete does not care about your schedule. It cures based on chemistry and temperature, and weather conditions have a direct impact on every phase of the formwork operation.
Hot Weather Concrete Placement
When ambient temperatures exceed 90°F, or when the combination of temperature, humidity, and wind creates rapid evaporation conditions, you are in hot weather territory. The problems multiply:
Accelerated set time. Concrete stiffens faster in hot weather, reducing your window for placement and finishing. A mix that gives you 90 minutes of working time at 70°F might give you 45 minutes at 95°F. This directly affects your maximum pour size because you cannot place fresh concrete against material that has already begun to set.
Increased water demand. Hot concrete needs more water to maintain workability, but adding water at the site reduces strength. The batch plant should adjust the mix with retarders, ice, or chilled water instead of adding water on site.
Plastic shrinkage cracking. Rapid evaporation from the concrete surface causes the top layer to shrink before the concrete below has set, creating a network of fine cracks. Fogging, windbreaks, and evaporation retarders help, but the formwork plan should account for these measures.
Higher early temperature. The heat of hydration combined with ambient temperature can push the concrete’s internal temperature above 160°F, which risks delayed ettringite formation (a long-term durability problem). Mass pours and thick slabs are particularly vulnerable.
For your formwork planning, hot weather means:
- Smaller pours (tighter time windows)
- Earlier start times (4:00 or 5:00 AM pours are common in summer)
- Faster form stripping is possible due to accelerated strength gain, but verify with cylinder tests
- More aggressive curing measures on the formed surfaces
We have a detailed breakdown of how temperature affects your concrete operations in our hot weather concrete guide.
Cold Weather Concrete Placement
ACI 306 defines cold weather as any period when the ambient temperature is below 40°F or is expected to fall below 40°F within 24 hours of placement. Cold weather creates the opposite set of problems:
Slow strength gain. Concrete cures through a chemical reaction that slows dramatically as temperature drops. At 50°F, concrete gains strength at roughly half the rate it does at 73°F. At 40°F, strength gain nearly stops. Below 32°F, the water in the concrete can freeze, permanently damaging the internal structure.
Longer shoring and reshoring periods. Because the concrete gains strength more slowly, you cannot strip forms or remove reshores as quickly. This directly affects your cycle time and your formwork inventory. If your schedule assumes a 7-day cycle per floor, cold weather might stretch that to 10 or 14 days. That means you need more sets of forms and shores to keep the building moving, or you accept a slower schedule.
Protection requirements. Freshly placed concrete must be kept above 50°F for curing. This means heated enclosures (typically polyethylene tarps over the form area with propane or electric heaters), insulated blankets on exposed surfaces, and temperature monitoring. The cost of winter protection adds significantly to the formwork budget.
Formwork adjustments for cold weather:
- Plan for longer cycle times and budget additional shoring sets
- Specify high-early-strength concrete mixes to offset slow strength gain
- Install temperature monitoring (thermocouples embedded in the slab) to track actual curing conditions
- Budget for heated enclosures and insulated curing blankets
- Adjust cylinder test schedules to reflect the slower strength gain curve
For a deeper look at cold weather concrete operations, check out our cold weather concrete placement guide.
Wind and Rain
Wind and rain create additional complications for elevated slab formwork:
Wind loads on shoring. Tall shoring systems act like sails. Open buildings without cladding or walls offer no wind resistance, and lateral wind loads on exposed shoring frames can cause displacement or collapse. The formwork engineer should account for wind loads in the design, and the field crew must monitor conditions. Most formwork engineers specify a maximum wind speed for the shoring system. If conditions exceed that limit, work stops.
Rain on the form deck. Water pooling on the form deck before the pour dilutes the concrete at the surface and weakens the slab bottom. Drain holes in the form deck and good housekeeping before the pour are basic requirements. If heavy rain is expected during the pour, have a plan to protect the fresh concrete surface with plastic sheeting.
Lightning. Crews working on an exposed elevated slab during a thunderstorm are at extreme risk. The project lightning safety plan should specify how far in advance of approaching storms the crew must evacuate the deck.
Seasonal Scheduling Strategies
Smart contractors plan their multi-story concrete schedules with the seasons in mind:
- Start foundations in late winter/early spring so the above-grade concrete work happens during warmer months
- Budget winter protection costs if the schedule forces winter pours, and carry that cost in the estimate from day one
- Accelerate cycle times in warm weather to bank schedule buffer for slower winter cycles
- Stage formwork inventory to account for the longer cycle times that cold weather creates
Weather is not a surprise. It happens every year in the same pattern. The contractors who plan for it protect their schedules and their budgets. The ones who treat it as an unforeseen condition lose money every winter.
Coordination Between Trades on Elevated Slab Projects
Getting the concrete right is only half the battle on a multi-story building. The forming crew, iron workers, MEP trades, and concrete finishers all need to work in the same space, often on the same day, in a sequence that does not create conflicts or rework.
The Pre-Pour Coordination Challenge
Before concrete can be placed on an elevated slab, several things must happen in a specific order:
- Formwork and shoring erected. The forming crew builds the deck and installs all shores and bracing.
- MEP rough-in. Electricians install conduit, boxes, and sleeves embedded in the slab. Plumbers install drain lines and sleeves. Mechanical contractors install any embedded HVAC components. Fire protection crews install sleeves for sprinkler risers.
- Reinforcing steel placed. Iron workers install bottom mat rebar, chairs, slab bolsters, then top mat rebar, followed by any post-tension tendons.
- Embedded items installed. Anchor bolts, embed plates, edge forms for slab steps, and any other items that get cast into the concrete.
- Inspections. The structural engineer or special inspector verifies rebar placement, tendon profiles, embeds, and formwork before the pour is approved.
- MEP final check. The MEP trades verify their embedded items one last time before concrete covers everything permanently.
If any of these steps falls behind schedule, the pour gets delayed. And a delayed pour on a multi-story building cascades upward through every subsequent floor.
Where Coordination Breaks Down
The most common coordination failures on elevated slab projects:
MEP trades not finishing in time. Electricians and plumbers often work on multiple projects and do not prioritize your slab embedment work until the last minute. Then they rush, make mistakes, and still are not ready for the scheduled inspection.
Rebar conflicts with MEP. Conduit runs that conflict with rebar placement create arguments, delays, and field modifications that require engineering approval. These conflicts should be caught in coordination drawings (BIM or 2D overlay) before anyone sets foot on the form deck.
Late embed requests. The steel fabricator or curtain wall contractor submits embed plate locations after the rebar is already placed. Now the iron workers have to move bars, the formwork crew has to add blockouts, and the engineer has to review the changes.
Inspection scheduling. The special inspector has a full calendar and cannot come on your schedule. If the inspection is not completed before the concrete trucks arrive, you either wait (expensive) or proceed without inspection (unacceptable on most projects and illegal on some).
How to Prevent Coordination Failures
Hold weekly pour coordination meetings. Starting two weeks before each scheduled pour, bring together the forming foreman, iron worker foreman, MEP foremen, and the project superintendent. Review the pour date, what needs to be complete by when, and who is behind.
Publish a detailed pre-pour checklist. List every embedded item, every inspection, every MEP rough-in task, and the responsible party and completion date for each. Post it on the floor and in the project trailer.
Use scheduling software. When your crew scheduling is visible to everyone on the project, trade foremen can see when their window opens and closes. Surprises drop dramatically when people can see the schedule in real time instead of hearing about it secondhand at a meeting they missed.
Build float into the MEP window. Instead of giving the MEP trades exactly enough time to complete their work, build in a buffer day. The cost of one extra day in the schedule is nothing compared to the cost of a blown pour date with 20 concrete trucks lined up and a pump sitting idle.
Document everything. When coordination failures happen (and they will), you need a record of who was responsible, what the delay cost, and how it affected the schedule. That documentation is critical for back-charge negotiations and schedule impact claims. A project management platform that tracks tasks, assignments, and completion dates gives you that paper trail without the shoebox full of daily reports.
Coordinating Crane Time
On multi-story concrete buildings, the crane is the bottleneck resource. Everyone needs it:
- The forming crew needs it to fly form tables, move shoring bundles, and deliver plywood
- The iron workers need it to land rebar bundles and post-tension reels
- The MEP trades need it to deliver conduit bundles and equipment to upper floors
- The concrete pump needs to be set up (and sometimes repositioned mid-pour)
- Material deliveries need to be unloaded and distributed
A crane schedule that is not coordinated daily results in trades standing around waiting for their turn, which burns labor hours at $50 to $80 per worker per hour. On a busy multi-story project with 40 or 50 workers on site, two hours of unplanned crane downtime can cost $4,000 to $8,000 in wasted labor alone.
The superintendent or project manager should publish a daily crane schedule the afternoon before, with specific time blocks for each trade. Formwork moves get priority on strip and erect days. Rebar gets priority on placement days. And the day before the pour, the schedule should be locked so there are no surprises.
Wrapping Up
Elevated slab formwork is a temporary structure that must be engineered with the same care as the permanent building. The shoring and reshoring system carries loads that often exceed the building’s design service loads, and it does so on a structure that gains strength day by day. Getting the design right, inspecting the installation, monitoring during the pour, and following the reshoring sequence are what separate a smooth concrete cycle from a catastrophic failure.
Plan it, engineer it, inspect it, and document it. That is the formula for elevated slab formwork done right.
Frequently Asked Questions
What is the difference between shoring and reshoring?
How many levels of shoring and reshoring are typically required?
When can you strip formwork from an elevated slab?
What are the most common shoring systems for elevated slabs?
How do you determine the pour sequence for a large elevated slab?
What loads must the formwork system support?
What is flying formwork and when is it used?
How do you prevent formwork failures?
Related Articles

Concrete Tilt-Up Construction: A Contractor's Complete Field Guide
Tilt-up construction accounts for roughly 15 percent of all industrial and commercial buildings in North America. This...
Read More →
How to Implement Construction Software Without Losing Your Mind
Most construction software rollouts fail. Not because the software is bad, but because the rollout was rushed. Here are...
Read More →
How Selections Can Pay for Themselves in Three Easy Steps
Most contractors lose thousands each year on wrong material orders, slow client decisions, and missed upsell chances....
Read More →