Low Voltage and Fiber Optic Cabling Guide

Construction Fiber Optic and Low Voltage Cabling Guide for Contractors
Ten years ago, low voltage cabling on a construction project meant a couple of phone jacks and maybe a coax run to each room. Today, you are looking at structured data networks, fiber optic backbones, security camera systems, access control, fire alarm networks, distributed audio, and smart building controls, sometimes all on the same project.
If you are a general contractor or specialty contractor who keeps running into bigger and more complicated cabling scopes, this guide is for you. We are going to break down the types of cables you will encounter, how to plan and install them correctly, what the code says, and how to keep your cabling subs from blowing up your schedule.
Whether you are building out a new office, a multi-family residential project, or a commercial space that needs serious data infrastructure, understanding fiber optic and low voltage cabling will keep you from making expensive mistakes.
Understanding Fiber Optic vs. Low Voltage Cable Types
Before you can manage a cabling scope, you need to know what you are actually dealing with. Here is a quick breakdown of the cable types that show up on modern construction projects.
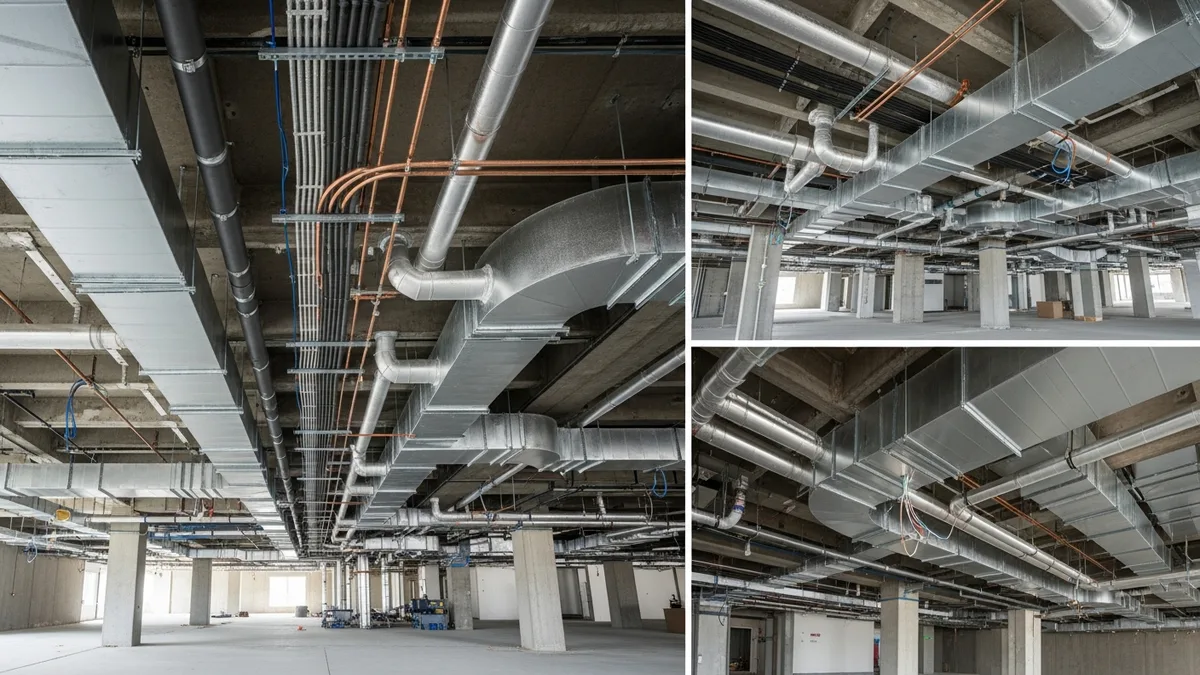
Low Voltage Copper Cables
The bulk of low voltage work on most projects involves copper cabling. The most common types include:
- Cat5e - Still functional for basic networks up to 1 Gbps, but it is increasingly being phased out in new construction. If an architect specs Cat5e in 2026, push back. It is not worth saving a few dollars per run when the building owner will want faster speeds in three years.
- Cat6 - The current standard for most commercial and residential projects. Supports 10 Gbps at shorter distances (up to 55 meters) and 1 Gbps at the full 100-meter limit. This is your bread and butter.
- Cat6a - The step up from Cat6 with full 10 Gbps support at 100 meters. Required for many healthcare, education, and enterprise projects. The cable is thicker and stiffer, which matters when you are planning conduit and pathway sizing.
- Coaxial (RG6) - Still used for cable TV distribution and some security camera systems, though IP-based cameras running on Cat6 are quickly replacing coax in most applications.
- Speaker wire and audio cables - Distributed audio systems use various gauges of speaker wire, typically 14 or 16 AWG for in-wall runs.
- Fire alarm cable - Usually 14 or 16 AWG shielded cable in red jacket. This has its own set of code requirements under NFPA 72 and is typically handled by the fire alarm sub, not the data cabling crew.
Fiber Optic Cables
Fiber comes in two main flavors:
- Single-mode (OS2) - Uses a very small core (9 microns) and transmits data over long distances, sometimes miles. This is what you see for building-to-building connections, risers in tall buildings, and connections back to the service provider. The yellow jacket is the giveaway.
- Multi-mode (OM3, OM4, OM5) - Uses a larger core (50 microns) and works for shorter runs, typically up to 300 to 500 meters depending on the grade. Aqua or violet jacket. Common for backbone runs within a building or campus.
Fiber is more expensive to terminate and requires specialized tools and training, but it carries significantly more data over longer distances with zero electromagnetic interference. If you are working on a project with a serious network infrastructure requirement, fiber is going to be part of the picture.
Planning and Design: Getting the Cabling Scope Right Before You Break Ground
The biggest mistakes in cabling happen long before anyone pulls a single cable. They happen during planning and design, when nobody is thinking carefully about where cables need to go and how they get there.
Pathway Planning
Every cable needs a path from point A to point B. That sounds obvious, but you would be surprised how often the cabling scope gets treated as an afterthought. You need to think about:
- Conduit sizing - A conduit should never be more than 40% filled per NEC guidelines. That means a 1-inch conduit can handle about four to five Cat6 cables comfortably. If you are running a bundle of 24 cables to a telecom room, you need bigger conduit or multiple runs.
- Cable tray and J-hooks - In commercial construction, cable tray and J-hooks are the standard support method for low voltage cables above drop ceilings. Plan the tray routes before the HVAC and sprinkler teams fill up all the ceiling space.
- Vertical risers - Multi-story buildings need dedicated riser pathways with fire-stopping at each floor penetration. These need to be coordinated with your permit tracking process since many jurisdictions inspect fire stops separately.
- Telecommunications rooms (TRs) - Every floor needs a dedicated telecom room or closet with adequate power, cooling, and backboard space. TIA-568 standards specify minimum room sizes based on the floor area served.
Coordination With Other Trades
Cabling does not exist in a vacuum. Your low voltage sub needs to coordinate with:
- The electrician, who is running power to the same areas and whose work typically goes in first
- The HVAC team, whose ductwork competes for the same ceiling space
- The plumber, especially in areas where water lines run near telecom rooms (hint: keep water away from electronics)
- The drywall crew, who needs to know where every low voltage box and bracket is before they start hanging board
If you are already managing subcontractors across multiple trades, add your cabling sub to those coordination meetings. They tend to get left out, and that is when conflicts happen.
Documentation
Get the cabling design documented before installation starts. At minimum, you need:
- A floor plan showing every cable drop location with a unique identifier
- A riser diagram showing backbone connections between floors and buildings
- A cable schedule listing every run with its origin, destination, cable type, and length
- A labeling standard that everyone agrees to before the first cable gets pulled
This documentation feeds directly into your testing and closeout process later. Skip it now and you will pay for it during commissioning.
Installation Best Practices That Save You From Rework
Pulling cable is not complicated work, but doing it correctly requires attention to detail. Here are the things that separate a clean installation from one that fails testing or causes problems after move-in.
Bend Radius
Every cable type has a minimum bend radius. Exceed it and you damage the cable, sometimes invisibly. For Cat6, the minimum bend radius is four times the cable diameter. For fiber optic cables, it depends on the type, but a general rule is 10 to 15 times the cable diameter. Sharp bends in fiber can crack the glass core and kill the signal entirely.
Watch your installers at corners, inside junction boxes, and where cables enter faceplates. These are the spots where bend radius violations happen most often.
Pull Tension
Cables have maximum pull tension ratings. For Cat6, the standard is 25 pounds of pulling force. Fiber has even lower limits. If your crew is yanking cables through conduit with a fish tape and brute force, they are likely exceeding these limits.
Best practice: use cable lubricant (yes, it exists specifically for this), pull cables in reasonable quantities rather than trying to stuff 50 runs through a conduit at once, and never use the cable itself as a pull rope. Attach a proper pull string or use a pulling grip.
Separation From Power
NEC requires minimum separation between low voltage and power cables. For unshielded twisted pair (which includes most Cat5e and Cat6), maintain at least 12 inches of separation from power lines running in parallel, or use a barrier. At crossing points where cables are perpendicular, the distance requirement is less strict, but you still want to maintain some gap.
This is where coordination with your electrical rough-in matters. If the electrician runs power lines first (as they should), the cabling sub needs to know where those runs are so they can maintain proper separation.
Firestopping
Every penetration through a fire-rated wall or floor assembly needs proper firestopping. This is not optional, and inspectors will flag it. Use UL-listed firestop materials rated for the specific cable type and penetration size. Your inspection checklist should include a specific line item for low voltage firestop verification.
Labeling
Label both ends of every cable run during installation, not after. Use a consistent numbering system that matches your cable schedule. Machine-printed labels beat handwritten ones for readability and durability. This sounds like a minor detail, but it saves massive time during testing, troubleshooting, and future maintenance.
Code Requirements and Standards You Need to Know
Low voltage cabling has its own set of codes and standards that are separate from (but related to) the standard electrical code. Here is what matters most.
NEC (National Electrical Code)
The NEC covers low voltage and fiber optic cabling in several articles:
- Article 725 - Class 1, 2, and 3 remote-control, signaling, and power-limited circuits. This covers security, fire alarm signaling, and control wiring.
- Article 770 - Optical fiber cables and raceways. This is your fiber optic rulebook.
- Article 800 - Communications circuits. This covers data and telephone cabling.
- Article 820 - Community antenna television (CATV) and radio distribution systems.
Each article has specific requirements for cable ratings (plenum vs. riser vs. general purpose), installation methods, and separation from power conductors. The most common gotcha is using the wrong cable rating for the space. If you are running cables in a plenum air-handling space (which includes most commercial drop ceiling areas), you need plenum-rated cables (CMP for copper, OFNP for fiber). Using standard PVC-jacketed cable in a plenum space is a code violation and a fire hazard.
TIA Standards
The Telecommunications Industry Association publishes the standards that define how cabling systems should be designed and installed:
- TIA-568 - The big one. Covers structured cabling system requirements, including cable performance specs, maximum distances, connector types, and testing requirements.
- TIA-569 - Covers telecommunications pathways and spaces, including conduit sizing, cable tray requirements, and telecom room specifications.
- TIA-606 - Administration standard for labeling and documentation.
- TIA-607 - Grounding and bonding for telecom systems. Yes, your telecom system needs its own grounding, separate from the electrical ground.
While TIA standards are not law in the same way NEC is, they are typically referenced in the project specifications and many jurisdictions incorporate them by reference. If the spec says “install per TIA-568 standards,” you are contractually obligated to follow them.
Local Amendments and Licensing
Here is where it gets tricky. Many states and municipalities have their own amendments to the NEC and their own licensing requirements for low voltage work. Some require a separate low voltage contractor license. Others allow the work to be done under a general electrical license. A few have almost no regulation at all.
Check your local requirements early in the bidding process. Getting hit with a licensing issue after you have already signed a contract is a headache nobody needs. This is similar to the permitting homework you should be doing on every project, as we covered in our permits guide.
Managing Your Cabling Subcontractors
Unless you are a specialty low voltage contractor yourself, you are probably subbing this work out. Managing cabling subs requires the same fundamentals as managing any other trade, but there are some specifics worth calling out.
Qualifying Your Sub
Before you hand off a cabling scope, verify:
- Proper licensing for low voltage work in your jurisdiction
- Relevant certifications (BICSI, manufacturer certifications for specific cabling brands)
- Insurance coverage, including the right business insurance for the work they are performing
- References from similar projects in terms of size and complexity
- An understanding of the testing and documentation requirements in the spec
Read real contractor reviews and see why Projul carries a 4.9/5 on G2.
A data cabling contractor who has spent the last five years wiring single-family homes may not be the right fit for a 200-drop commercial office build. Match the sub to the scope.
Scheduling the Work
Low voltage rough-in typically follows electrical rough-in and happens before insulation and drywall. But the timeline is tighter than most GCs realize. Your cabling sub needs:
- Access to the space after electrical and plumbing rough-in but before insulation
- Coordination with the electrical sub for shared pathways and separation requirements
- A clean work area, meaning the framing crew’s debris is picked up and the space is reasonably organized
- Return access after drywall and paint for finish work (terminating cables, installing faceplates, testing)
Build this into your crew scheduling from the start. Cabling finish work is one of those tasks that always seems to get squeezed at the end of a project, and rushed terminations lead to failed tests.
Testing and Acceptance
Every cable run should be tested after installation. For copper cables, this means channel testing with a certified cable tester (like a Fluke DSX series) that verifies the cable meets the performance standard it was designed for. For fiber, it means OTDR testing and insertion loss testing.
Your sub should provide test results for every single run, documented in a format that matches the project spec. These results become part of the closeout package. Do not accept a cabling installation as complete until you have passing test results for every run on the cable schedule.
If a run fails testing, the sub fixes it at their cost. Make sure your subcontract spells this out clearly. Failed cable runs are almost always an installation problem, not a materials problem, which means the responsibility falls squarely on the installer.
Future-Proofing: What to Install Now to Avoid Tearing Open Walls Later
One of the smartest things you can do on a cabling project is think about what the building will need five or ten years from now. Pulling extra cables during rough-in is cheap compared to opening finished walls later.
Run More Than You Think You Need
The rule of thumb in the industry is to install at least two data drops per workspace location. Many IT consultants recommend four. The cost difference between one drop and two drops at the same location is minimal during rough-in since you are already pulling cable through the same pathway.
Also consider running spare conduit or sleeves in areas where future expansion is likely. An empty conduit costs almost nothing during construction but saves thousands if the building owner wants to add a security system or AV infrastructure later.
Choose the Right Cable Grade
If you are deciding between Cat6 and Cat6a, lean toward Cat6a for any commercial project with a lifespan measured in decades. The cost premium is modest, and Cat6a will support 10 Gbps networking at full distance, which is quickly becoming the baseline for business networks.
For fiber, single-mode is more future-proof than multi-mode because it supports higher speeds over longer distances as transceiver technology improves. The cable itself does not change; only the equipment on each end gets upgraded.
Wireless Still Needs Wires
Here is something that surprises a lot of people: the growth of wireless networking actually increases the demand for structured cabling. Every wireless access point needs a wired connection back to the network. As buildings deploy more access points for better coverage and higher capacity, the number of cable drops going to ceiling-mounted locations keeps growing.
Plan for wireless access point locations during the design phase and run cables to those ceiling locations during rough-in. A typical commercial space needs one access point for every 1,500 to 2,500 square feet, though high-density environments like conference rooms and event spaces may need more.
Smart Building Infrastructure
Building automation, IoT sensors, IP-based lighting controls, and smart HVAC systems all ride on the low voltage cabling infrastructure. If the building is going to have any of these systems now or in the future, make sure the cabling backbone can support them.
This ties back to having properly sized pathways and enough spare capacity in your telecom rooms. A building that starts with 200 cable drops might need 400 in five years as more systems get connected. Plan the infrastructure to handle that growth.
Documentation for the Long Term
All of that planning means nothing if nobody can find the information later. Make sure your closeout package includes complete as-built drawings showing actual cable routes (not just the design intent), test results, labeling schedules, and equipment lists. Store digital copies where the building owner and their IT team can actually access them.
The contractor who leaves behind clean, thorough documentation is the contractor who gets called back for the next project. It is a small thing that makes a big impression, and it is one more reason why tracking your project details with a tool like Projul’s construction management software pays off in the long run.
Estimating and Bidding Low Voltage and Fiber Optic Work
Whether you are bidding cabling as part of a larger GC scope or you are a specialty contractor pricing the work directly, getting your numbers right on low voltage and fiber optic projects requires a different approach than most other trades. The materials are relatively inexpensive compared to mechanical or electrical work, but the labor is where projects get expensive fast. And the margin for error on pricing is thin because building owners often get multiple bids from cabling-only contractors who know their costs down to the penny.
Breaking Down the Cost Components
A typical cabling bid has four main cost buckets:
- Materials - Cable by the box or spool, connectors, faceplates, patch panels, cable tray, J-hooks, conduit, firestop materials, labels, and velcro ties. For a standard Cat6 drop, materials usually run $30 to $60 per drop depending on run length and the quality of components specified. Fiber materials are higher because the connectors and termination hardware cost more.
- Labor - This is where most of the money goes. A skilled cable installer can typically complete 8 to 12 Cat6 drops per day during rough-in, including pulling, supporting, and leaving enough slack at each end for termination. Termination and testing during finish adds another 15 to 20 minutes per drop. Fiber termination takes significantly longer, especially fusion splicing, which can run 30 to 45 minutes per splice point for an experienced technician.
- Testing and certification - If the spec requires channel certification (and it usually does on commercial work), factor in the time for testing every single run. A Fluke DSX-8000 or similar tester costs $15,000 to $20,000, so either your sub owns one or they are renting one for the project. Either way, that cost gets built into the bid.
- Overhead and profit - Like any other trade, you need to cover insurance, vehicle costs, tool maintenance, warranty reserves, and your margin. Specialty cabling contractors typically work on 15 to 25 percent margins depending on the market and project size.
Common Estimating Mistakes
The mistakes that blow up cabling bids are usually about underestimating labor, not materials. Watch out for:
- Long runs - A 200-foot cable pull takes more than twice as long as a 100-foot pull because of the added weight, friction, and difficulty of managing the cable. If your average run length is over 150 feet, adjust your labor rates upward.
- Difficult pathways - Running cables through an existing building with limited ceiling access, tight chases, or no conduit infrastructure takes two to three times longer than new construction with open framing and clear pathways.
- Coordination time - Your installers do not pull cable eight hours straight. They spend time coordinating with other trades, waiting for access, moving materials, and dealing with field conditions that differ from the drawings. Build in a 15 to 20 percent productivity factor for this reality.
- Scope creep - Building owners and their IT consultants love to add drops, move locations, and change cable types during construction. Make sure your contract has a clear change order process so you get paid for added work.
When you are putting together your estimate, using a structured approach through your construction budget management process helps keep all these line items visible and trackable. The last thing you want is to win a bid and then realize you forgot to price the firestop materials for 40 floor penetrations.
Getting Competitive Without Losing Money
The cabling market is competitive, and there is always a contractor willing to lowball a bid. Do not try to win on price alone. Instead, differentiate on:
- Testing and documentation quality (many low-bid contractors cut corners here)
- Warranty terms (offer a longer warranty if you are confident in your installation quality)
- Schedule reliability (if you consistently hit your dates, that is worth money to a GC)
- Clean workmanship (neat cable management in telecom rooms is a visible sign of professionalism)
These are the things that get you invited back for the next project and earn you referrals. Price gets you in the door, but execution keeps you there.
Troubleshooting Common Cabling Problems on the Jobsite
Even on well-planned projects, cabling issues come up. The faster you can identify and fix problems, the less impact they have on your schedule and budget. Here are the most common issues you will run into and how to deal with them.
Failed Cable Tests
When a cable run fails certification testing, the cause is almost always one of these:
- Bad termination - The most common culprit. A connector that was not punched down correctly, a wire in the wrong position, or a connector that was not fully seated. The fix is simple: re-terminate and retest. This is why you hire experienced termination technicians and not just whoever is available.
- Cable damage during installation - Kinks, crush points, or excessive pulling tension can degrade cable performance below the certification threshold. Sometimes the damage is visible (a kinked cable at a sharp corner), and sometimes it is not. If re-termination does not fix the failure, you may need to pull a new cable.
- Exceeding distance limits - Cat6 has a 100-meter channel limit (including patch cords on both ends). If a run exceeds that distance, no amount of re-termination will make it pass. The fix is either moving the telecom room closer to the drop or adding an intermediate distribution point.
- Cross-talk from adjacent cables - Poor cable management at patch panels or bundles of cables pulled too tightly together can cause near-end cross-talk (NEXT) failures. Unbundle the cables, dress them neatly, and retest.
Fiber Issues
Fiber problems are less common but harder to diagnose without the right equipment. The most frequent issues include:
- Dirty connectors - Fiber connectors are extremely sensitive to contamination. A single speck of dust on a connector endface can block enough light to cause a failure. Always clean connectors with proper fiber cleaning tools before testing or making connections. This is not optional, it is standard procedure.
- Bad splices - Fusion splices that were not properly aligned will show high loss on OTDR testing. The fix is to cut out the bad splice and redo it. Mechanical splices are more prone to issues than fusion splices, which is why fusion splicing is preferred on any project where performance matters.
- Macro-bending - Fiber that is bent too tightly around corners or compressed by cable ties will lose signal. Walk the cable route and look for any point where the fiber is bent below its minimum bend radius. Relieve the bend, retest.
- Wrong fiber type - It sounds basic, but using multi-mode fiber where single-mode was specified (or vice versa) happens more often than anyone wants to admit. The cables look similar, and if someone grabs the wrong spool off the truck, you will not know until testing. Color coding helps: single-mode jackets are yellow, OM3/OM4 multi-mode is aqua, and OM5 is lime green.
Physical Conflicts With Other Trades
This is the one that causes the most frustration on jobsites. Your cabling sub comes back to finish their work and finds that:
- The HVAC crew hung a duct right where the cable tray was supposed to go
- The electrician ran conduit through the space allocated for the telecom room backboard
- The drywall crew covered up low voltage boxes that were not properly marked
- Someone cut through cable bundles while doing other work in the ceiling
Prevention is better than cure here. Regular coordination meetings, clear marking of low voltage infrastructure, and walking the site before drywall closes up the walls will catch most of these conflicts early. When they do happen, document the conflict, determine who is responsible, and get it resolved through your project management process. Having everything tracked in one place through your construction project management system makes it much easier to sort out who needs to fix what and who pays for it.
Closeout and Commissioning for Cabling Projects
The closeout phase on a cabling project is where sloppy contractors get exposed and thorough contractors earn their reputation. A clean closeout protects you from warranty claims, makes the building owner’s IT team happy, and gives you the documentation trail you need if disputes come up later.
What Goes in the Closeout Package
A complete cabling closeout package should include all of the following:
- As-built drawings - These show the actual installed cable routes, not the original design drawings. They should reflect every change, addition, and deviation that happened during construction. Mark up the original drawings or create new ones, but make sure they match what is actually in the walls and ceilings.
- Cable test results - Every single cable run should have a documented test result showing it passed the required performance standard. For copper, this means channel test results from a certified tester. For fiber, this means OTDR traces and insertion loss test results. Organize these by cable ID so anyone can find the test result for a specific run.
- Labeling schedule - A complete list of every cable label, what it connects (both ends), and the cable type. This should match the physical labels on the cables, patch panels, and faceplates.
- Warranty documentation - Most structured cabling manufacturers offer extended warranties (15 to 25 years) when their products are installed by certified installers and the installation passes certification testing. Make sure you have the warranty registration paperwork and that it transfers to the building owner.
- Product data sheets and cut sheets - Copies of the specification sheets for every product installed, including cable, connectors, patch panels, cable tray, and any active equipment if it was part of your scope.
- Firestop documentation - Test reports or manufacturer documentation for every firestop installation, including the UL system number used and photos of the installed firestop before it was concealed.
Commissioning vs. Testing
Testing tells you whether individual cable runs meet their performance specs. Commissioning tells you whether the entire cabling system works as a system. The difference matters.
During commissioning, the building owner’s IT team (or their consultant) will connect network equipment to the cabling infrastructure and verify that everything works end to end. They will test actual data throughput, verify that patch panel ports are labeled correctly, confirm that cables go where the drawings say they go, and generally make sure the system is ready for occupancy.
As the contractor, you want to be present during commissioning so you can address any issues immediately rather than getting a punch list two weeks later. Most commissioning issues are minor (a label in the wrong spot, a patch cord that needs replacing) but they go faster when the installer is on site.
Punch List Items Specific to Cabling
Cabling punch lists tend to include the same items over and over. Knowing what to look for helps you catch these before the owner’s team does:
- Faceplates that are crooked, have gaps around the edges, or do not match the specified color
- Cable bundles visible below the ceiling grid line
- Missing or illegible labels
- Patch panels that are not neatly dressed (cables should be managed with horizontal cable managers, not hanging loose)
- Telecom room organization issues like missing rack screws, unsecured equipment, or cables draped across the floor
- Firestop that was not installed or does not match the specified system
Walk every telecom room and spot-check 10 to 15 percent of drops before you call the owner in for commissioning. Fix the obvious stuff first. Your construction closeout process should include these cabling-specific items right alongside the general closeout checklist.
Handing Off to the Building Owner
The handoff meeting is your chance to show the building owner that their cabling infrastructure was installed professionally and thoroughly documented. Walk them through the telecom rooms, explain the labeling system, show them where the as-built drawings and test results are stored, and review the warranty terms.
If you did the job right, this meeting takes 30 minutes and ends with a handshake. If you cut corners, this meeting takes two hours and ends with a punch list. Invest the time upfront and the closeout takes care of itself.
Safety Considerations for Cabling Installers
Low voltage work is generally safer than high voltage electrical work, but it is not without risks. Contractors who treat cabling as “safe” because the voltage is low are missing several real hazards that cause injuries on jobsites every year.
Working at Heights
A huge percentage of cabling work happens above drop ceilings, on ladders, or on scissor lifts. Falls are the number one cause of serious injury in the cabling trade. Your cabling sub should have a fall protection plan that covers:
- Proper ladder selection and use (fiberglass ladders if there is any chance of contact with electrical systems)
- Scissor lift and aerial lift certification for operators
- Ceiling grid weight limits (drop ceiling grids are not designed to support a person’s weight, and installers who lean on the grid or use it as a handhold are asking for trouble)
- Tie-off requirements when working from lifts or at unprotected edges
Make sure your cabling sub’s safety program is documented and that their workers are trained. This is not just good practice, it is required, and it ties into your overall construction safety program.
Eye Protection for Fiber Work
Fiber optic cables transmit invisible laser or LED light. Looking into the end of an active fiber or staring at the output of a fiber test source can cause permanent eye damage. This is not theoretical, it happens. Every worker handling fiber should wear appropriate eye protection, and no one should ever look directly into a fiber connector or the output of test equipment.
Fiber scraps are another eye hazard. When technicians cleave (cut) fiber during termination, the tiny glass shards are nearly invisible and can easily get into eyes or skin. Fiber work areas should have a dark work mat to catch scraps, and all scraps should be collected and disposed of properly, not swept onto the floor where someone can step on them or pick them up.
Dust and Particulates
Drilling through concrete, cutting cable tray, and working in older buildings with disturbed insulation all create dust exposure risks. Cabling installers should have appropriate respiratory protection when drilling or cutting, and they should be aware of potential asbestos or lead paint in older buildings.
Electrical Contact
While the cabling itself is low voltage, the spaces where cables are installed often contain high voltage wiring. Accidental contact with power conductors while pulling cables through shared pathways is a real risk. Your sub’s workers should treat every unknown wire as energized until proven otherwise, and they should use voltage testers before reaching into junction boxes or panels.
Building owners sometimes repurpose spaces in ways that put unexpected power sources near telecom infrastructure. A telecom room that was originally a storage closet might have a 240-volt outlet for a piece of equipment that is long gone but still energized. Never assume a space is safe just because it is labeled as a telecom room.
See how Projul makes this easy. Schedule a free demo to get started.
Getting fiber optic and low voltage cabling right is not about being a cabling expert. It is about understanding enough to plan properly, hire the right subs, coordinate the work with other trades, and hold everyone to the standards the project demands. Do that, and this scope becomes just another part of the job instead of a source of surprises and change orders.
Frequently Asked Questions
What is the difference between low voltage and high voltage cabling in construction?
Do you need a license to install low voltage cabling?
When should fiber optic and low voltage cabling be installed during construction?
Can fiber optic cables be run in the same conduit as electrical wiring?
How much does low voltage cabling cost per drop in new construction?
Related Articles
Construction Electrical Rough-In Guide for General Contractors
The electrical rough-in is where circuit layout, box placement, and wire routing all have to come together before...
Read More →
Interior Finishing for Contractors: The Complete Drywall, Paint, and Trim Guide
Interior finishing is where your project goes from bare studs to a space your client can actually picture living in....
Read More →
Helical Piles and Screw Foundations: The Contractor's Complete Guide
Helical piles are showing up on more and more project specs. This guide covers everything a contractor needs to know...
Read More →