Construction Masonry Management Guide
Construction Masonry Management: What GCs Need to Know About Brick, Block, and Stone
If you have been running jobs for any length of time, you know that masonry is one of those trades that looks straightforward until it isn’t. A good mason crew makes it look easy. A bad one can set your schedule back weeks and leave you with walls that need to come down and go back up.
The reality is that most GCs don’t come from a masonry background. You might know framing inside and out, or you cut your teeth on concrete work. But when it comes to brick, block, and stone, a lot of general contractors are relying on their subs to get it right without fully understanding what “right” looks like.
That’s a problem. Because when you don’t understand the trade, you can’t manage it. And when you can’t manage it, you lose money.
This guide covers what you actually need to know to run masonry scopes without getting burned. No theory, no fluff. Just the stuff that matters on real job sites.
Understanding the Three Main Masonry Types
Before you can manage masonry work, you need to understand what you’re working with. The three primary materials each have different costs, installation methods, structural properties, and scheduling considerations.
Concrete Masonry Units (CMU Block)
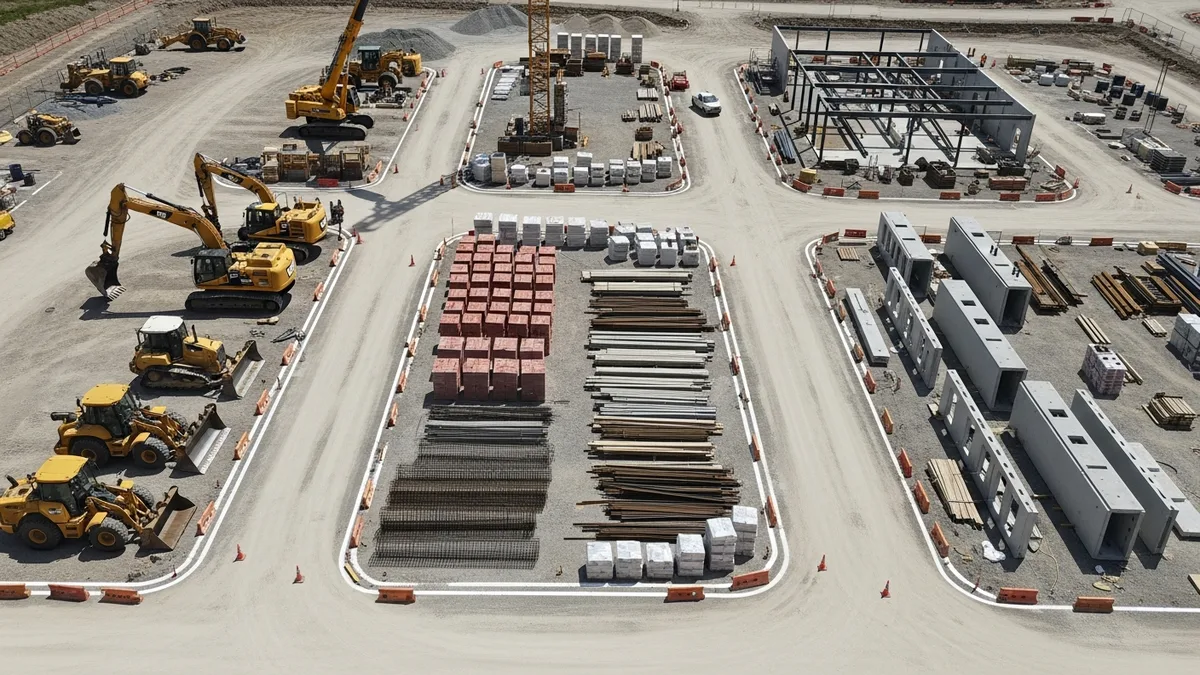
CMU is the workhorse of commercial and residential construction. Standard blocks are 8x8x16 inches (nominal), though you will see 4-inch, 6-inch, 10-inch, and 12-inch widths depending on structural requirements. They go up relatively fast, they’re cost-effective, and they can be reinforced with rebar and grout to carry serious loads.
Most GCs are comfortable with CMU because it shows up on so many project types. Foundation walls, retaining structures, elevator shafts, fire-rated separations, and exterior walls all use block. If you have done any commercial work, you have dealt with CMU.
The key thing to watch with block is grout and reinforcement. The structural engineer specifies which cells get rebar and grout, and skipping or misplacing reinforcement is one of the most common masonry defects. Your inspector will catch it eventually, but by then you might have 20 courses of wall that need to come down. If you’re also working on retaining walls, the reinforcement details get even more critical since those structures are fighting lateral soil pressure every day.
Brick
Brick comes in two main flavors: structural and veneer. Structural brick carries load. Veneer brick is a facing material tied back to a structural backup wall (usually CMU or wood framing) with metal ties.
Most residential and light commercial brick work is veneer. The brick itself isn’t holding anything up. It’s there for appearance, weather protection, and durability. But that doesn’t mean it’s simple. Veneer brick requires proper air space, flashing, weep holes, and tie spacing. Miss any of those details and you are looking at moisture problems down the road. We cover related moisture issues in our waterproofing guide, and the principles overlap heavily with masonry wall assemblies.
Brick also comes in about a thousand colors, textures, and sizes. Getting the right product specified and ordered early is critical because lead times on specialty brick can stretch to 8 or 10 weeks. Sometimes longer.
Natural and Manufactured Stone
Stone is the premium option. Natural stone (limestone, granite, sandstone, bluestone) costs more, weighs more, and takes longer to install. Manufactured stone veneer is lighter and cheaper but still requires skilled installation.
Natural stone work is a specialty within a specialty. Not every mason crew can do it well. The cutting, fitting, and setting of natural stone requires experience that you simply cannot rush. If your project has a significant stone scope, make sure your sub has a portfolio of similar work. Ask for references and go look at their finished projects in person.
Manufactured stone veneer has gotten popular on residential projects because it gives you a stone look at a fraction of the weight and cost. But the installation details matter. It needs a proper drainage plane, the right scratch coat, and correct flashing at transitions. Failures in manufactured stone veneer are almost always moisture-related.
Estimating Masonry: Where Most GCs Get It Wrong
Masonry estimating trips people up because there are so many variables. Square footage alone doesn’t tell you what a wall is going to cost. Two walls with the same square footage can have wildly different price tags depending on the details.
Here’s what drives masonry costs:
Material selection is the obvious one. Standard gray CMU is cheap. Custom-color split-face block costs more. Common brick is reasonable. Hand-molded brick imported from a specialty manufacturer is going to hurt. Make sure your estimating process accounts for the specific products called out in the specs, not just generic unit prices.
Wall complexity matters more than most people realize. A straight, uninterrupted wall goes up fast. A wall with multiple openings, corners, pilasters, corbels, soldier courses, and pattern changes takes two or three times as long per square foot. Your sub knows this, which is why their bid on the “simple” elevation is so much lower than the “fancy” one.
Reinforcement and grouting add labor and material cost. A fully grouted and reinforced CMU wall costs significantly more than a standard hollow wall. Make sure you’re reading the structural drawings carefully and pricing accordingly.
Access and scaffolding are often underestimated. Masonry work above 5 or 6 feet requires scaffolding. Someone has to supply it, erect it, move it, and take it down. Clarify in your scope documents who carries that cost. If it’s the mason sub, it’s baked into their price. If it’s on you as the GC, budget for it separately.
Waste factors vary by material. CMU waste runs 3 to 5 percent on a typical job. Brick waste is usually 5 to 8 percent, sometimes higher with complex patterns. Natural stone waste can hit 10 to 15 percent depending on the cutting required. If you’re estimating tight, these percentages make a real difference on material cost.
Mortar and accessories add up quietly. Mortar, sand, wall ties, flashing, reinforcement, grout, lintels, sealant, and joint reinforcement are all separate line items. Don’t let them surprise you.
Read real contractor reviews and see why Projul carries a 9.8/10 on G2.
The bottom line with masonry estimating: get specific early. Vague scopes produce vague bids, and vague bids produce change orders. Write a tight scope of work, reference the drawings and specs, and make sure every bidder is pricing the same thing.
Scheduling Masonry Work: Timing, Sequencing, and Weather
Masonry is one of the most weather-sensitive trades on any project. It’s also one of the hardest to reschedule because good crews are always booked. Getting the timing right requires planning that starts well before your mason shows up on site.
Lead times matter. Book your masonry sub early. If you’re working with a scheduling tool, plug in your masonry scope with realistic durations and buffer time. A crew of four masons with two tenders can lay roughly 400 to 500 CMU blocks per day under good conditions. Brick production is lower, usually 300 to 400 units per mason per day for standard running bond. Stone is slower still.
Sequencing with other trades is where things get complicated. Masonry walls often need to be in place before steel, roofing, or mechanical rough-in can proceed. On a CMU building, your masonry is your structure. Everything else keys off of it. That means a masonry delay cascades through your entire schedule.
On projects with brick or stone veneer over wood or steel framing, the sequencing is different. The structure goes up first, and the masonry veneer follows. But the veneer crew still needs scaffolding access, which can conflict with window installation, exterior sheathing, and other envelope work. Coordinate access carefully.
Weather is the biggest variable. As we discuss in our weather planning guide, you need to be watching forecasts constantly during masonry operations. The key temperature thresholds are:
- Below 40°F: Cold weather protection required (tarps, heaters, insulated blankets)
- Below 20°F: Most specs prohibit masonry placement entirely
- Above 100°F: Hot weather precautions needed (fog spray, shading, pre-wetting units)
- Rain: No masonry placement on wet surfaces or during precipitation
A week of bad weather during your masonry scope can push your project back two weeks or more by the time you account for the crew’s next availability. Build weather contingency into your schedule from the start.
Material staging needs advance planning too. A pallet of CMU block weighs about 2,800 pounds. A pallet of brick weighs around 2,200 pounds. You need a plan for delivery, storage, and distribution on site. The material needs to be close enough that the crew isn’t spending half their day moving it around, but not so close that it’s in everyone else’s way. Think about forklift access, staging areas, and how material will get to upper floors if applicable.
Managing Your Masonry Subcontractor
Your masonry sub relationship is one of the most important on any project that includes significant masonry scope. Getting this right comes down to clear communication, fair expectations, and staying on top of the details.
Scope clarity is everything. Your subcontract should spell out exactly what the mason is responsible for and what falls on other trades. Common gray areas include: Who supplies scaffolding? Who provides the forklift or crane for material distribution? Who installs flashing and through-wall accessories? Who handles cleanup? Who is responsible for protection of finished work?
If your subcontractor management process doesn’t nail down these details before work starts, you will be arguing about them during the job. And arguments during the job cost money.
Pre-construction meetings are not optional. Before your mason starts, sit down with the foreman and walk through the plans. Review the spec section (usually 04 20 00 for unit masonry and 04 70 00 for stone). Talk through the sequence, identify potential conflicts with other trades, and agree on daily production targets.
This meeting is also where you confirm mortar type and color, joint profile, coursing heights, bond pattern, and any special details at openings, corners, or transitions. Get everyone on the same page before the first unit goes up.
Daily quality checks keep you out of trouble. Walk the masonry work every day. You don’t need to be a mason to spot problems. Here’s what to look for:
- Plumb walls (use a level or just your eye on a long straightedge)
- Consistent mortar joints (same width, same depth, same tooling profile)
- Clean weep holes at the base of veneer walls (not filled with mortar droppings)
- Flashing visible at shelf angles, lintels, and window heads
- Proper tie spacing for veneer walls (typically one tie per 2.67 square feet)
- Reinforcement in place before grouting
- Clean work with minimal mortar smears on the face of the wall
Catching a problem on day two is an inconvenience. Catching it on day twenty is a disaster.
Pay applications should tie to measurable progress. Masonry lends itself to straightforward quantity tracking. You can count courses, measure linear feet, and calculate square footage of installed wall. Don’t pay based on “percent complete” estimates. Measure the work and pay for what’s in place.
Common Masonry Problems and How to Avoid Them
Every experienced GC has a masonry horror story. Most of those stories come down to a handful of recurring problems that are preventable if you know what to watch for.
Efflorescence is the white, powdery deposit that shows up on masonry surfaces. It’s caused by water moving through the wall and carrying soluble salts to the surface. It looks terrible on a new building and clients will absolutely notice it. Prevention starts with keeping masonry materials dry during storage, using low-alkali mortar, and making sure your wall drainage system (flashing, weep holes, air space) is functioning correctly. Most efflorescence is cosmetic and will weather away over time, but heavy efflorescence can indicate a moisture problem in the wall assembly.
Cracking in masonry walls is usually caused by one of three things: settlement, thermal movement, or inadequate control joints. Settlement cracks are a foundation issue, and if you are seeing them, you have a bigger problem than your masonry. Thermal movement cracks happen when expansion and contraction aren’t accounted for with proper joint spacing. Control joints in CMU walls should be placed at intervals specified by the engineer, typically every 20 to 25 feet and at changes in wall height or thickness. Brick expansion joints serve the same purpose but account for the fact that brick expands over time (the opposite of concrete, which shrinks).
Understanding your concrete basics helps here too, because a lot of masonry cracking traces back to what’s happening in the foundation or slab below.
Mortar joint failures show up as cracked, crumbling, or missing mortar in the joints between units. This usually comes from one of three causes: improper mortar mix (too much or too little portland cement), poor tooling technique (joints not compressed properly), or freeze-thaw damage from water getting into the joints. Good workmanship is the best prevention. Make sure your mason is mixing mortar to the spec and tooling joints while the mortar is still at the right consistency.
Moisture intrusion through veneer walls is the big one. A brick or stone veneer wall is supposed to be a rain screen. Water will get through the veneer. That’s expected. The system handles it with an air space behind the veneer, flashing at the base and at shelf angles, and weep holes that let the water drain out. When any part of that drainage system is compromised, water ends up in the wall cavity where it causes mold, rot, corrosion, and structural damage. This ties directly into the same principles covered in our waterproofing guide.
Wrong mortar type is more common than it should be. Mortar comes in Types M, S, N, O, and K, each with different strength and flexibility characteristics. Type S is the most commonly specified for structural masonry. Type N is typical for veneer. Using the wrong type can result in cracking (if too rigid) or structural inadequacy (if too weak). Check the spec and verify that your sub is mixing the right mortar.
Documentation, Closeout, and Protecting Yourself
Masonry work generates a lot of documentation that you need to collect and keep. This isn’t just paperwork for the sake of paperwork. It protects you when questions come up months or years after the project is done.
Submittals should be reviewed and approved before any material hits the site. This includes masonry unit samples, mortar mix designs, grout mix designs, reinforcement shop drawings, flashing and accessory product data, and sealant compatibility letters. Don’t let your sub start work without approved submittals. If something goes wrong later and you don’t have approved submittals on file, you’re exposed.
Testing and inspection records need to be organized and filed. Most structural masonry requires special inspection per the building code. The special inspector will verify reinforcement placement, grout placement, mortar proportions, and unit compliance. Prism testing (strength testing of masonry assemblies) may be required on larger projects. Keep all inspection reports, test results, and any corrective action documentation.
Daily logs should note masonry production quantities, weather conditions at the time of placement, any cold or hot weather protection measures used, and any issues observed. If a moisture problem shows up five years later and the building owner’s attorney comes knocking, your daily logs are your first line of defense.
Progress photos are cheap insurance. Take pictures of flashing installation, reinforcement in place before grouting, weep holes before they get buried by landscaping, and the overall wall at various stages. You can never have too many photos.
Warranty documentation from the masonry sub should clearly state what they’re warranting, for how long, and what’s excluded. Most masonry subs warrant workmanship for one year. Material warranties come from the manufacturer. Make sure you have both on file.
As-built documentation should note any deviations from the original drawings. If reinforcement was relocated to avoid a conflict, if a control joint was shifted, or if the wall section was modified during construction, document it. These details matter for future renovations or repairs.
If you’re looking for a better way to keep all of this organized across your masonry projects and every other scope on the job, take a look at what Projul can do. Having your schedule, documents, and sub communication in one place makes a real difference when you’re managing multiple trades on a complex project.
Masonry is one of the oldest building trades, and it’s still one of the most demanding to manage well. The materials are heavy, the work is weather-dependent, the quality standards are high, and the consequences of getting it wrong are expensive. But when you understand the basics, write clear scopes, schedule realistically, and stay on top of quality in the field, masonry work goes smoothly more often than not.
Ready to see how Projul can work for your crew? Schedule a free demo and we will walk you through it.
The GCs who consistently run good masonry projects aren’t masonry experts. They’re project management experts who took the time to learn enough about the trade to ask the right questions and spot problems early. That’s the standard to aim for.
Frequently Asked Questions
How far in advance should I schedule masonry subcontractors?
What is the difference between CMU block and structural brick?
How does weather affect masonry construction schedules?
What should I include in a masonry scope of work for bidding?
How do I check masonry work quality on site?
Related Articles

Construction Septic System Installation: What Every GC Needs to Know
Septic systems on rural builds bring unique scheduling, permitting, and soil challenges that can wreck your timeline if...
Read More →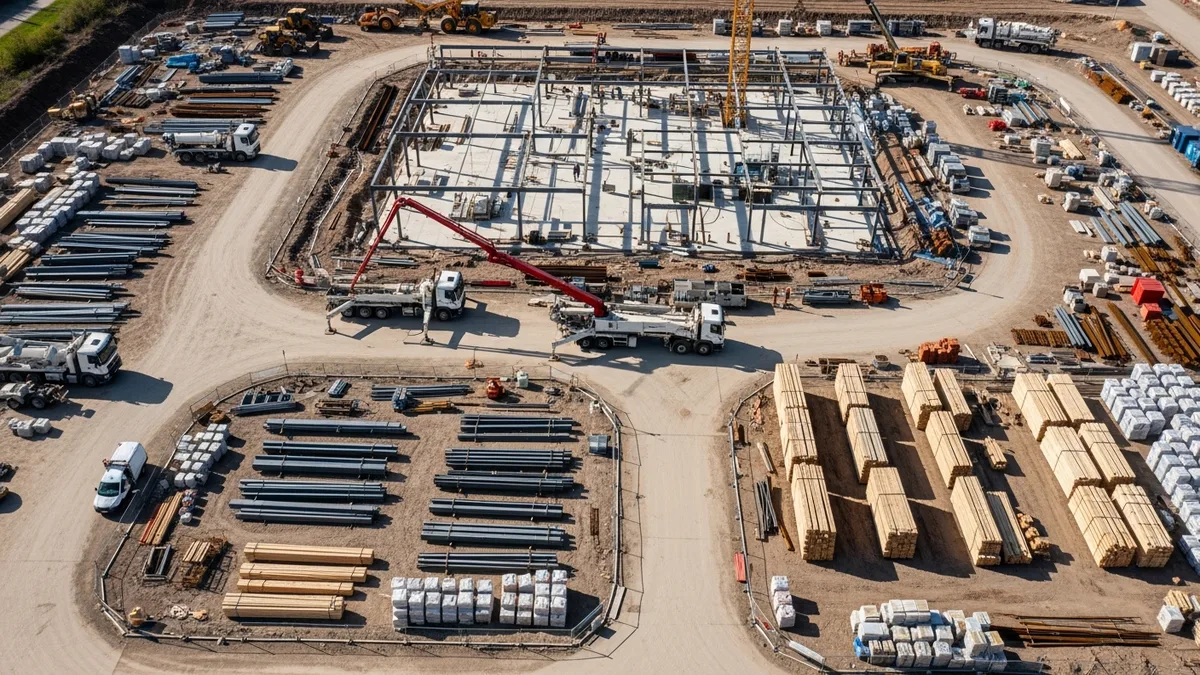
Construction Painting Project Management: Coordinating Interior and Exterior Phases
Painting is one of those trades that touches every other trade on the schedule. Get the sequencing wrong, and you're...
Read More →
Epoxy Flooring and Industrial Coatings: A Contractor's Complete Guide
Epoxy flooring and industrial coatings are high-margin work when you get the process right and a fast way to lose money...
Read More →