Prefab Bathroom Pods: Cost, Install, and Logistics
If you have ever managed the bathroom phase of a hotel, dormitory, or multi-family project, you know the pain. Dozens or hundreds of identical bathrooms, each one requiring the same sequence of framing, rough plumbing, rough electrical, waterproofing, tile, fixtures, accessories, and punch list work. It is the most trade-dense, schedule-intensive part of many buildings, and it is where coordination problems, quality issues, and delays tend to pile up.
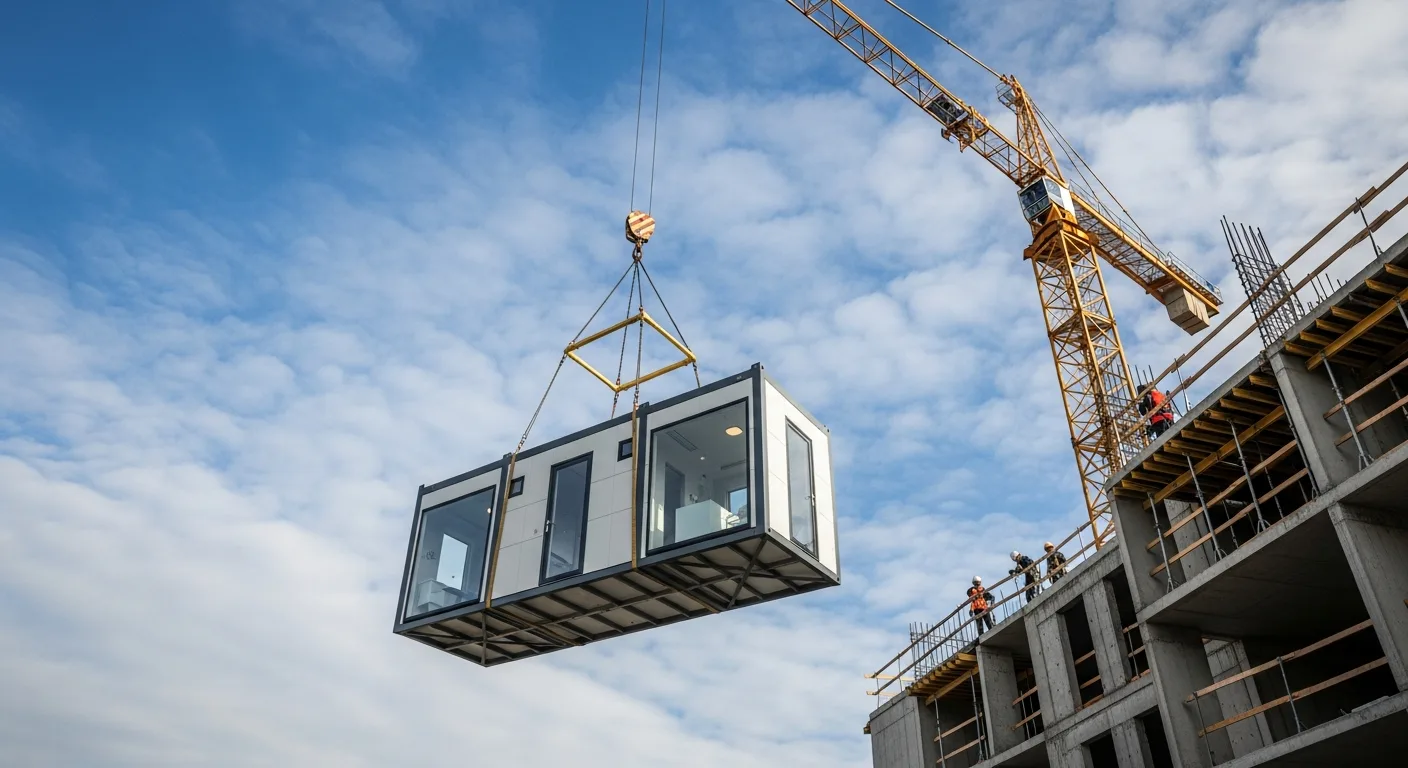
Prefab bathroom pods offer a different approach. Instead of building each bathroom in place with six or eight different trades working on top of each other, the bathrooms are manufactured complete in a factory and delivered to the site ready to install. One crane pick, a few utility connections, and the bathroom is done.
The concept is not new. European and Asian construction markets have used bathroom pods for decades. But adoption in North America has accelerated significantly in the last several years as labor shortages, schedule pressure, and quality expectations have pushed contractors to rethink how they build repetitive spaces.
This guide covers the full picture: how pods are made, how they get to your site, how they are installed, what they cost, and how to decide if they are right for your project.
How Prefab Bathroom Pods Are Made
Pod manufacturing happens in a controlled factory environment, which is a large part of why the finished product is more consistent than field-built bathrooms.
Factory Setup
A typical pod factory is organized as a production line. Raw materials enter at one end, and finished, wrapped pods roll out the other end. The process includes:
Frame construction. Pods start with a structural frame, usually light-gauge steel or a combination of steel and concrete. The frame provides the pod’s structural integrity during transport, crane lifting, and permanent installation. Floor pans are typically formed from a single sheet of steel or fiberglass with integrated slopes to the drain, eliminating the field waterproofing challenges that plague stick-built shower pans.
Rough plumbing and electrical. With the frame complete, plumbers and electricians install rough-in piping, drain lines, vent connections, conduit, and wiring. Because the work happens in a factory with consistent conditions, quality control is straightforward. Every connection is accessible, inspectable, and testable before the walls go on.
Wall and ceiling panels. Interior wall panels (often fiber cement board, fiberglass, or tile-ready substrates) are installed on the frame. Some manufacturers pre-tile the walls in the factory using the same materials you would specify for field-built bathrooms. Others use molded fiberglass or solid surface panels that eliminate grout joints entirely.
Waterproofing. This is where factory construction really outperforms field work. Waterproofing in a factory is applied under controlled temperature and humidity conditions, with proper cure times enforced by the production schedule. There is no rain delay, no freezing overnight, and no next trade stepping on the membrane before it cures.
Tile and finishes. For projects that specify traditional tile, the factory applies it using the same methods a tile setter would use in the field, but with better access, better lighting, and more consistent conditions. Grout curing is controlled, and finished surfaces are protected immediately.
Fixtures and accessories. Toilets, sinks, faucets, mirrors, grab bars, shower doors or curtain rods, toilet paper holders, towel bars, and accessories are all installed in the factory. Plumbing fixtures are connected and pressure-tested.
Final inspection and wrapping. Each completed pod undergoes a quality inspection against a detailed checklist. Plumbing is pressure-tested, electrical connections are verified, and finishes are inspected for defects. The pod is then wrapped in protective packaging (foam corners, shrink wrap, and sometimes a plywood crate for long-distance shipping) and staged for delivery.
Quality Advantages of Factory Production
The factory environment provides several quality advantages that are difficult to match in the field:
Consistent conditions. Temperature, humidity, and lighting are controlled. No weather delays, no working in the dark, no frozen pipes.
Repeatable processes. When you build the same bathroom 200 times in sequence, the process gets refined and the quality improves with every unit. By pod number 50, the crew has worked out every detail.
Better inspection access. Inspecting work in a factory is easier than inspecting work on the eighth floor of a building under construction. Every surface is accessible, well-lit, and at a comfortable working height.
Reduced rework. Factory quality control catches problems before the pod leaves the facility. Field rework on stick-built bathrooms (a leaking shower pan, a cracked tile, a plumbing connection behind a finished wall) is expensive and disruptive. Factory rework is comparatively simple.
Material protection. Finished surfaces are protected immediately after installation. In field construction, completed tile work, fixtures, and finishes are exposed to damage from other trades for weeks or months before the building is enclosed and secured.
Designing for Pods: What the Team Needs to Know
The decision to use bathroom pods needs to happen early in the design process. Retrofitting pods into a design that was not planned for them creates problems. Here is what the design team needs to consider.
Standardization
Pods deliver maximum value when the bathroom layouts are repetitive. The ideal project has one to three bathroom configurations repeated dozens or hundreds of times. Each unique configuration requires its own production setup, so minimizing variations keeps costs down and production efficient.
Work with the architect to standardize layouts as much as possible. Even small differences (a mirror on the left wall instead of the right, a different faucet style on one floor) add complexity and cost.
Dimensional Constraints
Pods must fit through the building during installation, which means the architect and structural engineer need to account for:
- Clear openings in the building structure large enough for the pod to pass through (typically one exterior wall is left open per floor during the pod-setting sequence)
- Corridor widths if pods are moved horizontally within the building after crane placement
- Floor-to-floor height to ensure the pod fits within the structural bay
- Transport dimensions (highway width and height limits) that constrain maximum pod size
Most pods fall within these typical dimensions:
- Width: 5 to 8 feet
- Length: 7 to 12 feet
- Height: 8 to 9 feet
- Weight: 3,000 to 8,000 pounds
Structural Coordination
Pods are heavier than the equivalent stick-built bathroom because all the finishes and fixtures are in place at the time of installation. The structural engineer must design floor framing and supporting elements to handle:
- The total dead load of the completed pod
- Concentrated loads at pod bearing points
- Dynamic loads during crane setting (impact factors)
- Connection details between the pod frame and the building structure
MEP Coordination
Mechanical, electrical, and plumbing connections between the pod and the building are critical details. The building’s rough-in locations must align precisely with the pod’s connection points. This requires close coordination between the pod manufacturer, the design team, and the site trades.
Typical connection points:
- Hot and cold water supply (usually flexible connections with shut-off valves)
- Drain and vent connections (usually at the floor level, connecting to below-floor piping)
- Electrical feed (single connection point for all pod circuits)
- Exhaust duct connection (if the pod includes a bath fan)
Getting these connection points right is the single most important coordination task. A mismatch of even an inch can create problems during installation. Use BIM coordination to verify locations before the building’s rough-in work begins.
Procurement and Lead Times
Bathroom pods have longer procurement lead times than materials for stick-built bathrooms. Plan accordingly.
Typical Timeline
- Design and engineering: 4 to 8 weeks for the pod manufacturer to produce shop drawings and engineering
- Shop drawing approval: 2 to 4 weeks for design team review
- Manufacturing: 8 to 16 weeks depending on quantity and complexity
- Delivery: 1 to 4 weeks depending on distance from factory to site
Total lead time from order to first delivery is typically 16 to 30 weeks. This means you need to commit to pods and finalize selections much earlier than you would for traditional construction.
What to Include in the Procurement Package
When soliciting bids from pod manufacturers, provide:
- Floor plans and reflected ceiling plans for each bathroom configuration
- Finish schedules (tile, countertop, paint, flooring)
- Fixture schedules (toilet, lavatory, faucet, shower valve, accessories)
- Structural details showing building frame and pod bearing conditions
- MEP rough-in locations from the building design
- Delivery schedule (how many pods per week, sequenced by floor)
- Site logistics plan showing crane location and access
Transporting Pods to the Site
Getting finished bathroom pods from the factory to your jobsite without damage is a logistics exercise that requires planning.
Truck Loading and Securing
Pods are loaded onto flatbed trucks using overhead cranes at the factory. They are secured with straps, blocking, and bracing to prevent movement during transit. Protective wrapping covers all finished surfaces.
Standard flatbed trailers accommodate pods up to approximately 8 feet 6 inches wide and 13 feet 6 inches tall (including the trailer deck height). Pods wider or taller than these limits require oversize load permits, escort vehicles, and restricted travel routes and times.
Plan for:
- Number of pods per truck (typically one to four, depending on size)
- Delivery frequency aligned with your installation schedule
- Staging area on site if pods cannot be set directly from the truck
- Traffic and access restrictions at the site
Site Staging
If your crane schedule or building readiness does not allow immediate setting, pods need a staging area. The staging area must:
- Be flat, firm, and level
- Have enough space for the number of pods being stored
- Be accessible by both delivery trucks and the crane
- Provide protection from weather and site damage
- Allow for inspection before setting
Minimize staging time. Every day a pod sits on site exposed to weather, traffic, and other trades increases the risk of damage.
Installation: Setting and Connecting Pods
Installation day is when the planning pays off. A well-coordinated pod set is remarkably fast compared to the weeks of multi-trade work required for stick-built bathrooms.
Crane Selection and Setup
Most bathroom pods are set with a mobile crane, though tower cranes can be used on high-rise projects. Crane selection depends on:
- Pod weight (including rigging)
- Required reach (distance from crane position to the farthest setting point)
- Lift height (how high the pods need to go)
- Site access and setup space
The crane needs a clear path from the pickup point (truck or staging area) to the setting location. Plan the crane position to minimize swing time and maximize the number of pods that can be set from a single setup.
Setting Sequence
Pods are typically set starting at the top floor and working down, or starting at the farthest point from the crane and working closer. The exact sequence depends on the building layout and crane positioning.
The setting process for each pod:
- Rigging crew attaches lifting straps or a spreader bar to the pod’s lift points
- Crane lifts the pod from the truck or staging area
- Spotters guide the pod through the building opening and into position
- The pod is lowered onto its bearing points
- Temporary bracing or bolting secures the pod to the building structure
- Rigging is detached and the crane moves to the next pod
An experienced crew can set one pod every 15 to 45 minutes, depending on complexity. On a good day with consistent conditions, 10 to 20 pods can be set.
Utility Connections
After the pod is in place, the site trades make the final utility connections:
Plumbing: Connect hot and cold water supply lines, drain connections, and vent tie-ins. These are typically simple flex connector or coupling joints that take 30 minutes to an hour per pod.
Electrical: Connect the pod’s electrical feed to the building’s branch circuit. The pod arrives pre-wired internally, so only the single feed connection is needed on site.
Exhaust: Connect the bath fan duct to the building’s exhaust system.
Fire protection: If the pod includes a sprinkler head, connect to the building’s fire suppression piping.
Total utility connection time per pod is typically two to four hours with experienced tradespeople.
Gap Closure and Finish Work
The joint between the pod and the building structure needs to be closed and finished. This typically involves:
- Firestopping at the pod perimeter (required by code for fire-rated assemblies)
- Framing and drywall to close any gaps between the pod and adjacent walls or corridors
- Threshold transitions at the bathroom doorway
- Final paint touch-up at the joint locations
This finish work is the one area where pods still require site labor, but it is a fraction of the work required for a full stick-built bathroom.
Cost Analysis: Pods vs. Stick-Built
The financial case for bathroom pods depends on several factors. Here is how to think about the comparison.
Direct Cost Comparison
Pod cost per unit includes materials, factory labor, quality control, packaging, and delivery. Depending on size, finish level, and quantity, expect $8,000 to $25,000 per pod for a typical hotel or multi-family bathroom.
Stick-built cost per unit includes materials, site labor for all trades (framing, plumbing, electrical, waterproofing, tile, drywall, paint, fixtures), supervision, and quality control. A comparable bathroom built in the field typically costs $10,000 to $30,000 depending on market labor rates and finish level.
At first glance, the unit costs may look similar. The real savings show up in the indirect costs.
Indirect Cost Savings
Schedule compression. Pods remove bathroom construction from the critical path. While pods are being manufactured in the factory, site work continues on the building structure, exterior, and MEP rough-ins. The bathrooms that would have taken months of sequential trade work on site are done in a day of crane setting and a few days of connections.
On a 200-room hotel, bathroom pods can shorten the overall project schedule by 8 to 16 weeks. At $50,000 to $100,000 per week in general conditions cost, that is $400,000 to $1.6 million in savings.
Reduced site labor. Fewer trades on site means less coordination overhead, fewer conflicts, and less general conditions expense. The labor that would have been building bathrooms can be deployed on other parts of the project.
Lower waste. Factory production generates 50 to 80 percent less material waste than field construction. Cuts are planned, offcuts are reused, and materials are stored properly.
Fewer punch list items. Factory quality control produces a more consistent finished product with fewer defects. Punch list walks on pod bathrooms are typically faster with fewer items than stick-built bathrooms.
Reduced warranty callbacks. Controlled factory conditions for waterproofing application and plumbing connections result in fewer leaks and failures during the warranty period.
When Pods Make Financial Sense
The break-even point for bathroom pods depends on the project, but as a general guideline:
- 50+ identical bathrooms: Pods almost always make financial sense
- 25 to 50 bathrooms: Pods likely make sense, especially in markets with high labor costs or tight schedules
- Fewer than 25 bathrooms: The setup costs and lead times may not justify the investment unless schedule is the primary concern
Challenges and Limitations
Pods are not the right solution for every project. Here are the honest limitations.
Early Design Commitment
You must finalize bathroom layouts, fixtures, and finishes much earlier than with traditional construction. Changes after manufacturing begins are expensive or impossible. This requires discipline from the design team and the owner.
Transportation Constraints
Pod size is limited by highway regulations. Very large bathrooms or those with unusual configurations may not fit on a standard flatbed. Remote sites with poor road access or tight urban sites with limited crane space add logistical complexity.
Coordination Requirements
While pods simplify the bathroom construction itself, they add coordination requirements around structural design, MEP rough-in, crane logistics, and installation sequencing. Projects that use pods need detailed planning and tight communication between the pod manufacturer, design team, and site team.
Perception Issues
Some owners and designers are skeptical of prefab bathrooms because they associate them with lower quality. This perception is outdated, but it persists. Address it early with factory tours, sample pods, and references from completed projects.
Managing a Pod Project with the Right Tools
Bathroom pod projects involve more coordination points than traditional construction, which makes having a solid project management system even more important. Tracking manufacturer submittals, delivery schedules, crane logistics, utility connection progress, and punch items across dozens or hundreds of pods requires organization.
Projul’s project management platform gives you a central place to manage schedules, track deliveries, assign and monitor tasks, document completed work with photos, and keep your entire team aligned. When you are setting 15 pods in a day, everyone needs to know exactly what is happening and when.
Bathroom Pod Materials and Construction Types
Not all bathroom pods are built the same way. The materials and construction method affect weight, durability, cost, and what types of buildings they work with. Understanding the differences helps you spec the right pod for your project.
Steel-Framed Pods
Steel-framed pods use light-gauge steel studs and a steel floor pan as the structural base. They are the most common type in North America. Steel frames are strong relative to their weight, which matters when you are lifting pods with a crane and need to keep loads manageable.
Steel-framed pods typically weigh 3,000 to 5,500 pounds depending on size and finish weight. They work well in steel-framed and concrete-framed buildings. The steel frame also makes it straightforward to bolt the pod to the building structure at the bearing points.
One thing to watch: steel-framed pods with a concrete floor topping add significant weight. If the manufacturer pours a mortar bed for floor tile, that adds 300 to 600 pounds on a typical hotel bathroom pod. Ask about floor construction early so the structural engineer has accurate loads.
Concrete Pods
Concrete pods use precast or cast-in-place concrete for the floor, walls, or both. They are heavier (5,000 to 8,000+ pounds) but offer superior sound isolation and fire resistance. Concrete pods are common in European markets and are gaining traction in North America for high-rise residential and hospitality projects where sound transmission between units is a concern.
The trade-off is weight. Concrete pods require larger cranes, stronger floor framing, and sometimes limit how many pods can be stacked vertically without additional structural support. If you are considering concrete pods, get the structural engineer involved in the pod selection conversation from day one.
GRP and Composite Pods
Glass-reinforced plastic (GRP) and composite pods are the lightest option, often weighing under 2,000 pounds. They use molded fiberglass or composite panels for walls and floors, with a steel or aluminum frame for structural support.
GRP pods are fast to produce and easy to handle. Their light weight means smaller cranes and less structural demand on the building. The finish is typically a smooth, jointless surface with no grout lines, which makes cleaning and maintenance simple.
The limitation is aesthetics. GRP pods look like what they are: molded plastic. For economy hotels, student housing, military barracks, and healthcare facilities where durability and ease of cleaning matter more than high-end finishes, they are a great fit. For upscale hospitality or luxury residential, most owners want the look and feel of real tile, stone, or solid surface materials that steel-framed pods with traditional finishes provide.
Hybrid Approaches
Some manufacturers offer hybrid construction that combines a steel frame with concrete floor sections and GRP or tile wall finishes. These hybrids try to balance weight, acoustics, and finish quality. If your project has specific requirements around sound ratings (STC values), fire ratings, or finish materials, talk to multiple manufacturers about how they would approach it. The construction method should follow from the project requirements, not the other way around.
Common Mistakes Contractors Make with Pod Projects
After talking with contractors who have completed pod projects (both successfully and painfully), a few mistakes come up repeatedly. Avoiding these will save you money and frustration.
Waiting Too Long to Commit
This is the most common and most expensive mistake. Pods need to be part of the conversation during schematic design, not something you bolt on during construction documents. Waiting until late in design means the building structure was not designed for pod loads, MEP rough-in locations do not match the pod connection points, and you are scrambling to get shop drawings approved while the factory queue fills up.
If you are even thinking about pods for a project, bring a manufacturer into the conversation during schematic design. Their early input on dimensions, weight, and connections prevents costly redesign later.
Underestimating the Coordination Effort
Pods simplify bathroom construction on site, but they add coordination complexity during preconstruction. You need tight alignment between the architect, structural engineer, MEP engineers, pod manufacturer, and your site team. BIM coordination is not optional for pod projects.
The connection points between the pod and the building are where things go wrong. A drain rough-in that is two inches off means every pod on that floor has a problem. Check and double-check rough-in locations before the concrete is poured or the steel is set. Investing time in preconstruction planning saves you from expensive field fixes.
Ignoring Site Logistics Until It Is Too Late
Crane access, pod staging, delivery truck routing, and the setting sequence all need to be planned well before the first pod arrives. Contractors who treat pod installation like any other delivery get surprised by:
- No crane setup area because another trade is using the space
- Delivery trucks that cannot navigate the site access road
- Pods sitting in weather for weeks because the building was not ready
- Setting sequence conflicts with other critical path work
Create a detailed logistics plan that covers crane position, swing radius, pod pickup and set locations, truck staging, and the coordination with other site activities. If you are already using scheduling tools to manage your project timeline, add the pod delivery and setting milestones as hard dates that other activities coordinate around.
Skipping the Factory Visit
Some contractors buy pods based on specs and references alone without visiting the factory. This is a mistake. A factory visit tells you things that no spec sheet will:
- How organized is the production line?
- What does quality control actually look like?
- How are finished surfaces protected during production and packaging?
- What is the factory’s capacity, and are they overcommitted?
- How experienced is the workforce?
Spending a day at the factory before you sign the contract gives you confidence in the manufacturer and catches potential problems early. It also gives you photos and firsthand observations that help sell the concept to skeptical owners.
Not Planning for Damaged Pods
Even with the best packaging and logistics, some percentage of pods will arrive with damage. Scratched finishes, cracked tiles, bent frames from rough handling during transport. Plan for it.
Your contract with the pod manufacturer should spell out the inspection and acceptance process, damage reporting timelines, repair responsibilities, and replacement pod lead times. Have a small repair crew available during the setting sequence to handle minor field repairs quickly so you do not hold up the crane.
Bathroom Pods and Building Codes: What You Need to Know
Building code compliance is a legitimate concern for contractors considering pods for the first time. The good news is that the code framework for off-site construction is well-established. But you need to understand how it works.
Factory Inspections and Third-Party Agencies
Most jurisdictions allow bathroom pods to be inspected at the factory by a third-party inspection agency rather than by the local building inspector. The third-party agency (accredited by organizations like the International Accreditation Service, or IAS) inspects the manufacturing process and individual pods for compliance with the applicable building codes.
The factory inspection covers everything that would be inspected on site for a stick-built bathroom: framing, plumbing, electrical, waterproofing, fire-stopping, and accessibility. The inspector reviews the approved plans, checks the work in progress, and issues a certification label for each pod that passes.
On-Site Inspections After Installation
Even with factory inspection, the local jurisdiction will inspect the pods after installation. The on-site inspection typically covers:
- Utility connections (the work done in the field, not the factory work)
- Structural connections between the pod and the building
- Fire-stopping at the pod perimeter
- Accessibility compliance (final door clearances, grab bar locations, fixture heights)
- Life safety systems (sprinkler connections, smoke detector operation)
Make sure your local building department is on board with the pod approach early in the permitting process. Some jurisdictions are unfamiliar with off-site construction and need education about the third-party inspection process. Bringing the pod manufacturer into the pre-application meeting with the building department can smooth the path.
ADA and Accessibility
Accessible bathroom pods follow the same ADA and accessibility requirements as stick-built bathrooms. Turning radius, fixture heights, grab bar locations, door width, threshold height, and floor slope requirements all apply.
Pod manufacturers build accessible versions of their standard layouts. These are typically wider to accommodate the required turning radius and include all required grab bars, lowered accessories, and accessible fixtures. Make sure the project’s accessibility requirements are clearly defined in the pod procurement package so the manufacturer builds them correctly.
One detail that trips up contractors: the threshold between the pod and the corridor. The pod floor is set on top of the building floor, which can create a height difference at the doorway. ADA limits the threshold height to half an inch maximum (with a beveled edge) for accessible units. The structural design needs to account for this, either by recessing the pod bearing area or by specifying a pod with a flush floor connection detail.
Fire Rating and Compartmentalization
Bathroom pods are typically non-rated assemblies that sit within a fire-rated building compartment. The fire rating is provided by the surrounding building walls and floor/ceiling assemblies, not by the pod itself.
The critical code detail is the fire-stopping at the pod perimeter. Where the pod meets the building’s fire-rated walls and floors, all gaps and penetrations must be sealed with approved fire-stop materials and systems. This is field work that your site crew handles after the pod is set.
For some project types (healthcare, high-rise residential), the pod itself may need to contribute to the fire compartmentalization. In these cases, the pod manufacturer designs the pod enclosure to achieve the required fire rating. This adds cost and weight, so confirm the fire rating requirements with the code consultant before finalizing the pod specification.
Real-World Project Scheduling with Pods
Understanding how pods change your project schedule is key to selling the approach to owners and making sure your team plans correctly.
The Parallel Path Advantage
The biggest schedule benefit is that pod manufacturing happens in parallel with site construction. While your site crew is building the structure, enclosing the exterior, and roughing in utilities, the factory is building bathrooms. These two work streams run simultaneously instead of sequentially.
On a traditional project, bathroom construction starts after the structure and rough-ins are complete and takes weeks or months of sequential trade work. With pods, the bathrooms are ready to install as soon as the structure and rough-ins are ready for them. You convert months of bathroom construction time into days of crane setting and connection work.
Sample Schedule Comparison
Here is a simplified comparison for a 150-room hotel project:
Traditional stick-built bathrooms:
- Structure complete: Month 8
- Bathroom rough-in starts: Month 9
- Bathroom framing, waterproofing, tile: Months 9 through 14
- Fixture installation and punch: Months 14 through 16
- Total project: 20 months
Bathroom pods:
- Pod order placed: Month 2
- Pod manufacturing: Months 4 through 10 (runs parallel with site structure)
- Structure complete: Month 8
- Pod setting and connections: Month 9 (2 to 3 weeks)
- Gap closure and punch: Month 10
- Total project: 16 months
Four months of schedule savings on a project like this represents real money. General conditions, insurance, financing costs, and earlier revenue for the owner all factor in. For project budgeting and financial tracking, those saved months often represent hundreds of thousands of dollars in reduced overhead.
Scheduling Tips
A few things to keep in mind when building your pod project schedule:
Start procurement early. The 16 to 30 week lead time means you need to issue the pod purchase order during early construction, not after the structure is up. Back-calculate from your desired setting date and add buffer for submittals and approval cycles.
Sequence setting by floor and zone. Work with the crane operator to establish a setting sequence that minimizes crane repositioning and aligns with your building completion sequence. Typically you set all pods on one floor before moving to the next.
Build in connection time. Each pod needs two to four hours of utility connection work after setting. Plan your plumber and electrician crews around the setting schedule so connections happen immediately after each pod is placed. Do not let connected pods fall behind the setting pace.
Coordinate with other trades. Pod setting requires crane access and clear work areas. Block out the setting days on the master schedule and make sure other trades know to stay clear. A pod setting day is not the day for concrete pours, steel erection, or any other crane-dependent work.
Plan for weather days. Crane operations have wind speed limits (typically 25 to 35 mph depending on the crane and load). Build weather contingency into your setting schedule, especially in exposed locations or during windy seasons.
Getting Started with Bathroom Pods
If you are considering pods for an upcoming project, here is a practical starting point:
- Identify the opportunity early. Look for projects with 25 or more repetitive bathrooms.
- Engage a pod manufacturer during design. Their input on dimensions, connections, and constructability is valuable.
- Run a cost comparison. Include schedule savings and indirect costs, not just unit prices.
- Visit a factory. Seeing the manufacturing process firsthand answers most questions and addresses quality concerns.
- Plan the logistics. Crane access, delivery staging, and setting sequence need to be worked out well before the first pod arrives.
- Coordinate MEP rough-ins carefully. This is the number one risk area. Use BIM and verify locations before the building work is done.
Bathroom pods are not a magic solution, but for the right projects, they deliver real benefits: faster schedules, better quality, less site congestion, and lower total cost. The contractors who are using them successfully are the ones who plan thoroughly, coordinate tightly, and treat the factory as an extension of their jobsite.
Ready to manage your next project more effectively? Schedule a demo with Projul to see how our platform keeps complex projects on track. Or check our pricing to find the plan that fits your team.
Frequently Asked Questions
What is a prefab bathroom pod?
How much do prefab bathroom pods cost compared to traditional construction?
How long does it take to install a prefab bathroom pod?
What types of projects are best suited for bathroom pods?
Can bathroom pods be customized for different designs?
How are bathroom pods transported to the job site?
What are the structural requirements for installing bathroom pods?
Do bathroom pods meet building codes and ADA requirements?
Related Articles

Concrete Tilt-Up Construction: A Contractor's Complete Field Guide
Tilt-up construction accounts for roughly 15 percent of all industrial and commercial buildings in North America. This...
Read More →
How to Implement Construction Software Without Losing Your Mind
Most construction software rollouts fail. Not because the software is bad, but because the rollout was rushed. Here are...
Read More →
How Selections Can Pay for Themselves in Three Easy Steps
Most contractors lose thousands each year on wrong material orders, slow client decisions, and missed upsell chances....
Read More →