Outdoor Kitchen Construction Guide for Contractors
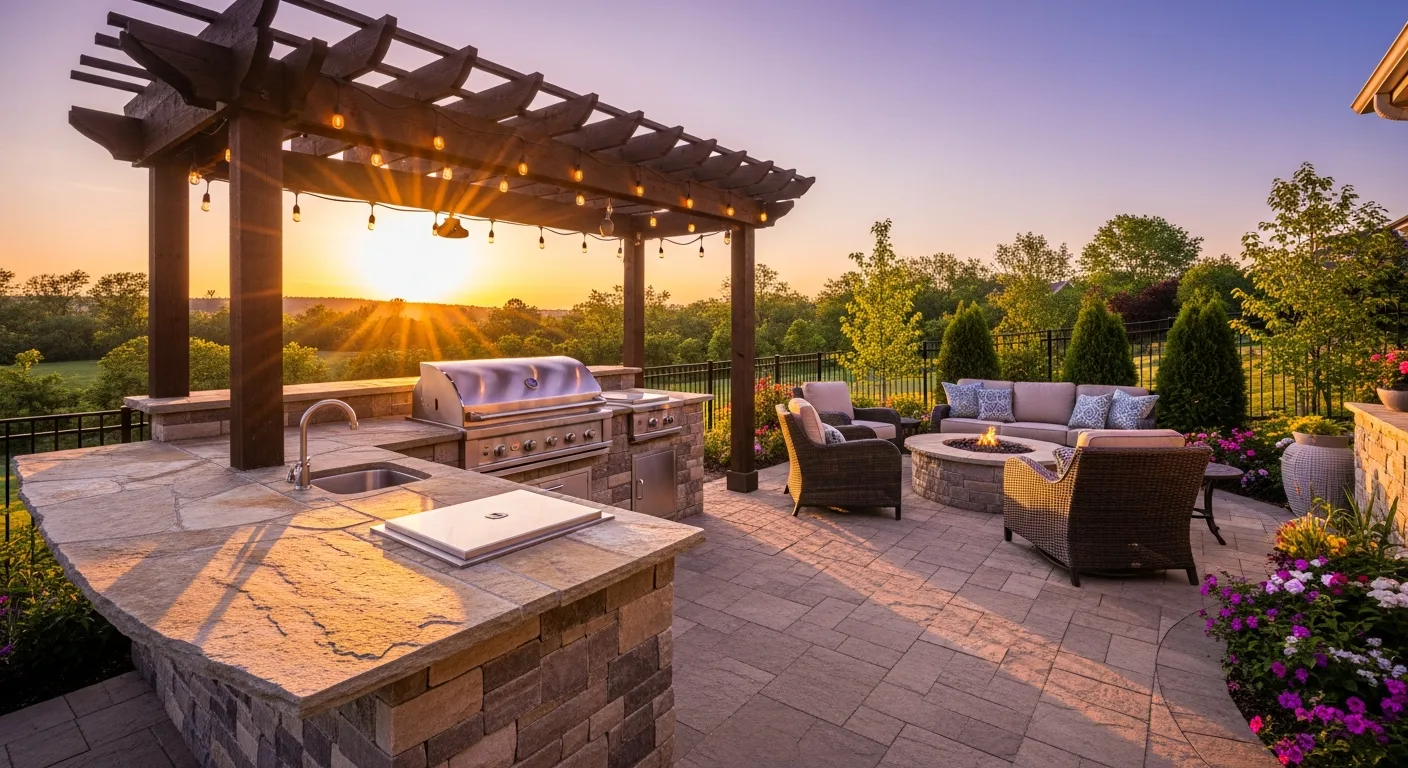
Outdoor kitchens have gone from luxury add-ons to standard residential construction requests. Homeowners want full cooking setups, bar seating, fire features, and covered lounging areas that function as real extensions of the home. For contractors, that means working with gas, electric, plumbing, concrete, stone, and framing all in the same outdoor project.
This guide covers the construction details for building outdoor kitchens and living spaces that hold up to weather, perform safely, and look good for years.
Planning and Layout
Space Planning
A functional outdoor kitchen needs more space than most homeowners expect. Here are practical minimums:
- Cooking zone: 6 to 8 linear feet of counter with a built-in grill as the centerpiece
- Prep area: 3 to 4 feet of clear counter space adjacent to the cooking zone
- Bar/seating area: 24 inches of counter depth for a raised bar top, with 24 inches of knee space per seat
- Traffic flow: 42 inches minimum behind the cooking area for safe movement; 48 inches is better if the space allows
The total footprint for a mid-range outdoor kitchen with a bar runs 10 to 16 feet long and 3 to 4 feet deep for the kitchen island, plus the seating area.
Location Considerations
Where you place the outdoor kitchen affects everything from utility runs to the homeowner’s daily experience:
- Prevailing wind: Position the grill so smoke blows away from the seating area and the house. Spend 10 minutes on-site at different times of day observing wind direction.
- Sun exposure: The cooking area should have shade during the afternoon hours when it gets the most use. If there is no natural shade, plan for a covered structure.
- Utility access: Shorter gas, water, and electrical runs mean lower costs and fewer opportunities for problems. Place the kitchen on the side of the house closest to the gas meter and electrical panel when possible.
- Views and privacy: Orient the seating area toward the best view and away from neighbors. Screening with landscaping, fencing, or pergola structures can create a sense of enclosure.
- Distance from the indoor kitchen: Close enough to carry dishes and supplies conveniently, but far enough that smoke and cooking odors do not enter the house through open windows or doors.
Foundation and Base Structure
Concrete Slab
The kitchen island and surrounding patio need a solid base. A poured concrete slab is the standard approach:
- Thickness: 4 inches minimum for the patio area; 6 inches under the kitchen island if supporting heavy countertops and appliances
- Base: 4 to 6 inches of compacted gravel (3/4-inch crushed stone or road base)
- Reinforcement: Welded wire mesh (6x6 W1.4/W1.4) or #3 rebar at 18-inch spacing both ways
- Slope: 1/4 inch per foot away from the house and away from the kitchen island for drainage
- Control joints: Every 8 to 10 feet in each direction to control cracking
- Footings: In cold climates, the slab edges or piers must extend below the frost line. Check your local frost depth requirement.
Island Frame Construction
The kitchen island structure supports the countertop, holds the appliances, and must resist weather exposure for the life of the installation. Common framing approaches:
Steel Stud Framing: Light-gauge steel studs (20 or 18 gauge) are the preferred framing material for outdoor kitchens. Steel does not rot, warp, or attract termites. Use galvanized or stainless steel fasteners throughout.
- Frame the island walls with 2.5-inch or 3.625-inch steel studs at 16-inch spacing
- Sheath with cement board (1/2-inch or 5/8-inch fiber cement) on both sides
- Add blocking at appliance cutout locations and countertop support points
Concrete Block (CMU): Some builders prefer 8-inch concrete block for outdoor kitchen islands. CMU provides excellent mass, fire resistance, and durability. Fill the cores with grout at corners and at reinforcement locations. CMU adds weight, so verify your slab can handle the load.
Aluminum or Stainless Steel Frame Systems: Prefabricated outdoor kitchen frame systems are available from several manufacturers. These bolt-together systems speed up construction and guarantee material compatibility. They cost more than site-built framing but reduce field labor.
Weather Barrier
The finished island exterior needs to shed water and resist moisture penetration:
- Apply a weather-resistant barrier (WRB) over the cement board before applying stone or tile veneer
- Use lath and scratch coat for adhered stone veneer applications
- Flash all countertop-to-wall transitions to prevent water from entering the framing cavity
- Ventilate the interior of the island to prevent moisture buildup (small vents at the bottom and top of the island)
Countertop Selection and Installation
The countertop is the most visible and most used surface in the outdoor kitchen. It needs to handle heat, moisture, UV exposure, food prep, and the occasional dropped cast-iron pan.
Material Options
Granite: The go-to choice for outdoor kitchens. Granite handles heat, UV, and moisture without issues when properly sealed. Seal granite annually with an exterior-grade penetrating sealer. Choose a polished or honed finish based on the look you want. Darker colors show less staining.
Concrete: Poured-in-place or precast concrete countertops offer unlimited shape and color options. Integral color, acid stain, or embedded aggregates create unique looks. Concrete must be sealed and resealed regularly because it is porous. Expect some hairline cracking over time, which most owners consider part of the character.
Porcelain Slab: Large-format porcelain slabs (brands like Dekton, Neolith) are gaining traction for outdoor use. They resist UV, heat, staining, and scratching better than most natural stones. Installation requires diamond tooling and experienced fabricators.
Tile: Porcelain or natural stone tile over a concrete substrate works for budget-conscious projects. Use large-format tiles (12x24 or larger) to minimize grout lines. Grout maintenance is the main drawback.
Stainless Steel: Commercial look, completely weather-resistant, and easy to clean. Stainless steel countertops are fabricated to fit and installed over the island frame. They show fingerprints and can be noisy, but they are practically indestructible.
Installation Details
- Support: Countertops need full perimeter support and intermediate support for spans over 30 inches. Use steel angle brackets or a continuous ledger on the island frame.
- Overhang: Bar-top overhangs of 12 to 15 inches need corbels or knee brackets every 24 to 36 inches.
- Cutouts: Grill, sink, and access door cutouts must be precisely sized to the appliance specifications. Measure twice, cut once applies here more than anywhere.
- Seams: Minimize seams in outdoor applications. Water infiltration at seams is a long-term durability concern.
- Edge profiles: Keep edges simple for outdoor use. Bullnose or eased edges are easier to seal and maintain than complex ogee or waterfall profiles.
Gas Line Installation
Gas work is the trade that carries the most liability in an outdoor kitchen project. Get it right or do not do it at all.
Sizing the Gas Line
Every gas appliance has a BTU rating that determines its gas demand. Common BTU loads:
- Built-in grill: 40,000 to 100,000 BTU
- Side burner: 12,000 to 25,000 BTU
- Pizza oven: 40,000 to 80,000 BTU
- Fire pit/table: 40,000 to 60,000 BTU
- Outdoor heater: 40,000 to 50,000 BTU per unit
- Warming drawer: 5,000 to 10,000 BTU (if gas)
Total the BTU load for all appliances, then size the gas line per the International Fuel Gas Code (IFGC) pipe sizing tables, accounting for the length of run from the meter and the available supply pressure.
A common residential setup with a grill, side burner, and fire pit might total 150,000 to 185,000 BTU. For a 50-foot run at standard 1/4 psi residential pressure, that typically requires a 1-inch main line, stepped down to 1/2-inch branch lines at each appliance.
Pipe Materials
- Black iron pipe: Traditional material, threaded connections. Reliable but labor-intensive to install for long runs.
- CSST (corrugated stainless steel tubing): Flexible, fast to install, and approved by most codes for outdoor use. Must be bonded per manufacturer and NEC requirements. Some jurisdictions restrict CSST use, so verify local code.
- Copper: Allowed in some areas for natural gas. Not permitted for propane in most jurisdictions. Check local code.
Key Requirements
- Shutoff valve: Install an individual shutoff at each appliance and a main shutoff for the outdoor kitchen gas supply.
- Pressure test: Test the entire gas system at 1.5 times the working pressure (typically 3 to 5 psi for residential) for a minimum of 15 minutes before inspection.
- Drip leg: Install a sediment trap (drip leg) at each appliance connection to catch moisture and debris before it enters the appliance.
- Burial depth: Underground gas lines must be buried at least 12 inches deep (18 inches is better) and run in a sleeve or with tracer tape per local code.
- Permit and inspection: Gas work requires a permit and inspection in virtually every jurisdiction. Do not skip this.
Propane vs. Natural Gas
If natural gas is not available, propane (LP) is the alternative. Key differences for construction:
- Propane is heavier than air and settles in low spots. Do not route propane lines through enclosed, below-grade spaces.
- Propane tanks require setback distances from the house, property lines, and ignition sources per NFPA 58.
- Appliance orifices must match the gas type. Most outdoor appliances come configured for natural gas with an LP conversion kit available.
- Propane regulators at the tank and sometimes at the appliance are required to step down the supply pressure.
Electrical Work
Outdoor kitchens need more electrical capacity than most homeowners realize. Plan for current needs and future additions.
Circuit Requirements
- Dedicated 20-amp circuit: For the refrigerator, ice maker, or any other appliance that runs continuously
- GFCI protection: All outdoor receptacles must be GFCI protected per NEC Article 210.8
- Weatherproof covers: In-use covers (bubble covers) for all receptacles exposed to weather
- Lighting circuits: Separate circuit for task lighting, ambient lighting, and landscape lighting
- Exhaust hood: If a vent hood is installed, it typically needs its own dedicated circuit
Common Electrical Loads
- Outdoor refrigerator: 2 to 5 amps
- Ice maker: 3 to 5 amps
- Vent hood: 2 to 4 amps
- Electric warming drawer: 8 to 12 amps
- Blender/small appliance receptacles: 12 to 15 amps (intermittent)
- LED task lighting: 1 to 2 amps total
- Landscape/ambient lighting: 1 to 3 amps total
- Sound system: 1 to 2 amps
Wiring
- Use UF (underground feeder) cable for direct-buried runs or THWN wire in schedule 40 PVC conduit
- Burial depth: 24 inches for UF cable, 18 inches for PVC conduit per NEC
- Bring conduit stubs up through the slab or island frame before pouring concrete
- Install a small sub-panel or disconnect near the kitchen if running multiple circuits
Low-Voltage Systems
Many outdoor living spaces include:
- Landscape lighting (12V LED, typically on a separate low-voltage transformer)
- Audio speakers (wired or powered outdoor speakers)
- TV connections (weatherproof outlet and conduit for HDMI/coax)
- Wi-Fi extender power
Run low-voltage wiring in separate conduit from line-voltage circuits. Install conduit stubs during the slab pour for any future wiring needs. It is much cheaper to run an empty conduit now than to saw-cut the slab later.
Plumbing and Drainage
Water Supply
If the outdoor kitchen includes a sink, you need hot and cold water supply:
- Pipe material: PEX or copper from the nearest interior water line to the outdoor kitchen
- Shutoff valves: Install individual shutoffs inside the house where the outdoor lines branch off, plus shutoffs at the sink
- Freeze protection: In cold climates, use self-draining fixtures or install the supply lines with shutoffs and drain valves for winterization. Heat tape on exposed pipes is another option but requires electricity.
- Hot water: Either run hot water from the indoor water heater (insulate the pipe for long runs) or install a small point-of-use electric or tankless water heater at the outdoor kitchen.
Drain
Outdoor sink drains can connect to:
- The home’s sanitary sewer if the run is practical and the slope works (1/4 inch per foot minimum)
- A dry well or French drain for gray water in jurisdictions that allow it (check local code)
- A grease interceptor if the local code requires one for food prep areas
Use schedule 40 PVC for drain lines and maintain proper slope. Install a P-trap to prevent sewer gas from entering through the drain.
Surface Drainage
Water management around the outdoor kitchen prevents puddling, erosion, and foundation problems:
- Slope all patio surfaces at 1/4 inch per foot away from the kitchen island and house
- Install channel drains at the low side of the patio if adjacent to landscaping or structures
- French drains or catch basins may be needed for larger installations
- Gutter and downspout systems on covered structures must be planned and routed to appropriate discharge points
Covered Structures and Weather Protection
Pergolas
Pergolas provide partial shade and define the outdoor space without creating a fully enclosed structure. Construction considerations:
- Materials: Western red cedar, Douglas fir, or aluminum for the frame. Pressure-treated lumber works but needs a quality stain for appearance.
- Posts: 6x6 minimum for spans up to 12 feet. Anchor to the slab with post bases rated for the uplift loads in your area.
- Beams and rafters: Size per structural requirements based on span and any loads (fans, lighting, retractable shade covers).
- Footings: If the pergola posts are not on the kitchen slab, they need independent footings below the frost line.
Pavilions and Covered Structures
A fully roofed structure over the outdoor kitchen provides real weather protection and extends the usable season:
- Roofing: Match the house roofing material for a cohesive look, or use standing seam metal for a clean, modern appearance
- Ceiling: Tongue-and-groove cedar or pine, stained or painted, is the classic choice. Exterior-rated materials only.
- Ceiling fans: Damp-rated or wet-rated fans depending on exposure. Rough-in the electrical box and bracing during framing.
- Structural engineering: Covered structures must be engineered for wind, snow (where applicable), and seismic loads per local code. This is not a DIY framing job.
Retractable Systems
Motorized retractable screens, shades, and awnings offer flexibility:
- Screen systems keep insects out while maintaining airflow
- Retractable awnings provide shade on demand
- Motorized louver roofs adjust for sun and rain
All motorized systems need electrical feeds planned during the rough-in phase. Structural supports for retractable systems must handle wind loads when the system is deployed.
Fire Features
Fire pits and fireplaces are the centerpiece of many outdoor living spaces.
Gas Fire Pits
- Burner sizing: Match the burner BTU rating to the fire pit size. A 24-inch round burner typically runs 65,000 to 90,000 BTU.
- Fire media: Fire glass, lava rock, or ceramic logs sit on the burner and distribute the flame.
- Gas connection: Dedicated gas line with a shutoff valve. Route the gas line through the fire pit base with proper clearance from the burner.
- Drainage: If the fire pit is not covered, it needs a drain at the bottom to remove rainwater. Route the drain to a dry well or daylight.
- Wind guard: Glass wind guards prevent the flame from blowing out and keep the heat focused.
Wood-Burning Fireplaces
Outdoor fireplaces are significant masonry or concrete structures:
- Foundation: Reinforced concrete footing designed for the full weight of the fireplace and chimney
- Firebox: Firebrick lining, typically 4 inches thick, with a refractory morite bed
- Chimney: Minimum height per code (usually 2 feet above any structure within 10 feet), with a spark arrestor
- Clearances: Combustible materials must be at the distances specified by the local fire code
Project Management for Outdoor Living Construction
Outdoor kitchen and living space projects involve a surprising number of trades: concrete, framing, gas plumbing, water plumbing, electrical, stone/tile, countertop fabrication, appliance installation, roofing, and landscaping. On a residential project with a homeowner who wants to use the space by summer, keeping all these trades moving on schedule is the difference between a profitable job and a headache.
Projul’s construction management software helps you schedule each phase, manage material orders, and communicate with the homeowner through a client portal. When you are coordinating 8 to 10 trades on a single backyard project, having one system that tracks it all saves you hours of phone calls and text messages every week.
Want to see how it works? Schedule a demo or check out the pricing to find a plan that fits your business.
Maintenance Considerations During Construction
Build for easy maintenance from the start:
- Access panels in the island frame for gas valve access, plumbing shutoffs, and electrical connections
- Removable countertop sections or large access doors near appliances that will eventually need service or replacement
- Drain cleanouts accessible from outside the island
- Material documentation: Give the homeowner a binder or digital file with all material specs, paint colors, stone sources, and appliance manuals. This helps them maintain the space and helps you if warranty questions come up later.
Common Mistakes to Avoid
No drainage plan: Water sitting against the island base causes stone veneer failure, rusted framing, and slab damage. Slope everything, drain everything.
Undersized gas lines: Running a 1/2-inch line to serve a grill, side burner, and fire pit will starve the appliances. Size the line for the total BTU load, not just the grill.
Wrong countertop material: Engineered quartz (Silestone, Caesarstone) is not rated for outdoor use. UV exposure causes yellowing and discoloration. Stick with granite, concrete, porcelain slab, or stainless steel.
Forgetting about winter: In cold climates, outdoor plumbing that cannot be drained will freeze and burst. Plan for winterization from the start.
Skipping permits: Gas, electrical, and structural work all require permits. An un-permitted outdoor kitchen can cause problems during a home sale and creates liability for the contractor.
No ventilation under covered areas: A grill producing 80,000 BTU under a low ceiling with no ventilation is a fire hazard and will damage the structure above it.
Material Selection for Outdoor Durability
Choosing the right materials for every component of an outdoor kitchen is not just about aesthetics. Outdoor installations face UV radiation, temperature swings, moisture, freeze-thaw cycles, and constant exposure to the elements. Materials that perform well indoors can fail quickly when used outside. Here is what to consider for each major component.
Veneer and Cladding
The exterior finish of the kitchen island takes the brunt of weather exposure. Common options include:
- Natural stone veneer: Limestone, bluestone, and fieldstone are popular choices. They resist UV and handle moisture well when installed over a proper weather barrier. Use a full-bed mortar application on lath over cement board for long-term adhesion.
- Manufactured stone veneer (MSV): Lighter than natural stone and available in a wide range of styles. Quality MSV from reputable manufacturers holds up well outdoors. Cheap products can fade or delaminate within a few years.
- Stucco: A traditional exterior finish that works well on outdoor kitchens. Apply a three-coat system (scratch, brown, and finish) over metal lath for durability. Integral color or mineral-based paint avoids the peeling issues of latex paint on stucco.
- Porcelain tile: Large-format porcelain panels rated for exterior use provide a sleek, modern look. Use a modified thinset rated for exterior and freeze-thaw conditions. Grout lines should be sealed with a penetrating sealer.
- Brick: Real brick or thin brick veneer offers a classic look and holds up for decades. Brick absorbs some moisture, so a proper drainage plane behind the veneer is important in wet climates.
Appliance Ratings
Not all outdoor appliances are created equal. Look for these ratings and features:
- 304 stainless steel: The minimum grade for outdoor appliance housings. Lower grades (like 201 or 430) corrode in coastal or humid environments. In saltwater-adjacent areas, look for 316 marine-grade stainless.
- UL or CSA certification: Appliances should be listed for outdoor use by a recognized testing lab. Indoor-rated appliances used outdoors void the warranty and may not meet code.
- Weatherproof ratings: Outdoor refrigerators and ice makers should be rated for the temperature range in your climate. Some units have built-in heaters for freeze protection, while others must be brought indoors or winterized.
Fasteners and Hardware
Fastener failure is one of the most common causes of outdoor kitchen deterioration. Every fastener, hinge, and bracket in the project must be rated for exterior use:
- Stainless steel screws and bolts: Use 304 or 316 stainless for all structural connections
- Hot-dip galvanized: Acceptable for concealed framing connections where stainless is cost-prohibitive
- Avoid electrogalvanized and zinc-plated fasteners: These coatings are too thin for long-term outdoor exposure and will rust within a year or two
- Hinges and latches: Access doors, trash pullouts, and storage doors should use 304 stainless hardware. Powder-coated steel hardware will eventually chip and rust.
Sealers and Protective Coatings
Every porous material in an outdoor kitchen needs sealing:
- Granite: Apply a penetrating silicone-based sealer (not a topical coating) annually. Test by dropping water on the surface. If it beads up, the sealer is still working. If it absorbs, reseal.
- Concrete: Use a penetrating concrete sealer rated for exterior use and UV exposure. Topical sealers peel and flake outdoors.
- Natural stone veneer: A breathable masonry sealer prevents water absorption without trapping moisture behind the stone.
- Wood structures: Use a UV-resistant exterior stain or oil on pergolas, pavilions, and trim. Avoid film-forming finishes like polyurethane, which peel in sun exposure.
Plumbing and Gas Line Considerations
Beyond the basic sizing and materials covered earlier, outdoor kitchen plumbing and gas work present unique challenges that differ from interior work. Contractors who approach these systems with interior plumbing habits often run into problems within the first season.
Thermal Expansion and Contraction
Outdoor piping experiences much wider temperature swings than interior plumbing. A gas line that is 60 degrees in the morning can be 140 degrees in direct afternoon sun, then drop to 40 degrees overnight. This cycling causes:
- Threaded connection loosening: Black iron threaded joints can work loose over years of thermal cycling. Use thread sealant rated for gas (yellow PTFE tape or pipe dope), and support the pipe to prevent stress on joints.
- CSST movement: Corrugated stainless steel tubing expands and contracts with temperature. Follow manufacturer guidelines for support spacing and allow for movement at connection points.
- PEX water lines: PEX handles thermal expansion better than rigid pipe, which is one reason it is preferred for outdoor water supply runs. Copper expands less but requires soldered joints that can stress at fittings in extreme temperature cycling.
Backflow Prevention
Any outdoor water supply connection must include backflow prevention to protect the potable water system:
- Vacuum breaker: The minimum requirement for most outdoor hose bibs and simple sink connections. Install at least 6 inches above the highest point of the fixture.
- Reduced pressure zone (RPZ) assembly: Required in some jurisdictions for any outdoor water connection that could be submerged or cross-connected. An RPZ is bulkier and more expensive but provides the highest level of protection.
- Check local requirements: Backflow prevention requirements vary widely by municipality. Some require annual testing and certification of backflow devices.
Gas Line Routing Best Practices
- Keep gas lines accessible: Do not bury gas connections in places that cannot be reached for inspection or repair. Use access panels in the island frame to reach shutoff valves and connections.
- Separate from electrical: Maintain at least 6 inches of separation between gas piping and electrical wiring, and 12 inches from electrical panels or disconnects.
- Label everything: Mark gas line locations on as-built drawings. Buried gas lines should have tracer wire and warning tape installed 12 inches above the pipe. This prevents accidental damage during future landscaping or irrigation work.
- Test with a manometer: After the pressure test and before connecting appliances, verify pressure with a manometer to confirm there are no slow leaks. A 15-minute test catches most leaks, but a 30-minute test catches the slow ones.
Hot Water Delivery for Outdoor Sinks
Running hot water from the home’s water heater to an outdoor kitchen 40 or 50 feet away means a long wait for hot water and significant heat loss in the pipe. Better options include:
- Point-of-use tankless water heater: A small electric or gas tankless unit installed in the kitchen island delivers hot water in seconds. Electric units need a dedicated 30- or 40-amp circuit. Gas units need their own gas line and venting.
- Recirculation pump: For shorter runs, a small recirculation pump can keep hot water available near-instantly. The pump needs a dedicated circuit and a return line.
- Insulated supply lines: If running from the indoor heater, use R-4 or higher pipe insulation on the entire run. This reduces heat loss and shortens wait time, though it will not eliminate it on long runs.
Permitting Requirements by Municipality
Permitting is one of the most overlooked aspects of outdoor kitchen construction. Many contractors assume a backyard cooking area is a simple project that flies under the radar. In reality, outdoor kitchens touch multiple permit categories, and skipping permits creates liability, complicates home sales, and can result in forced removal of completed work.
Which Permits You Typically Need
Most outdoor kitchen projects require at least two and sometimes four or more separate permits:
- Gas/mechanical permit: Required for any gas line installation or modification. The gas company may also need to verify meter capacity before you begin work.
- Electrical permit: Required for any new circuits, outlets, or panel modifications. Even adding a single outdoor GFCI receptacle may require a permit in some jurisdictions.
- Plumbing permit: Required when adding water supply and drain connections. Some jurisdictions require a separate permit for the backflow preventer.
- Building/structural permit: Required for covered structures (pergolas, pavilions, roofs), retaining walls over a certain height (often 30 inches), and sometimes for the concrete slab itself if it exceeds a size threshold.
- Fire department review: Some municipalities require fire department review for outdoor cooking installations, especially those with wood-burning fireplaces or those placed close to structures.
Setback and Zoning Issues
Before designing the outdoor kitchen, verify:
- Property line setbacks: Most municipalities require structures to be set back 5 to 15 feet from property lines. Covered structures and fireplaces often have larger setback requirements than open patios.
- Easements: Utility easements, drainage easements, and access easements can restrict where you build. An outdoor kitchen built in an easement can be ordered removed.
- HOA restrictions: Many homeowners associations have rules about outdoor structures, materials, colors, and heights. Review the CC&Rs before starting design.
- Impervious surface limits: Some jurisdictions limit the percentage of a lot that can be covered with impervious surfaces (concrete, pavers, structures). A large patio and outdoor kitchen can push a property over the limit.
Inspection Sequences
Understanding the inspection sequence helps you schedule your trades correctly. A typical outdoor kitchen project requires inspections in this order:
- Foundation/slab inspection: Before pouring concrete, the inspector verifies footings, rebar placement, and gravel base.
- Underground rough-in: Gas lines, water supply, drain lines, and electrical conduit that run under or through the slab must be inspected before the concrete pour.
- Framing inspection: After the island frame and any structural framing for covered structures is complete, before applying the weather barrier and veneer.
- Gas pressure test: After the gas piping is complete and before concealing the lines.
- Electrical rough-in: After wiring is run and before covering with finish materials.
- Plumbing rough-in: After supply and drain lines are complete and before concealing.
- Final inspections: Gas, electrical, plumbing, and building finals. Some jurisdictions combine these into a single final inspection visit; others require separate inspections by different inspectors.
Documentation and Record-Keeping
Keep thorough records for every permitted outdoor kitchen project:
- Permit numbers and dates for each trade
- Inspection results with inspector names and dates
- As-built drawings showing the actual location of buried gas lines, water lines, electrical conduit, and drainage
- Material specifications for countertops, veneer, appliances, and structural components
- Warranty information for appliances, countertops, and any manufactured components
Provide copies of all documentation to the homeowner at project completion. This protects both the homeowner and your business.
Estimating Outdoor Kitchen Projects Accurately
Outdoor kitchen projects are notoriously difficult to estimate because they span so many trades and involve custom work at almost every step. A missed line item can turn a profitable project into a loss. Here is how to build accurate estimates that protect your margins.
Breaking Down the Estimate
Divide the estimate into clear cost categories that match the construction sequence:
- Site preparation: Demolition, grading, excavation, and soil export. Do not forget disposal fees for removed materials.
- Foundation: Concrete slab, footings, gravel base, rebar, and forming. Get a concrete price per yard from your supplier and calculate yardage precisely.
- Framing and structure: Steel studs, cement board, fasteners, blocking, and any structural steel for covered areas. Include labor for the framing crew.
- Gas plumbing: Pipe, fittings, valves, regulators, and labor. Get a firm quote from your plumber based on the final appliance list and layout.
- Water plumbing: Supply lines, drain lines, fittings, backflow preventer, and point-of-use water heater if needed.
- Electrical: Wire, conduit, breakers, receptacles, switches, GFCI devices, sub-panel, and labor. Include low-voltage wiring for lighting and audio.
- Countertop: Fabrication, delivery, and installation. Get a template-based quote from the fabricator after the island frame is complete.
- Veneer and finish: Stone, tile, stucco, or other finish material plus labor. Include lath, mortar, grout, and sealers.
- Appliances: Grill, refrigerator, sink, faucet, ice maker, pizza oven, warming drawer, and any other equipment. Include delivery and installation costs.
- Covered structure: Posts, beams, rafters, roofing, ceiling, fans, and lighting. This is often the single most expensive line item on high-end projects.
- Fire features: Fire pit or fireplace, gas connection, fire media, and glass wind guard.
- Landscaping and hardscape: Pavers, planting, irrigation modifications, and lighting around the outdoor kitchen area.
- Permits and inspections: Add the actual permit fees plus your time for scheduling and attending inspections.
Using Estimating Software
Manually estimating an outdoor kitchen project with 50 or more line items across 8 to 10 trades is where mistakes happen. Projul’s estimating tools let you build detailed estimates with material and labor breakdowns for each phase, then convert the approved estimate directly into a project schedule. This eliminates the disconnect between what you quoted and what you actually build.
Common Estimating Mistakes
- Forgetting utility trenching: The cost of trenching for gas, water, and electrical from the house to the kitchen location adds up quickly. Include trenching, backfill, and compaction in the estimate.
- Underestimating concrete: Waste, overdig, and uneven subgrade mean you always pour more concrete than the theoretical volume. Add 10 to 15 percent to your calculated yardage.
- Missing the permit timeline: Permit review can take 2 to 6 weeks depending on the municipality. If the homeowner wants the project done by Memorial Day, you need to submit permits in March. Build permit lead time into the project timeline.
- Not accounting for access: Delivering concrete, stone, and appliances to a backyard with limited gate access requires pump trucks, hand-carrying materials, and extra labor. Walk the access path during the estimate visit and price accordingly.
- Ignoring change order potential: Outdoor kitchen projects have a high rate of change orders because homeowners see the space taking shape and want to add features. Include a change order process in your contract and discuss likely additions during the sales process.
- Skipping the contingency: A 10 percent contingency on outdoor kitchen projects is standard. Unforeseen conditions like rock, roots, utility conflicts, or drainage issues are common in backyard construction.
Presenting the Estimate
How you present the estimate matters as much as the numbers:
- Itemize by phase: Homeowners appreciate seeing the cost broken down by construction phase rather than a single lump sum. It builds confidence that you have thought through the entire project.
- Show allowances clearly: For items where the homeowner has not made a final selection (countertop material, appliances, stone veneer), use allowances and state them clearly. This prevents disputes when the homeowner upgrades their grill from a $2,000 unit to a $5,000 unit.
- Include a timeline: Pair the estimate with a preliminary project schedule showing the duration and sequence of each phase. This sets expectations and demonstrates professionalism.
- Digital delivery: Send estimates digitally through your project management platform so the homeowner can review, ask questions, and approve electronically. Paper estimates get lost, and email attachments get buried.
Wrapping Up
Outdoor kitchens and living spaces are becoming standard on residential projects, and the scope of work keeps growing. Gas, electric, plumbing, concrete, stone, and framing all come together in a single project that the homeowner will use every day. Getting the details right during construction, especially the gas line sizing, drainage, and material selection, determines whether the space holds up for decades or starts failing in a few years.
Plan your utility runs early, build on a proper foundation, choose materials rated for outdoor exposure, and keep every trade coordinated on the schedule. That is how you build an outdoor living space that works as well as it looks.
Frequently Asked Questions
How much does it cost to build an outdoor kitchen?
What is the best countertop material for an outdoor kitchen?
Do you need a permit for an outdoor kitchen?
What size gas line do I need for an outdoor kitchen?
Can outdoor kitchens be used in winter?
How far should an outdoor kitchen be from the house?
What kind of foundation does an outdoor kitchen need?
Do outdoor kitchens need ventilation?
Related Articles

Concrete Tilt-Up Construction: A Contractor's Complete Field Guide
Tilt-up construction accounts for roughly 15 percent of all industrial and commercial buildings in North America. This...
Read More →
How to Implement Construction Software Without Losing Your Mind
Most construction software rollouts fail. Not because the software is bad, but because the rollout was rushed. Here are...
Read More →
How Selections Can Pay for Themselves in Three Easy Steps
Most contractors lose thousands each year on wrong material orders, slow client decisions, and missed upsell chances....
Read More →