Pool and Spa Construction: A Contractor Guide
Pool construction is one of those trades where you are working with structural concrete, plumbing, electrical, gas, tile, stone, and landscaping all on the same project. Every system interacts with every other system, and the sequencing has to be right or you are tearing things apart to fix problems that should have been prevented.
Whether you are a pool builder refining your process or a GC adding pool construction to your services, this guide walks through the major phases and the details that matter.
Pre-Construction Planning
Site Evaluation
Before you draw a single line on the plan, evaluate the site:
- Soil conditions: Expansive clay, high water table, rock, or fill all affect the pool design and construction approach. A soils report is not optional for most jurisdictions and should not be skipped even where it is not required.
- Access: Can your excavator, shotcrete truck, and material deliveries reach the pool location? Tight backyards with narrow side gates are common and require planning.
- Utilities: Locate all underground utilities (gas, electric, water, sewer, telecom) before excavation. Call 811 and verify with the homeowner about any private lines (irrigation, landscape lighting, septic).
- Setbacks: Check local zoning for setback requirements from property lines, structures, easements, and septic systems. These vary widely by jurisdiction.
- Drainage: Where does surface water go now, and where will it go after the pool is built? Grading and drainage plans must account for the pool deck area displacing permeable ground.
Permits and Engineering
Pool construction requires permits in virtually every jurisdiction. Typical requirements include:
- Building permit for the pool structure
- Electrical permit for pool equipment, lighting, and bonding
- Plumbing permit for water supply, drain connections, and gas lines (if applicable)
- Fence/barrier permit for pool safety enclosure
- Engineering stamped plans (structural and sometimes civil)
Some jurisdictions also require separate permits for the pool deck, retaining walls, and gas-fired heaters. Get your permit list early and submit applications before excavation starts.
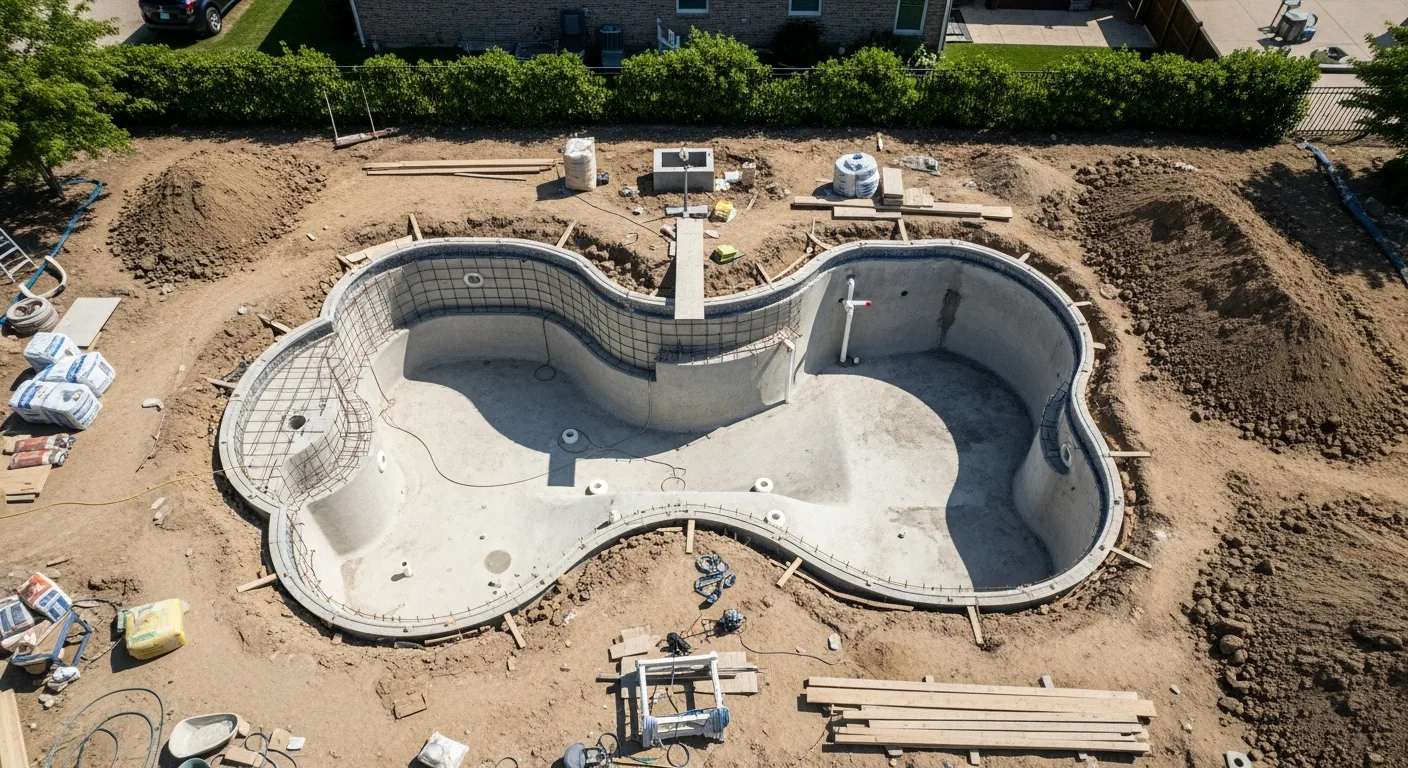
Excavation
Excavation sets the stage for everything that follows. Get it wrong and every subsequent trade suffers.
Equipment
Most residential pool excavations use a compact excavator (5 to 8 ton) for the main dig and a mini excavator or skid steer for tight areas. Dump trucks or transfer trucks haul the spoil. Soil volume from a typical 15x30-foot pool runs 75 to 120 cubic yards, depending on depth and shape.
Excavation Steps
- Layout: Stake the pool outline based on the plan. Verify setbacks and confirm the location with the homeowner before digging.
- Over-dig: Excavate 6 to 12 inches beyond the pool shell dimensions on all sides to allow room for the plumbing, rebar, and shotcrete application.
- Shape the contours: Cut the hopper bottom, benches, steps, and spa seat profiles to rough grade. These will be refined during the forming and steel phase.
- Check elevations: Shoot grades throughout the excavation to confirm depths match the plan. A rotary laser or GPS machine control keeps things accurate.
- Dewater if needed: High water table conditions may require dewatering pumps running continuously until the shell is complete and heavy enough to resist uplift.
Rock and Difficult Soil
Hitting rock during excavation adds cost and time. Options include:
- Hoe-ram (hydraulic breaker): Mounted on the excavator, effective for soft to medium rock
- Pneumatic rock drill and splitting: For harder rock formations
- Blasting: Rarely used in residential settings due to vibration and liability concerns
Budget a rock contingency in your estimate. If the soils report shows rock at or near pool depth, price it in from the start rather than surprising the homeowner with a change order.
Steel (Rebar) Installation
The rebar cage is the structural skeleton of the pool shell. This phase is where the pool takes its final shape.
Rebar Specifications
Most residential pools use:
- #3 rebar (3/8-inch diameter) at 12-inch spacing in both directions for walls and floor
- #4 rebar (1/2-inch diameter) for beam sections, cantilevered areas, and raised bond beams
- Overlap/splice length: 24 inches minimum (40 bar diameters for #3)
- Chair supports: Hold the steel at proper position within the shell (typically 1.5 to 2 inches from the soil side)
Key Details
- Beam: The pool perimeter beam (bond beam) ties the top of the walls together and anchors the coping. It is typically 8 to 12 inches square with #4 rebar, two bars top and two bottom, with #3 stirrups at 12-inch spacing.
- Steps and benches: Form these with rebar and shape them during the steel phase. Step riser height should be consistent (typically 10 to 12 inches) and tread depth adequate for comfort.
- Spa tie-in: Where the spa connects to the pool, the spillway or connection wall needs proper steel continuity. This is a high-stress area that cracks if the rebar is not detailed correctly.
- Plumbing stub-ups: Coordinate rebar placement with plumbing penetrations. The steel crew needs to know where every pipe enters the shell.
Inspection
Most jurisdictions require a rebar inspection before shotcrete. The inspector checks bar sizes, spacing, coverage, lap splices, and beam reinforcement. Do not schedule your shotcrete crew until the inspection passes.
Plumbing
Pool plumbing runs between the pool shell and the equipment pad. Getting the pipe routing, sizing, and connections right during this phase prevents problems that are extremely expensive to fix after the shell is shot.
Suction Side
- Skimmers: Typically 2-inch PVC from each skimmer to the pump. Most residential pools have two skimmers. The skimmer bodies are set during the steel phase and must be at the correct elevation for the waterline tile.
- Main drain: 2-inch PVC from the main drain to the pump. Current code (VGB Act) requires two main drains per pool, spaced at least 3 feet apart, connected with a split line. Single main drains are no longer compliant.
- Spa suction: Separate suction line from the spa to allow independent spa operation.
Return Side
- Return inlets: 1.5-inch or 2-inch PVC from the filter/heater back to the pool. Place returns to create proper circulation, typically pointing down and toward the skimmers to create a circular flow pattern.
- Spa returns: Separate returns for the spa, including jet fittings for hydrotherapy.
- Water features: Dedicated return lines for waterfalls, deck jets, bubblers, and other features. Size these for the specific flow requirements of each feature.
Equipment Pad Plumbing
The equipment pad is where the pump, filter, heater, chlorinator, and automation system live. Plan the pad location for:
- Easy access for maintenance
- Proximity to the pool (shorter pipe runs mean less friction loss)
- Adequate drainage (heater discharge, backwash water, winterization drainage)
- Code-required setbacks from doors, windows, and property lines
Pressure Testing
After all plumbing is installed and before shotcrete, pressure test every line. Standard practice is 20 to 25 psi for 24 hours with no drop. Mark every pipe and fitting with paint or flagging so the shotcrete crew can see them during application.
Shotcrete Application
Shotcrete day is the big event. The pool shell goes from a cage of rebar and pipes to a solid concrete structure in a single day.
Pre-Shoot Preparation
- Dampen the excavation walls to improve bonding (but no standing water)
- Verify all plumbing is pressure tested and flagged
- Confirm rebar inspection has passed
- Protect any adjacent structures, landscaping, and hardscapinge from overspray
- Have a cleanup crew ready because shotcrete overspray goes everywhere
Application
Shotcrete is applied at 400 to 600 psi nozzle pressure by a trained nozzleman. Key practices:
- Shoot from bottom up on walls to support the fresh material
- Build to proper thickness (typically 6 to 8 inches for walls, 6 inches for floors)
- Minimize rebound by holding the nozzle at the proper distance (3 to 5 feet) and angle (perpendicular to the surface)
- No cold joints: The entire shell should be shot in one continuous session. Stopping and restarting creates weak planes.
- Embed all plumbing fittings including return fittings, light niches, and skimmer bodies to their proper depth
Quality Control
After application:
- Probe the shell thickness at multiple points using a probe rod or small drill
- Check that plumbing fittings are at the correct position and depth
- Verify the shell profile matches the plan dimensions
- Begin curing. Wet cure for a minimum of 7 days, either by flooding the pool or using sprinklers and wet burlap.
Shotcrete core samples may be required by the engineer or building department. Typical compressive strength requirement is 4,000 psi at 28 days.
Tile and Coping
Once the shell has cured, the finish work begins. This is where the pool starts looking like a pool.
Waterline Tile
The waterline tile band sits at the water surface level and provides a durable, cleanable surface at the most visible and chemical-exposed area of the pool. Typical details:
- Height: 6 inches (one row of 6x6 tile) or 12 inches (two rows) is standard
- Setting material: Thinset morite rated for submerged application
- Grout: Epoxy grout or polymer-modified grout rated for pool use. Standard sanded grout will fail in the chemical environment.
- Elevation: The top of the tile should be 1/4 to 3/8 inch below the bottom of the coping to create a reveal line
Coping
The coping caps the pool beam and provides the finished edge between the pool and the deck. Options include:
- Precast concrete coping: Factory-made units in various profiles (bullnose, flat, cantilevered). Durable and cost-effective.
- Natural stone: Travertine, limestone, flagstone, and bluestone are popular choices. Set on a mortar bed over the bond beam.
- Poured-in-place concrete: The deck is poured right up to and over the pool edge with a formed bullnose. Clean look but requires careful forming.
- Brick: Traditional look, set on mortar with proper drainage behind the coping.
All coping must slope away from the pool at a minimum of 1/4 inch per foot to prevent deck water from running into the pool.
Electrical
Pool electrical work is governed by NEC Article 680, which has specific requirements that go beyond standard residential electrical.
Bonding
Bonding is the most misunderstood and most frequently failed inspection item in pool construction. NEC 680.26 requires bonding of:
- All metal parts within 5 feet of the pool (ladders, rails, light niches, drain covers)
- The pool shell reinforcing steel (a #8 solid copper conductor connected to the rebar at four points around the perimeter)
- Metal parts of the pool equipment (pump, heater, filter housing)
- Any metal within 5 feet horizontally of the pool water’s edge (fence posts, window frames, conduit)
- The pool water itself (through a listed pool water bonding device or metal return fitting)
The bonding grid connects all of these components together, not to ground, but to each other. This equalizes voltage potential and prevents electrical shock.
GFCI Protection
Every circuit serving pool equipment, lighting, or receptacles within 20 feet of the pool must have GFCI protection. This includes:
- Pool pump motor (GFCI breaker or GFCI disconnect)
- Underwater lights
- All receptacles within 20 feet of the pool edge
- Receptacles serving the equipment pad
Underwater Lighting
Pool lights are installed in niches (stainless steel or plastic housings) set into the pool wall during the steel and plumbing phase. Key details:
- LED is now the standard. Color-changing LED fixtures consume 15 to 50 watts compared to 300 to 500 watts for the old incandescent fixtures.
- Conduit: 1-inch rigid or flexible conduit from the niche to the junction box (J-box) behind the pool wall. The J-box must be at least 4 inches above the waterline and at least 4 feet from the pool edge.
- Extra cable: Leave 12 to 18 inches of extra cable coiled in the niche so the light can be pulled up to deck level for bulb replacement without draining the pool.
- Circuit: Dedicated 20-amp circuit with GFCI protection.
Equipment Electrical
The equipment pad needs:
- Dedicated circuits for pump(s), heater, and automation system
- A disconnect within sight of the equipment
- A convenience receptacle (GFCI) for maintenance equipment
- Conduit to the automation panel for control wiring
If the pool has a gas heater, coordinate the gas line installation with the plumber. The heater needs a gas shutoff valve, proper BTU-rated gas line, and clearances per the manufacturer and local code.
Interior Finish
The interior finish is the final coating applied to the pool shell. It is what you see when you look into the water, and it needs to be both beautiful and durable.
Plaster
Traditional white marcite plaster (Portland cement, marble aggregate, and water) is the most economical option. It provides a smooth, white finish that makes the water look blue. Lifespan is 7 to 12 years before resurfacing is needed.
Quartz/Pebble Finishes
Premium aggregate finishes mix colored quartz, river pebbles, or glass beads into the plaster mix. These finishes are more durable (12 to 20+ years), more stain-resistant, and available in a wide range of colors and textures.
Popular brands include PebbleTec, PebbleSheen, and NPP (National Plasterers & Pool). Each has specific application requirements that the plasterer must follow.
Application
Plaster application is a one-day, time-critical process:
- Prep the shell surface (acid wash or bond coat application)
- Apply the base coat (scratch coat) and let it set briefly
- Apply the finish coat and trowel to a smooth surface
- Begin filling the pool immediately. Do not let the fresh plaster dry out.
- Follow the manufacturer’s startup procedure for chemical treatment and brushing
Pool Deck Construction
The deck is the largest visible element of the pool project and takes the most abuse from weather, chemicals, and foot traffic.
Concrete Decks
Most pool decks are poured concrete with a decorative finish:
- Broom finish: Basic, slip-resistant, cost-effective
- Stamped concrete: Imitates stone, brick, or tile patterns. Requires experienced finishers.
- Exposed aggregate: Seeded or revealed aggregate for a textured, slip-resistant surface
- Cool deck / spray texture: Acrylic-based coatings that reduce surface temperature. Very common in hot climates.
Concrete decks should be 4 inches thick minimum on 4 inches of compacted base. Control joints every 8 to 10 feet and expansion joints at the pool coping and any adjacent structures.
Paver Decks
Concrete or natural stone pavers set on a compacted sand bed offer easy repair and replacement. Pavers also flex slightly with ground movement, reducing cracking. Edge restraints and proper base preparation (6 to 8 inches of compacted aggregate) are essential.
Drainage
Deck drainage must move water away from the pool and away from the house:
- Slope: Minimum 1/4 inch per foot away from the pool edge (except the coping, which slopes away from the pool)
- Perimeter drains: Channel drains or slot drains around the deck perimeter capture runoff
- Area drains: Point drains in low spots where water collects
- No deck drainage into the pool: This washes dirt, chemicals, and debris into the pool water
Managing the Pool Construction Process
A pool project involves excavation, steel, plumbing, electrical, shotcrete, tile, coping, plaster, decking, fencing, landscaping, and equipment installation. That is 10 to 12 trades on a single project, often in a residential backyard with limited space and an anxious homeowner watching from the kitchen window.
Keeping all of those trades coordinated and on schedule requires a real project management system, not a whiteboard and a phone. Projul is built for this kind of multi-trade residential construction. You can schedule each phase, track material deliveries, share updates with the homeowner through a client portal, and keep your entire crew aligned on what is happening next.
If you are building pools and managing the chaos with spreadsheets and text messages, schedule a demo of Projul and see how it simplifies the process. Or check the pricing page to find a plan that fits your operation.
Safety and Compliance
Pool Barriers
Every jurisdiction requires a barrier (fence) around the pool area. Common requirements per the IBC and IRC:
- Minimum height of 48 inches (some jurisdictions require 60 inches)
- No openings that allow a 4-inch sphere to pass through
- Self-closing, self-latching gates that open away from the pool
- Latch height at least 54 inches from grade on the outside of the gate
Anti-Entrapment
The Virginia Graeme Baker Pool and Spa Safety Act (VGB Act) requires:
- Drain covers compliant with ASME/ANSI A112.19.8
- Dual main drains for pools and spas
- Safety vacuum release systems (SVRS) or equivalent for single-drain configurations (where allowed)
Chemical Safety
If the pool has an automated chemical feed system (salt chlorine generator, liquid chlorine feeder, acid feeder), make sure the equipment is installed per manufacturer specs with proper ventilation and containment.
Budgeting and Estimating Pool Projects
Getting the estimate right on a pool project is harder than most residential work because so many variables stack on top of each other. A pool is not like framing a house where you can count studs and sheets of plywood. You are pricing excavation in soil you have not dug yet, shotcrete quantities that depend on shell thickness and shape, and finish materials that range from $3 per square foot plaster to $15 per square foot glass tile.
Breaking Down the Cost Categories
A solid pool estimate should break the project into clear categories so you can track actual costs against your bid as the job progresses:
- Excavation and haul-off: Price per cubic yard of soil removed, plus mobilization for the equipment. Add a rock contingency line item, even if the soils report looks clean. Hitting an unexpected boulder at 6 feet deep should not eat your profit.
- Steel and forming: Rebar by the ton, plus labor for cutting, bending, and tying. Include the chairs, tie wire, and any specialty forming for steps, benches, and raised features.
- Plumbing: All pipe, fittings, valves, skimmer bodies, main drains, return fittings, and equipment pad plumbing. If the pool has water features, those dedicated lines and fittings add up quickly.
- Shotcrete: Typically priced by the cubic yard of material delivered and pumped, plus the nozzleman crew. A typical residential pool uses 25 to 45 cubic yards depending on size and wall thickness.
- Electrical: Bonding, GFCI circuits, lighting, equipment wiring, automation panel, and the sub-panel. Do not forget the permit fees and inspection costs.
- Tile and coping: Material cost per linear foot for waterline tile and coping, plus setting materials and labor. Natural stone coping costs two to three times what precast coping does.
- Interior finish: Plaster, quartz, or pebble finish priced per square foot of interior surface area. The difference between basic plaster and a premium PebbleTec finish can be $5,000 to $15,000 on a standard pool.
- Decking: Concrete, pavers, or stone priced per square foot, including base preparation, forming, and finishing.
- Equipment: Pump, filter, heater, salt system or chlorinator, automation, and cleaning system. Equipment packages range from $5,000 for basic setups to $20,000+ for variable-speed pumps with full automation and salt chlorine generation.
- Permits and engineering: These are real costs that many builders bury in overhead. A structural engineering package and full permit set can run $2,000 to $5,000 depending on your jurisdiction.
Markup and Profit
Pool construction is capital-intensive. You have large material deposits, equipment rentals, and sub-contractor payments spread across 8 to 16 weeks before the homeowner makes their final payment. Your markup needs to account for that carrying cost.
Most successful pool builders work on 15 to 25 percent gross margins. If you are consistently below 15 percent, you are probably underestimating something or giving away too much in change orders that should have been priced from the start.
Using construction estimating software helps you build accurate, repeatable estimates so you are not reinventing the wheel on every bid. Templates for common pool configurations (standard rectangle, freeform with spa, vanishing edge) save hours and reduce the chance of missing a line item.
If you want free templates to get started, check out our pool and spa estimate templates that you can customize for your market.
Change Order Management
Pool projects generate change orders. The homeowner sees the hole in the ground and suddenly wants to add a spa, upgrade the tile, or extend the deck by 200 square feet. Each of those changes affects the schedule and the budget.
Document every change order in writing before the work starts. Include the additional cost, the impact on the timeline, and get a signature. Verbal agreements in the backyard lead to disputes at final payment.
A good project management system lets you create and track change orders digitally, attach them to the project, and keep a clear record of what was agreed to and when. That paper trail protects you if the relationship goes sideways.
Common Pool Construction Mistakes and How to Avoid Them
Every pool builder has a list of lessons learned the hard way. Here are the mistakes that cost the most money and the most sleep.
Poor Plumbing Layout
Running all your suction and return lines on the same side of the pool because it was easier during rough-in creates dead spots in circulation. The pool ends up with algae in the corners and the homeowner blames your water chemistry, but the real problem is that water is not moving through half the pool.
Plan return placements to push water in a circular pattern. Angle returns down at about 45 degrees and point them so the flow sweeps debris toward the skimmers. On freeform pools with irregular shapes, this takes more thought, but it makes a real difference in water quality.
Skimmer Elevation Errors
If the skimmer throat is too high, the skimmer does not pull surface debris effectively. If it is too low, the waterline tile looks wrong and the coping reveal is off. The skimmer body position is set during the steel phase but the final elevation is confirmed during tile and coping. Coordinate with your tile setter so the waterline hits the skimmer at the right point.
Insufficient Curing Time
Shotcrete needs moisture to cure properly. Spraying it down for a day or two and calling it good leads to a weaker shell that is more prone to cracking and delamination. Commit to 7 full days of wet curing. Either flood the pool to the bench level and keep it wet, or set up sprinklers on a timer. The small cost of water and time pays off in a shell that lasts decades.
Forgetting the Autofill
An autofill device (float valve connected to a water supply line) maintains the pool water level automatically. It seems like a small detail, but a pool that drops below the skimmer level pulls air into the pump and can damage the equipment. Most homeowners forget to check the water level, especially during hot summer months when evaporation is at its peak.
Install the autofill during the plumbing phase. It is a $200 part that prevents $2,000 pump repairs.
Deck Drainage Failures
Water ponding on the deck after rain is a warranty call that keeps coming back. If the deck was not graded properly or control joints were not placed correctly, fixing it after the concrete is poured means grinding, overlays, or in the worst case, removal and replacement.
Shoot your grades carefully before pouring. Use string lines and a laser level to verify the slope at multiple points. Pay attention to transitions where the deck meets the coping, the house foundation, and any retaining walls.
Bond Beam Cracking
The bond beam is the structural connection between the pool shell and the coping/deck. Cracking at this joint is one of the most common callbacks. It usually results from insufficient steel in the beam, poor compaction of the backfill around the pool, or deck concrete that was poured before the backfill had time to settle.
Let the backfill settle for at least two weeks before pouring the deck. Some builders water-compact the backfill in lifts, which speeds up the process. Either way, do not rush the deck pour.
Warranty, Callbacks, and Long-Term Client Relationships
Pool construction does not end when you hand over the keys and the homeowner jumps in. The warranty period is where you either build a reputation or destroy one.
Structuring Your Warranty
A clear, written warranty should spell out exactly what is covered, what is not, and for how long. Typical pool builder warranties include:
- Shell structure: 15 to 25 years (or lifetime) for structural defects in the shotcrete shell. This covers actual cracks through the shell, not surface crazing or hairline cracks in the plaster.
- Plumbing: 5 to 10 years for leaks in the underground plumbing.
- Equipment: Manufacturer warranty pass-through (typically 1 to 3 years depending on the brand and component).
- Interior finish: 1 to 3 years for defects in the plaster or pebble finish, excluding normal wear, chemical damage from improper water chemistry, or staining.
- Tile and coping: 2 to 5 years for delamination or failure of the setting material.
- Decking: 1 to 2 years for structural cracking. Surface hairline cracks and cosmetic crazing in stamped concrete are typically excluded.
Be specific about exclusions. Improper water chemistry is the number one cause of plaster failure, and it is not a construction defect. If the homeowner runs their pH at 8.2 for six months, the plaster will etch and stain, and that is on them, not you.
Handling Callbacks Professionally
When a homeowner calls with a problem, respond quickly even if you think it is not a warranty issue. The way you handle the first callback sets the tone for the entire warranty period.
Show up, assess the issue, and explain what you found. If it is a legitimate warranty item, fix it promptly. If it is a maintenance issue (water chemistry, filter cleaning, equipment settings), take the time to educate the homeowner. That conversation builds trust and prevents future calls about the same thing.
Track every callback in your project management software so you can see patterns. If you are getting the same callback on multiple pools, something in your process needs to change. Maybe your plaster sub is applying too thin. Maybe your tile setter is using the wrong thinset. The data tells you where to focus.
Turning Warranty Clients into Referral Sources
Pool homeowners talk to their neighbors. A well-built pool in a nice neighborhood generates referrals for years. But only if the builder stays responsive after the sale.
Some builders offer a complimentary “pool school” session after construction, where they walk the homeowner through equipment operation, water chemistry basics, seasonal maintenance, and how to use the automation system. That 90-minute investment turns a confused homeowner into a confident one who tells everyone how great their builder is.
Send a follow-up check-in at 30 days, 6 months, and 12 months after completion. A quick text or email asking “How is the pool?” costs nothing and keeps the relationship alive. When their neighbor asks who built their pool, you want your name to come up with a smile, not a complaint.
Choosing the Right Software for Your Pool Business
Running a pool construction company means juggling design consultations, permits, sub-contractors, material orders, inspections, and homeowner communication on every single project. Multiply that by 10 or 20 active projects and things fall through the cracks fast.
What to Look for in Pool Contractor Software
Not all construction software works well for pool builders. General contractor platforms often focus on large commercial projects with features you will never use, while simple to-do list apps do not have the depth to handle a multi-phase pool build. Here is what actually matters for pool contractors:
- Phase-based scheduling: You need to schedule work in the order it has to happen. Steel before plumbing. Plumbing before shotcrete. Tile before plaster. The software should make it easy to sequence phases and shift the whole schedule when one phase runs long.
- Sub-contractor coordination: Pool builds involve a dozen different subs. Your scheduling tool needs to notify subs when their phase is coming up and let them confirm availability without a phone call for every update.
- Photo documentation: Every phase of a pool build should be documented with photos. Before the shotcrete covers the plumbing and rebar, you want timestamped photos in the project file showing the work was done right. This protects you on warranty claims and inspections.
- Client communication: Homeowners want to know what is happening. A client portal where they can see progress photos, upcoming schedule, and project milestones reduces the “when will my pool be done?” calls by 80 percent.
- Estimating and invoicing: Tying your estimate to the actual project so you can compare estimated vs. actual costs per phase is how you get better at bidding over time.
- Mobile access: Your foreman is in a backyard, not at a desk. The software needs to work well on a phone or tablet in direct sunlight with one dirty hand.
Why Pool Builders Use Projul
Projul was built for residential and specialty contractors, including pool builders. The scheduling, photo documentation, client portal, and estimating tools are designed for the way pool projects actually flow, not the way a software developer imagines they flow.
If you are still running your pool business on spreadsheets, text message threads, and a whiteboard in the office, you already know the pain. Missed inspections, subs showing up on the wrong day, homeowners calling because nobody told them the shotcrete date moved.
Try Projul for free and see how it handles a real pool project. The setup takes about 30 minutes, and most builders have their first project loaded the same day.
Wrapping Up
Pool and spa construction is a rewarding niche that combines structural concrete work, plumbing, electrical, and finish craftsmanship into a single project. The key to doing it well is getting the sequencing right, coordinating your trades, and paying attention to the details that affect long-term durability.
Take the time to plan each phase, communicate with the homeowner about realistic timelines, and use a project management tool that keeps everyone on the same page. The projects that go smoothly are the ones where nothing is left to chance.
Frequently Asked Questions
How long does it take to build an inground pool?
What is the difference between shotcrete and gunite?
How thick should a pool shell be?
What size plumbing is used for pools?
How deep does a pool need to be for diving?
What electrical requirements does a pool have?
How much does an inground pool cost?
When can you swim after pool plastering?
Related Articles

Concrete Tilt-Up Construction: A Contractor's Complete Field Guide
Tilt-up construction accounts for roughly 15 percent of all industrial and commercial buildings in North America. This...
Read More →
How to Implement Construction Software Without Losing Your Mind
Most construction software rollouts fail. Not because the software is bad, but because the rollout was rushed. Here are...
Read More →
How Selections Can Pay for Themselves in Three Easy Steps
Most contractors lose thousands each year on wrong material orders, slow client decisions, and missed upsell chances....
Read More →