Post-Tensioned Concrete Slabs: A Contractor's Complete Guide | Projul
If you have been pouring conventional slabs your whole career, the first time you see a post-tensioned layout can feel like someone handed you a blueprint written in a different language. Tendons running in every direction, anchors bolted to the forms, and a stressing crew showing up days after the pour with hydraulic jacks. It looks complicated because it is, but once you understand the basics, PT concrete becomes another tool in your arsenal that opens doors to projects you could not touch before.
Post-tensioned concrete has been around since the 1950s, but it has become the standard for commercial construction, parking structures, multi-story residential, and even high-end custom homes in expansive soil areas. If you are a contractor looking to grow into bigger work or you are already seeing PT specs on your projects, this guide covers what you actually need to know on the job site.
How Post-Tensioned Concrete Works
At its core, post-tensioning is simple: you pour concrete around steel tendons, let the concrete cure, and then pull those tendons tight with hydraulic jacks. The tension in the tendons puts the entire slab into compression, which is exactly where concrete performs best.
Think of it like this. If you take a row of books and squeeze them together between your hands, you can lift the whole row without any of them falling out. The compression from your hands keeps everything tight. That is essentially what post-tensioning does to a concrete slab. The tendons are your hands, and the concrete is the books.
Each tendon is a high-strength steel strand (usually 1/2 inch or 0.6 inch diameter, 270 ksi steel) coated in grease and wrapped in a plastic sheath. One end has a dead-end anchor that gets cast into the concrete. The other end has a live anchor where the stressing crew attaches their jack. After stressing, each strand carries roughly 33,000 pounds of force. Multiply that across dozens or hundreds of tendons in a slab, and you have an enormous amount of compression holding everything together.
There are two main types of PT systems. Unbonded tendons are individually greased and sheathed, remaining free to move inside the concrete. This is the most common system in the United States for buildings. Bonded tendons run through metal or plastic ducts and get grouted solid after stressing, locking the tendon to the concrete permanently. Bonded systems are more common in bridges and international construction.
The result is a slab that can be 20 to 30 percent thinner than a conventionally reinforced slab spanning the same distance. Thinner slabs mean less concrete, less dead weight on the structure below, shorter floor-to-floor heights, and real cost savings that add up fast on multi-story buildings. If you want to understand concrete basics before jumping into PT, start there.
When Post-Tensioned Slabs Make Sense
Not every project needs post-tensioning. For a 10-by-10-foot patio slab, it would be overkill. But there are specific situations where PT is the clear winner.
Long spans without intermediate supports. If the architect wants a 30-foot clear span with no columns or beams dropping below the slab, PT is often the most practical answer. Convention reinforcement would require a much thicker slab or drop panels, both of which eat into usable space and add weight.
Expansive soils. In parts of Texas, Colorado, California, and the Southeast, clay soils expand and contract dramatically with moisture changes. PT slabs on grade resist this movement far better than conventional slabs because the compression keeps the slab acting as one rigid unit instead of cracking and breaking apart. Many residential builders in these regions have switched to PT foundations entirely.
Multi-story construction. On a 10-story building, saving 2 inches of slab thickness per floor adds up to nearly 2 feet of building height saved, or the ability to add an extra floor within the same height limit. The reduced concrete volume also means lighter floors, smaller columns, and smaller foundations. This is why nearly every multi-story concrete building in the US uses post-tensioning.
Parking structures. PT slabs dominate parking garage construction because they can span the 60-foot double-tee distances common in parking layouts, resist cracking from vehicle loads and thermal movement, and the thinner slabs reduce the overall building height.
Water-containing structures. Pools, tanks, and water treatment facilities benefit from PT because the compression keeps the concrete in a state where it resists cracking, which is exactly what you want when the slab needs to hold water.
If you are estimating a project and the specs call for post-tensioning, do not just guess at the numbers. PT work requires specialty subcontractors, and their pricing can vary significantly based on tendon layout complexity, access, and stressing schedule.
The Construction Sequence Step by Step
Building a post-tensioned slab follows a specific sequence, and skipping or rushing any step can create problems that are incredibly expensive to fix.
Step 1: Formwork and shoring. For raised slabs, your formwork and shoring need to handle not just the wet concrete weight but also the forces that come during stressing. The structural engineer will specify reshoring requirements because PT stressing creates forces that transfer through the slab to the shoring below. Proper formwork practices are critical here.
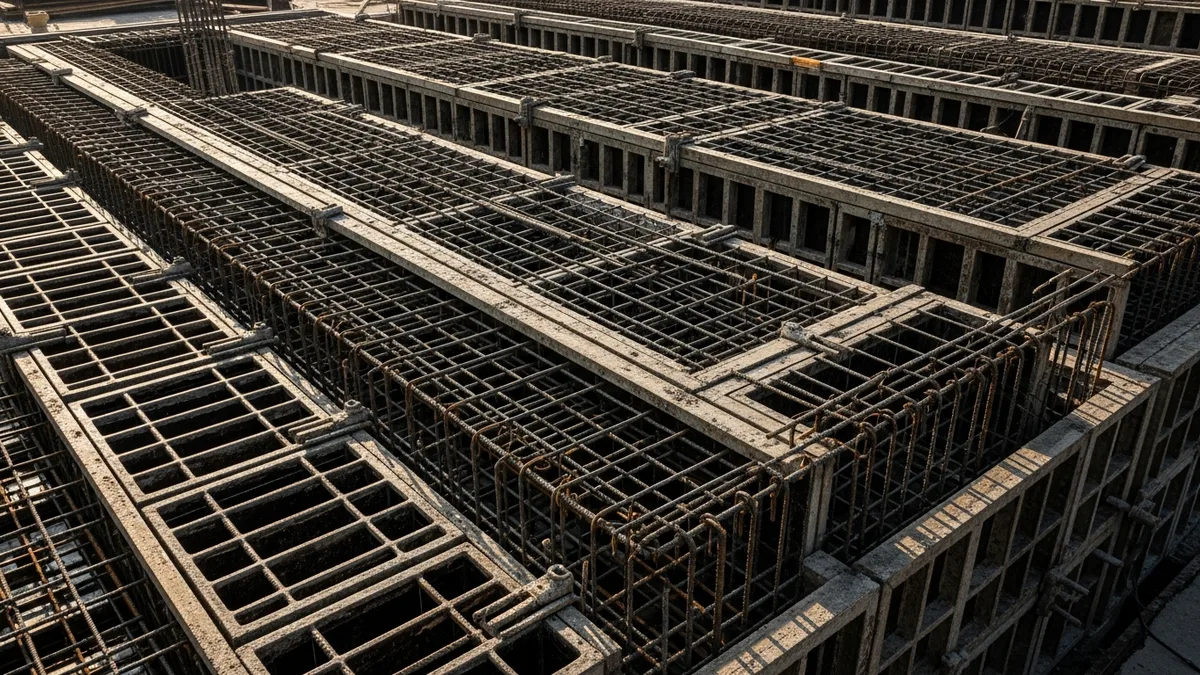
Step 2: Tendon layout. The PT subcontractor installs tendons according to the structural drawings. Each tendon has a specific profile, meaning it drapes up and down through the slab thickness in a calculated curve. The high points are typically over columns, and the low points are at midspan. This profile is what creates the upward force that counteracts the slab’s self-weight. Chairs and supports hold each tendon at its correct height. This is where inspection matters most. A tendon that is an inch too high or too low changes the structural behavior of the entire slab.
Step 3: Mild reinforcement. Even though post-tensioning provides the primary structural reinforcement, most PT slabs still require conventional rebar at specific locations. You will see rebar at column connections, around openings, at slab edges, and at any location where the engineer needs extra strength or crack control. The mild steel works alongside the tendons, not instead of them.
Step 4: Embed installation. Electrical conduits, plumbing sleeves, anchor bolts, and other embeds need to be placed before the pour, and they must avoid tendon locations. This is where coordination between trades becomes critical. A plumber who drills through a tendon sheath during rough-in has just created a corrosion path that could fail years down the road. Get everyone looking at the same drawings.
Step 5: Pour and finish. The concrete placement and finishing process is similar to conventional slabs, but with extra care around tendon anchorages and profiles. Do not vibrate directly on tendons or sheathing, and protect anchor pockets from concrete overflow. Your mix design matters here too, because the concrete needs to hit the required compressive strength within the stressing window specified by the engineer.
Step 6: Curing. Standard curing practices apply, but the stakes are higher because you are counting on the concrete reaching a specific strength before stressing. If you shortcut the curing process, the concrete may not reach the required PSI, and your stressing schedule gets pushed back, which pushes everything else back too.
Step 7: Stressing. Once the concrete reaches the specified strength (confirmed by cylinder breaks), the stressing crew arrives with calibrated hydraulic jacks. They stress each tendon to the engineer’s specified force, measure the elongation, and compare it to calculated values. If the measured elongation does not match the calculated elongation within about 5 to 7 percent, something is wrong, and the engineer needs to be notified before proceeding.
Step 8: Anchor grouting and patching. After stressing, the excess strand is cut off, and the anchor pockets are filled with non-shrink grout. This protects the anchor from corrosion and gives the slab edge a clean finish. Do not skip this step or use the wrong grout. The anchors are the termination points for all that force, and corrosion here can lead to anchor failures.
Common Mistakes That Cost Contractors Money
Read real contractor reviews and see why Projul carries a 9.8/10 on G2.
PT concrete is not forgiving. Mistakes that you might get away with on a conventional slab can become major structural problems on a post-tensioned one.
Drilling or cutting without locating tendons. This is the biggest one, and it can be fatal. A stressed tendon holds roughly 33,000 pounds of force. If you cut one, the strand retracts violently. People have been killed by severed PT tendons. Before any penetration in a PT slab, use GPR (ground-penetrating radar) to locate every tendon in the area, and get engineering approval. Mark it, scan it, and then scan it again.
Stressing before the concrete is ready. When the schedule is behind, there is always pressure to stress the tendons early so forms can be stripped and the next floor started. If the concrete has not reached the required compressive strength, stressing can crush the concrete around the anchorages, blow out the edges, or create internal cracking that you will not see until the slab starts deflecting months later. Always wait for the cylinder breaks.
Incorrect tendon profiles. If the chairs or supports that hold the tendons at their correct height get knocked during the pour, the tendon drapes in the wrong location. This changes the load path through the slab. A tendon that should be at the bottom at midspan but got pushed up is no longer providing the upward force the engineer designed for. Inspect tendon profiles carefully before the pour and fix anything that has moved.
Ignoring slab shortening. When you stress a PT slab, it literally gets shorter. A 200-foot slab might shorten by 3/4 of an inch or more. If the slab is connected rigidly to stiff walls, columns, or other elements, that shortening has to go somewhere, and it usually shows up as cracks in the restraining elements. Good PT design accounts for this with pour strips, closure strips, or delayed connections. As a contractor, make sure you understand the pour strip sequence and do not close them early.
Poor coordination with other trades. Plumbers, electricians, and HVAC contractors all need to know where the tendons are before they start roughing in. A conduit that crosses a tendon path might be fine if there is enough cover, but a drain line that conflicts with a tendon requires moving one or the other before the pour. Sort this out in coordination meetings, not on pour day.
If you are managing multiple PT projects, keeping track of stressing schedules, cylinder break results, and pour strip sequences across different jobs is where construction scheduling tools earn their keep. Missed stressing dates or early strip removals can set a project back weeks.
Inspection and Quality Control
Post-tensioned concrete demands more inspection than conventional work, and the consequences of skipping inspections are more severe.
Pre-pour inspection is the most critical checkpoint. Before any concrete goes in, an inspector (usually the structural engineer’s representative) should verify tendon profiles and spacing match the drawings, all anchorages are properly secured, mild reinforcement is placed correctly, tendon sheathing is intact with no tears or punctures, chairs and supports have not been displaced, and all embeds and blockouts are correctly located and do not conflict with tendons. If any of these items are off, stop and fix them. It is infinitely cheaper to adjust a tendon profile before the pour than to deal with a structural deficiency afterward.
Stressing inspection requires the stressing crew to record the force applied and the measured elongation for every tendon. These numbers get compared to the engineer’s calculated values. Acceptable tolerances are typically plus or minus 5 percent on elongation. Any tendon outside that range needs investigation. Common causes of elongation discrepancies include strand caught on rebar or embeds creating extra friction, incorrect tendon profile (higher friction than calculated), damaged sheathing, and wobble or misalignment at anchorages.
Post-stressing documentation should include stressing logs for every tendon, cylinder break results confirming concrete strength at stressing, photos of anchor pockets before and after grouting, and any deviation reports with engineering dispositions. Keep these records. They are part of the permanent project documentation, and they protect you if questions come up years later about slab performance.
For contractors who handle multiple crews and projects, having a system to track inspections, store documentation, and share reports across the team makes the difference between organized operations and scrambling through file cabinets when someone asks for a stressing log from three months ago. A good construction management platform handles this without adding paperwork to your day.
Working with PT Subcontractors and Engineers
Unless you are a specialty post-tensioning contractor yourself, you will be working with a PT sub on most projects. That relationship matters more than you might expect.
Choosing the right PT sub. Not all PT contractors are equal. Look for crews who have experience with your project type (residential on-grade is very different from multi-story raised slabs), carry proper certifications from PTI (Post-Tensioning Institute), own and maintain calibrated stressing equipment, provide detailed stressing reports, and have a track record you can verify with references. The cheapest PT bid is not always the best value. A sub who installs tendons wrong or stresses carelessly creates problems that cost far more than the savings on their contract.
Communication with the structural engineer. On PT projects, the structural engineer is more involved than on conventional work, and for good reason. Do not treat the engineer as an obstacle. They are your safety net. Call them when elongation readings are off, when you need to make a penetration in an existing PT slab, when pour strip closure timing needs to change, and when anything on site does not match the drawings. A five-minute phone call with the engineer can prevent a $50,000 problem. Keep their number in your phone.
Scheduling coordination. PT work adds steps to your construction schedule that do not exist on conventional projects. You need to account for tendon installation time (usually 1 to 3 days depending on slab size), curing time before stressing (3 to 7 days), the stressing operation itself (usually half a day to a full day per floor), and pour strip closure timing (often 30 to 60 days after stressing). Build these into your schedule from the start. Do not assume you can compress PT timelines the way you might adjust framing or finish schedules. The concrete does not care about your deadline.
Cost tracking. PT work involves materials and labor categories that do not exist in conventional concrete. Strand, anchors, sheathing, stressing labor, grouting, and engineering all need their own cost codes. If you are tracking job costs accurately, set up your cost codes before the project starts so you have real data for bidding the next PT job.
Post-tensioned concrete is not going away. It is becoming more common in residential markets, and it remains the dominant structural system for commercial and multi-story construction. The contractors who understand PT work, who can read the drawings, coordinate the trades, and manage the sequence, are the ones who get invited to bid on the projects worth building.
Ready to see how Projul can work for your crew? Schedule a free demo and we will walk you through it.
Whether you are seeing your first PT spec or your fiftieth, the fundamentals do not change. Get the tendons in the right place, wait for the concrete to reach strength, stress carefully, document everything, and never, ever cut into a PT slab without knowing where the tendons are. Do those things, and post-tensioned concrete becomes one of the most reliable structural systems you will ever work with.
Frequently Asked Questions
What is the difference between post-tensioned and conventionally reinforced concrete?
How long after pouring can you stress post-tension tendons?
Can you cut or core a post-tensioned slab?
How much does a post-tensioned slab cost compared to conventional concrete?
What are the most common problems with post-tensioned slabs?
Related Articles

Construction Apprenticeship vs Trade School: Which Path Is Better?
Apprenticeships and trade schools both lead to careers in the trades, but they take very different routes to get there....
Read More →
Owner-Builder Construction: What You Need to Know Before Acting as Your Own GC
Being your own general contractor sounds like a great way to save money, but the reality involves permits, insurance,...
Read More →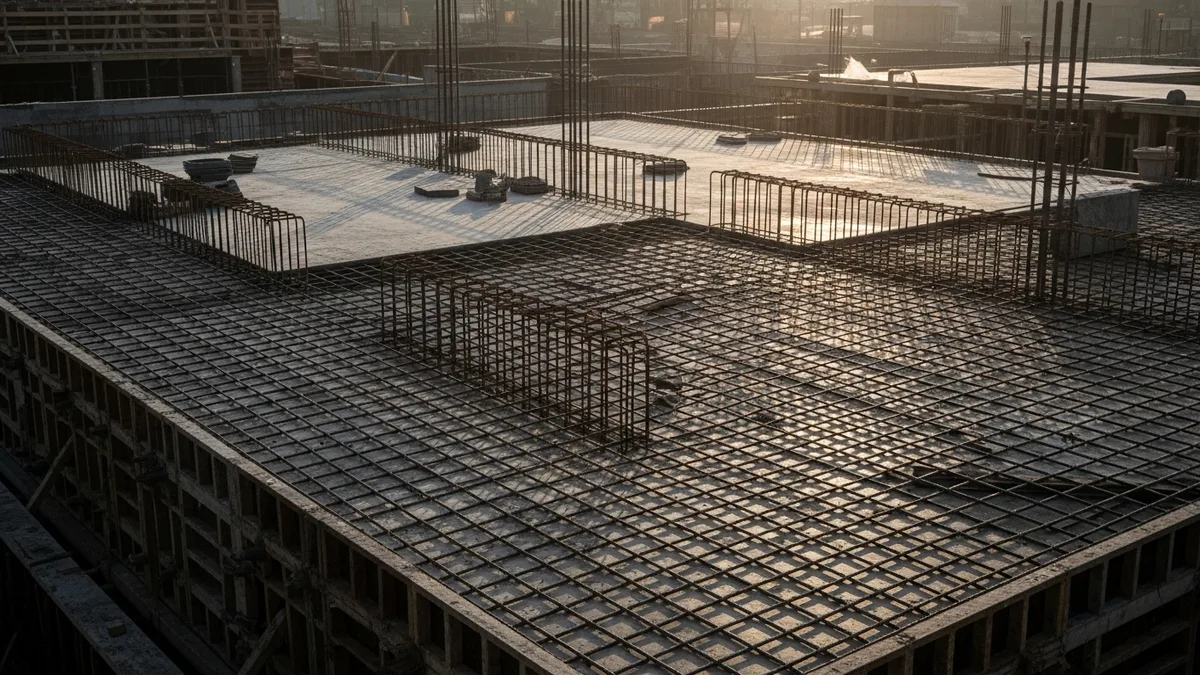
Construction Concrete Basics: Types, Mixes, and Placement for Contractors
Concrete is one of the most common materials on any job site, but getting it wrong is expensive. This guide covers the...
Read More →