Spray Foam Insulation: Open vs Closed Cell Guide
Spray Foam Insulation: A Contractor’s Complete Guide
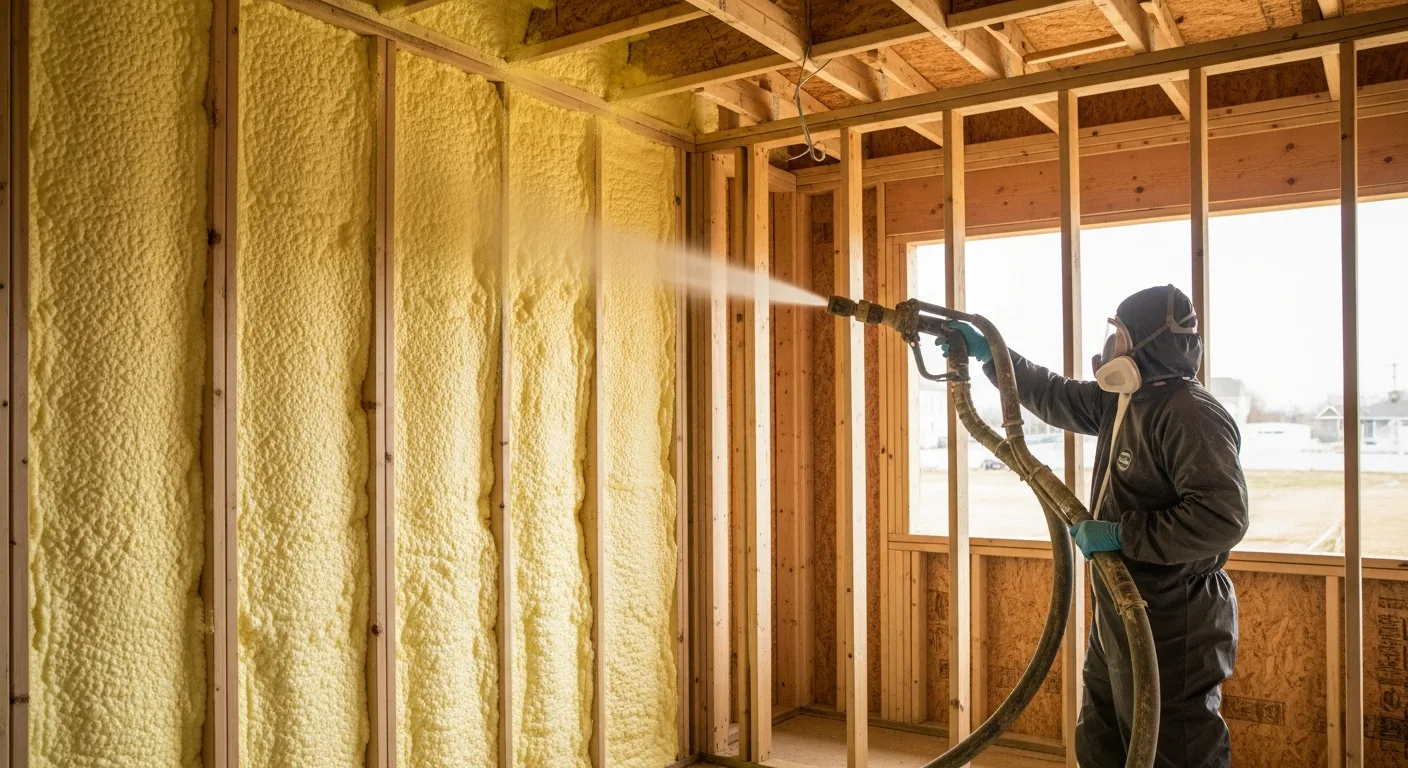
Spray foam insulation has gone from a specialty product to a mainstream building material over the past two decades. Builders use it to hit tighter energy codes, homeowners want it for comfort and energy savings, and weatherization contractors reach for it to seal up leaky old houses. When installed correctly, spray foam delivers air sealing and insulation in one application, something no other insulation material can do as well.
But spray foam is unforgiving. Bad technique, wrong chemical ratios, improper substrate conditions, or choosing the wrong type for the application leads to expensive failures. Shrinkage, adhesion problems, odor complaints, and moisture issues are all real risks that can turn a profitable job into a warranty nightmare.
This guide covers what contractors need to know about spray foam types, where to use each one, how to apply it correctly, and what goes wrong when details get missed.
Open Cell vs. Closed Cell: Know the Difference
The two types of spray foam serve different purposes. Using the wrong one in the wrong place is a common and costly mistake.
Open Cell Spray Foam (0.5 lb Density)
Open cell foam expands roughly 100 times its liquid volume when sprayed. The cells in the cured foam are not fully enclosed, which creates a soft, spongy material. Here are the key characteristics:
- R-value: 3.5 to 3.7 per inch
- Density: Approximately 0.5 pounds per cubic foot
- Vapor permeability: Permeable (not a vapor barrier). Allows moisture to pass through.
- Water absorption: Absorbs water. Not suitable for areas exposed to bulk water.
- Air sealing: Excellent. Fills cavities completely and stops air movement.
- Sound attenuation: Very good. The soft, open structure absorbs sound effectively.
- Cost: Lower than closed cell, roughly $0.35 to $0.55 per board foot installed.
Best applications for open cell:
- Interior wall cavities where sound control matters
- Attic roof decks (underside of roof sheathing) in conditioned attic assemblies
- Above-grade walls where a separate vapor retarder can be added if needed
- Anywhere you need air sealing and moderate insulation without the cost of closed cell
Where NOT to use open cell:
- Below-grade foundation walls (absorbs moisture from concrete)
- Flood-prone areas
- Unvented crawlspaces with moisture issues
- Anywhere exposed to standing water or bulk moisture
Closed Cell Spray Foam (2.0 lb Density)
Closed cell foam expands about 35 times its liquid volume. The cells are fully enclosed and filled with a blowing agent that gives the foam its higher R-value. The cured product is rigid and strong.
- R-value: 6.5 to 7.0 per inch
- Density: Approximately 2.0 pounds per cubic foot
- Vapor permeability: Vapor barrier at 2 inches or more (less than 1 perm)
- Water absorption: Does not absorb water. Can withstand temporary flooding.
- Air sealing: Excellent.
- Structural contribution: Adds racking strength to wall assemblies. Some products are rated to contribute to wall shear values.
- Cost: Higher, roughly $1.00 to $1.50 per board foot installed.
Best applications for closed cell:
- Exterior walls where maximum R-value is needed in limited cavity depth
- Below-grade foundation walls and crawlspace walls
- Metal building insulation (applied directly to steel panels)
- Areas where a vapor barrier is needed as part of the wall assembly
- Flood zones and areas prone to water exposure
- Roofing applications (above-deck or below-deck on low-slope roofs)
- SPF roofing systems (spray polyurethane foam roofing with an elastomeric coating)
Hybrid Approach
Many contractors use both types in the same building. A common approach for exterior walls in cold climates is to apply 2 inches of closed cell foam against the sheathing (providing a vapor barrier and R-14) and then filling the rest of the cavity with open cell foam or fiberglass batts to reach the total required R-value. This gets the vapor control and air sealing benefits of closed cell at the critical location while keeping costs reasonable.
R-Values and Energy Code Compliance
Energy codes vary by climate zone, and spray foam’s per-inch performance means you can often meet or exceed code requirements in less cavity depth than other insulation types.
R-Value Requirements by Climate Zone (Residential)
Here are typical code minimums for common applications under the 2021 International Energy Conservation Code (IECC). Your local jurisdiction may have amendments, so always verify.
| Climate Zone | Wall (Above Grade) | Ceiling/Attic | Basement Wall |
|---|---|---|---|
| Zone 1-2 (Southern) | R-13 | R-30 | R-0 to R-5 |
| Zone 3 (Central South) | R-20 or R-13+5ci | R-30 to R-38 | R-5 |
| Zone 4 (Central) | R-20 or R-13+5ci | R-38 to R-49 | R-10 |
| Zone 5 (Northern) | R-20 or R-13+5ci | R-49 | R-10 to R-15 |
| Zone 6-7 (Cold/Very Cold) | R-20+5ci or R-13+10ci | R-49 | R-15 |
ci = continuous insulation on the exterior of the framing
With closed cell foam at R-7 per inch, just 3 inches in a 2x4 wall gives you R-21, exceeding the R-20 requirement for many climate zones without any exterior continuous insulation. In a 2x6 wall, 3 inches of closed cell plus fiberglass in the remaining cavity gets you well above R-20.
Open cell in a 2x6 wall cavity (5.5 inches of available depth) gives roughly R-19 to R-20, meeting code in many zones.
Application Fundamentals
Spray foam installation requires training, proper equipment, and attention to conditions. This is not a product you can learn from a YouTube video and spray successfully on your first try.
Equipment
A spray foam rig includes:
- Proportioning unit: Heats and pressurizes the A-side (isocyanate) and B-side (polyol resin) chemicals and pumps them to the spray gun at the correct ratio and pressure.
- Heated hoses: Maintain chemical temperature from the rig to the gun. Hose lengths of 200 to 300 feet are common. Chemical temperature at the gun should be between 120 and 140 degrees Fahrenheit for most products.
- Spray gun with mixing chamber: The A-side and B-side chemicals mix in the gun’s mixing chamber and react as they exit the nozzle. The mix ratio is critical. Most systems run 1:1 by volume.
- Transfer pumps and drum heaters: Keep bulk chemical drums at the proper temperature (60 to 80 degrees storage, warmed to spraying temp at the rig).
- PPE: Full-face supplied-air respirator, disposable coveralls, chemical-resistant gloves, and eye protection. Isocyanate exposure is a serious health hazard.
Substrate Preparation
The surface you spray onto needs to be:
- Clean: No dust, dirt, oil, grease, or loose material. These prevent adhesion.
- Dry: Moisture on the substrate causes adhesion problems and can create voids in the foam. Wipe down wet surfaces or wait for them to dry.
- At temperature: Most spray foam products require a minimum substrate temperature of 40 to 50 degrees Fahrenheit. Cold substrates cause slow reactions, poor cell structure, and adhesion failure. Use heaters to warm the space and surfaces before spraying in cold weather.
- Properly framed: The cavity needs to be accessible from one side. Ensure wiring, plumbing, and other utilities are in place before spraying because you cannot easily move them after.
Spraying Technique
Pass thickness: Apply in multiple passes, not one thick coat. Maximum pass thickness is typically 2 inches for closed cell and 3 to 4 inches for open cell (varies by product). Exceeding the maximum pass thickness traps heat from the exothermic reaction inside the foam, which can cause scorching, shrinkage, or in extreme cases, combustion.
Gun distance: Hold the spray gun 18 to 24 inches from the substrate. Too close creates over-spraying and thick spots. Too far creates thin, porous foam.
Pattern: Use a consistent side-to-side pattern, overlapping each pass by about 50%. Start at the bottom of the cavity and work upward. This prevents foam from falling off the surface as it builds up.
Temperature monitoring: Use an infrared thermometer to check the foam temperature between passes. If the core temperature exceeds the manufacturer’s maximum (usually 200 to 250 degrees Fahrenheit for closed cell), wait for it to cool before applying the next pass. Overheating causes poor cell structure and can discolor or scorch the foam.
Trimming: After the foam has cured (time varies by product; open cell can be trimmed in minutes, closed cell may need an hour or more), trim excess foam flush with the framing using a long serrated knife, a reciprocating saw with a special foam-cutting blade, or a purpose-built foam trimming tool. Flat, flush trimming matters for drywall installation.
Dealing with Overspray
Spray foam overspray gets on everything: windows, floors, framing, wiring. Mask and protect anything you do not want covered in foam. Cover windows with poly sheeting and tape, protect finished floors with heavy paper or plywood, and mask electrical boxes and other items.
Cured spray foam is extremely difficult to remove from most surfaces. Fresh overspray can be wiped off some surfaces with acetone or a manufacturer-supplied solvent, but only within seconds of application. After that, it is a mechanical scraping job.
Common Problems and Troubleshooting
Shrinkage and Adhesion Failure
Foam that shrinks or pulls away from framing members is the most common spray foam callback. Causes include:
- Off-ratio mixing: If the A-side and B-side are not mixing at the correct ratio, the chemical reaction is incomplete, and the foam does not develop its full properties. This happens when drum temperatures are uneven, hoses are different lengths or temperatures, or the proportioner is malfunctioning.
- Cold substrate: Foam sprayed onto cold surfaces does not adhere properly and can shrink as it cures.
- Excessive thickness per pass: Over-applied closed cell foam traps exothermic heat, causing the interior of the foam mass to over-react while the exterior cures normally. The result is internal stress that leads to cracking and pulling away from the substrate.
- Expired or contaminated chemicals: Chemicals have a shelf life. Old or contaminated material does not react properly.
The fix for shrinkage is removal and re-application. You cannot patch spray foam that has shrunk. Cut out the failed section back to well-adhered foam and respray.
Off-Gassing and Odor
All spray foam has some odor during application and initial curing. The space should be vacated during spraying and for at least 24 hours after. If a strong chemical odor persists beyond 72 hours, the foam may be off-ratio or improperly cured. Have the installer return to inspect and test the foam.
Persistent odor complaints from occupants after the foam should be fully cured are a serious issue. Off-ratio foam can off-gas indefinitely and may need to be removed entirely. This is why proper equipment maintenance, chemical temperature management, and operator training matter so much.
Moisture and Condensation Issues
Spray foam changes how moisture moves through a building assembly. In a traditionally insulated house, moisture can pass through fiberglass batts and dry to the exterior. With spray foam (especially closed cell), the foam creates a vapor barrier inside the wall cavity. If the foam is not detailed correctly, moisture can get trapped in the wall assembly.
Key points:
- In cold climates, the vapor barrier (closed cell foam) should be on the warm side of the wall assembly.
- In mixed-humid climates, wall assemblies need to be able to dry in at least one direction.
- Conditioned attic assemblies (foam on the underside of roof sheathing) change the location of the thermal and moisture boundaries. The attic becomes conditioned space, which is usually a good thing, but the roof sheathing is now on the cold side of the insulation and needs adequate drying potential.
- Always consult a building science resource or the foam manufacturer’s technical team for wall assembly design in your climate zone.
Fire Safety
Spray foam is combustible. It must be covered with an approved thermal barrier (typically 1/2-inch gypsum drywall) when installed in occupied spaces. In attics and crawlspaces, an intumescent coating or ignition barrier may be acceptable depending on local codes.
Do not leave spray foam exposed in living spaces. Even if the homeowner says they do not care, the code requires a thermal barrier, and your liability is on the line.
Health and Safety
Spray foam installation is one of the more hazardous trades in construction. The chemicals are toxic, the equipment operates at high pressure and temperature, and the work spaces are often confined.
Isocyanate Exposure
The A-side chemical (MDI, methylene diphenyl diisocyanate) is a respiratory sensitizer. Once a person becomes sensitized, even tiny exposures can trigger severe asthma-like reactions. This is permanent. There is no reversing sensitization.
Required PPE:
- Supplied-air respirator (PAPR or SAR) during spraying and re-entry within 24 hours
- Full-body chemical-resistant coveralls
- Chemical-resistant gloves
- Eye protection under the respirator
Anyone in the building or nearby units should be evacuated during spraying and for 24 hours after. This includes other trades, homeowners, and pets.
Equipment Safety
- Operating pressures can exceed 1,500 PSI. A hose failure or gun malfunction can inject chemicals under the skin, which is a medical emergency.
- Lock out the system before changing nozzles or performing any maintenance.
- Chemical drums should be stored and handled per OSHA regulations and manufacturer SDS sheets.
Tracking Insulation Projects
Insulation work often involves coordination with the framing crew (cavities must be inspected and approved before insulating), HVAC contractor (ductwork routing affects insulation placement), and building inspector (energy code inspections happen at the insulation stage). Material ordering requires knowing the exact square footage and target thickness for each area.
Projul’s project scheduling tools let you sequence insulation work between framing inspection and drywall, track material costs per job, and notify the next trade when spraying is complete and the re-entry waiting period has passed.
See how it fits your workflow with a quick demo or check out pricing to get started.
Picking the Right Foam for the Job
Here is a quick decision framework:
Use open cell when:
- Budget matters and the cavity is deep enough to hit the target R-value
- Sound control is a priority (interior walls, media rooms, bedrooms)
- The application is above grade with no water exposure
- You can add a vapor retarder if your climate zone requires one
Use closed cell when:
- You need maximum R-value in limited space
- The application is below grade or in a flood-prone area
- You need a vapor barrier as part of the wall assembly
- You need added structural strength (metal buildings, high-wind areas)
- You are insulating a roof deck in a hot-humid climate where you need to control moisture drive from outside
Use a hybrid approach when:
- You want the vapor control of closed cell at the sheathing but the cost savings of open cell or fiberglass to fill the rest of the cavity
- Code requires both air barrier and specific vapor permeance levels that one product alone does not achieve at a reasonable thickness
Final Thoughts
Spray foam is a high-performance material that demands high-performance installation. The equipment is expensive, the chemicals are hazardous, and the margin for error is slim. But when it is done right, spray foam delivers air sealing, moisture control, and thermal resistance that no other single material can match.
If you are adding spray foam services to your business or subcontracting it out, make sure the installer is trained and certified, maintains their equipment properly, and understands building science well enough to choose the right product for each application. The cost difference between a good spray foam job and a bad one is not measured in dollars per board foot. It is measured in callbacks, tear-outs, and reputation damage.
Get it right the first time. Your clients and your bottom line will both benefit.
Frequently Asked Questions
What is the difference between open cell and closed cell spray foam?
How thick should spray foam insulation be?
Can spray foam be applied in cold weather?
Does spray foam need a vapor barrier?
Is spray foam insulation safe to be around after installation?
Why does spray foam sometimes shrink or pull away from framing?
Can you spray foam over existing insulation?
How much does spray foam insulation cost compared to fiberglass?
Related Articles

Best Glazier Software in 2026: 6 Options Compared for Glass Contractors
Looking for the best glazier software? We compare six top options for glass contractors, covering features, pricing,...
Read More →
Best Roofing Contractor Software in 2026: 6 Options Compared
Looking for the best roofing contractor software? We compare six top options, including pricing, roofing-specific...
Read More →
Fire Sprinkler System Installation: Wet vs Dry Systems, Pipe Sizing, and Code Requirements
Fire sprinkler systems are one of those building components that nobody thinks about until they are needed. But for...
Read More →