French Drain and Yard Drainage Guide for Builders
French Drains and Yard Drainage: A Contractor’s Complete Guide
Standing water in a yard is more than an eyesore. It kills grass, creates mosquito habitat, erodes soil, and when it pools near a foundation, it becomes a structural threat. Homeowners call contractors when they are tired of watching their yard turn into a swamp every time it rains, and the fix usually involves some combination of grading corrections and subsurface drainage.
French drains are one of the most reliable tools in the drainage contractor’s kit. They have been used for over 150 years because the concept is simple and, when installed properly, they work for decades. But “simple concept” does not mean “easy installation.” The details matter, and getting them wrong means the drain fails within a few years.
This guide covers everything a contractor needs to know about residential French drains and yard drainage: site assessment, grading, trench excavation, pipe selection, filter fabric, gravel, outlet design, and the mistakes that cause premature failure.
Understanding the Problem: Why Yards Hold Water
Before you start digging, you need to understand why the water is not draining on its own. The cause determines the solution.
Poor Surface Grading
The yard may slope toward the house or have low spots where water collects. This is the most common cause of residential drainage complaints. The fix is often regrading the surface to direct water away from structures and toward natural drainage paths.
The general rule is a minimum of 6 inches of fall in the first 10 feet away from the foundation. Beyond that, the yard should continue to slope (even gently) toward the property’s natural drainage outlet, whether that is a swale, storm drain, or low area at the property edge.
High Water Table
In some areas, the groundwater table sits close to the surface, especially in spring or after prolonged rain. Surface grading alone will not fix this because the water is coming from below. Subsurface drainage (French drains) is needed to intercept and redirect the groundwater. On sloped properties where water flows downhill toward structures, a curtain drain installed across the hillside can intercept that flow before it reaches the foundation.
Compacted or Clay Soil
Heavy clay soils and compacted subgrades drain very slowly. Water sits on the surface because it cannot percolate down. French drains help by providing a path of least resistance (gravel and pipe) that water can follow instead of sitting in the clay.
Impervious Surfaces
Driveways, patios, rooftops, and sidewalks shed water that concentrates in areas that might have handled natural rainfall just fine. Adding 2,000 square feet of patio to a yard changes the runoff pattern significantly. The drainage plan needs to account for all impervious surfaces on the property.
Downspout Discharge
Roof runoff from downspouts that dump at the foundation is a major contributor to basement moisture and yard drainage problems. Extending downspouts and tying them into a drainage system is often part of the solution.
Site Assessment and Planning
Walk the Property After Rain
The best time to assess a drainage problem is during or right after a heavy rain. You can see exactly where water collects, which direction it flows, and where the natural low points are. If you cannot visit during rain, look for clues: mud stains on the foundation, erosion channels, dead grass in low areas, and water marks on fences or walls.
Survey Elevations
Use a transit, laser level, or builder’s level to shoot elevations across the property. You need to know:
- The elevation of the foundation at multiple points
- The high and low points of the yard
- The elevation of any potential outlet (storm drain, swale, property edge)
- The available fall from the problem area to the outlet
Without adequate fall from the drain to the outlet, the system will not work. You need at least 1 percent slope across the entire run of pipe.
Identify the Outlet
Every drainage system needs somewhere to put the water. Common outlets include:
- Daylight outlet: The pipe exits the ground on a slope, discharging water at the surface. This is the simplest and most reliable option when the terrain allows it.
- Storm sewer connection: Tying into a municipal storm drain (where permitted and with proper permits).
- Dry well: A buried chamber filled with gravel that allows water to percolate into the surrounding soil. Works best in sandy or well-draining soils. Not effective in clay.
- Rain garden or bioswale: A planted depression designed to absorb and filter runoff. Increasingly required or incentivized by municipalities.
- Sump pit and pump: When gravity drainage is not possible, a sump pit with a pump moves water up and out. This adds complexity, maintenance, and a failure point (pump dies during the biggest storm of the year, every time).
Plan the outlet before you design the drain. If you cannot get the water somewhere useful, the prettiest French drain in the world will not solve the problem.
Check Utilities
Call 811 (or your local one-call service) before digging. Every time. Gas lines, water mains, electrical conduit, fiber optic cable, and sewer laterals are all buried in residential yards. Hitting a gas line with a trencher is a bad day for everyone.
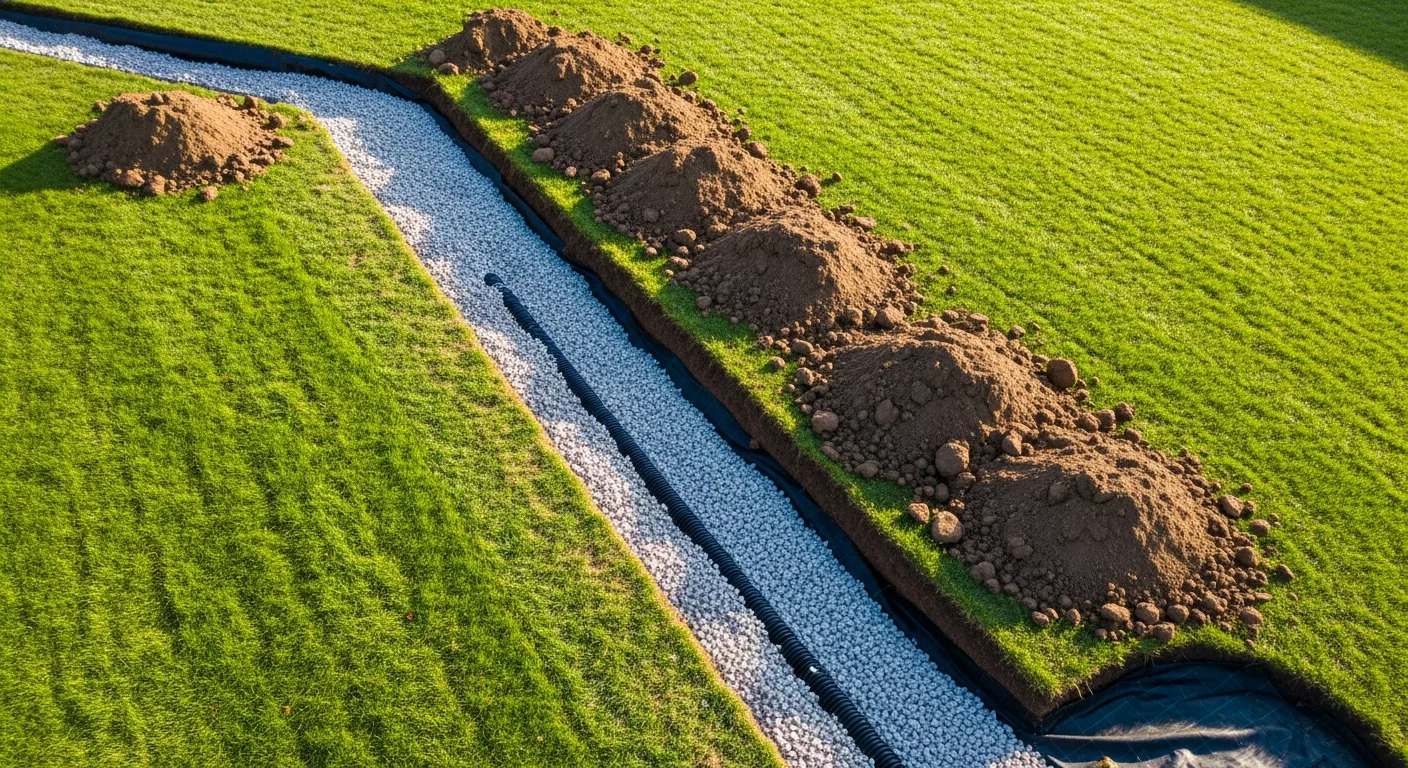
French Drain Construction
Trench Layout
Mark the trench route with paint or stakes and string. The trench should follow the path of water from the collection area to the outlet, maintaining consistent downhill slope the entire way.
For intercepting water before it reaches a foundation, the trench typically runs parallel to the foundation, 3 to 6 feet away from the wall. Placing it right against the foundation risks undermining the footing and is usually a bad idea unless you are doing a full exterior waterproofing job. Deeper excavations near foundations may also require temporary shoring and bracing to prevent soil collapse.
For collecting water from a low area in the yard, route the trench through the lowest part of the problem area and run it downhill to the outlet.
Trench Dimensions
- Width: 12 inches is standard for most residential French drains. Wider trenches (18 to 24 inches) move more water but cost more in gravel and labor.
- Depth: 12 to 18 inches for surface water collection. 18 to 24 inches for groundwater interception near foundations.
- Shape: A flat-bottomed trench is easier to grade and provides a stable bed for the pipe.
Excavation
For short runs (under 50 feet), hand digging with a trenching shovel works but is labor intensive. For longer runs or deeper trenches, use a walk-behind trencher or a mini excavator. A trencher cuts a clean, consistent trench quickly but cannot handle rocky soil well. A mini excavator is more versatile but requires more skill to cut a straight, even-bottomed trench.
Whatever method you use, check the trench bottom grade with a laser or string line before placing any material. The bottom must slope consistently toward the outlet. Low spots in the trench create standing water in the pipe.
Filter Fabric Installation
Line the entire trench with non-woven geotextile filter fabric before adding any gravel. Leave enough fabric on each side to fold over the top of the gravel bed after it is filled.
The fabric serves one purpose: keeping fine soil particles out of the gravel. Without it, silt migrates into the gravel voids over months and years, eventually clogging the system. The fabric allows water through while blocking particles.
Use non-woven fabric, not woven. Woven fabric has a tighter weave that can clog faster in fine soils. Non-woven fabric has a random fiber structure that resists clogging better.
Gravel Base
Place 2 to 3 inches of washed 3/4-inch to 1.5-inch crushed stone on the fabric-lined trench bottom. Level this base so the pipe sits at the correct slope.
The gravel must be washed. Unwashed crusher run or quarry process contains fine particles (stone dust) that clog the filter fabric and defeat the entire purpose of the system. Specify washed stone when you order materials.
Pipe Selection and Placement
Two main options for French drain pipe:
Rigid PVC (Schedule 20 or 35 perforated):
- 4-inch diameter for most residential work
- Smooth interior means better flow
- Comes in 10-foot sections with coupling fittings
- More labor to install (cutting, fitting) but more durable
- Perforations should face down when installed (water rises into the pipe)
Corrugated HDPE (perforated):
- 4-inch diameter, available in rolls up to 250 feet
- Flexible, fast to install, fewer fittings needed
- Corrugated interior creates slightly more friction (reduced flow)
- Some contractors avoid it because the corrugations can trap sediment
- The corrugated “sock pipe” (with fabric sleeve) is popular but the sock clogs faster than a proper fabric-wrapped gravel bed
For best performance, use rigid PVC in a fabric-wrapped gravel bed. For budget-conscious jobs, corrugated HDPE with a full trench fabric wrap is acceptable and much faster to install.
Place the pipe on the gravel base centered in the trench. Check the slope one more time.
Gravel Fill and Fabric Closure
Fill gravel around and over the pipe until you have at least 2 inches of gravel above the top of the pipe. For better performance, fill gravel to within 4 to 6 inches of the surface.
Fold the filter fabric over the top of the gravel, overlapping the edges. This fully encapsulates the gravel bed in fabric, preventing soil intrusion from any direction.
Backfill
Top off the trench with the excavated soil, or with topsoil if you are restoring a lawn. If the drain runs under a lawn area, grade the backfill slightly above the surrounding surface to account for settling.
Some installations leave the gravel exposed at the surface or cover it with decorative stone. This works in landscape beds and along foundation walls but is not practical in lawn areas.
Additional Drainage Solutions
Channel Drains
Channel drains (also called trench drains) are surface-mounted drains that collect water from driveways, patios, and other paved areas. They consist of a narrow channel with a grate that sits flush with the surface. The channel connects to a solid pipe that carries water to the outlet.
Use channel drains at the base of sloped driveways, along garage door thresholds, and at the edge of patios that slope toward the house.
Catch Basins
Catch basins are surface-mounted collection points, typically 9x9, 12x12, or larger boxes with grates. They collect surface water and connect to underground solid pipe. Use them at low points in the yard, at the end of swales, and where multiple drainage lines converge.
Install a catch basin with a sump (the box extends below the pipe outlet) to trap sediment and debris before it enters the pipe system. Clean the basins annually.
Downspout Connections
Tie roof downspouts into the drainage system using underground solid pipe (not perforated). A common approach is to connect each downspout to a 4-inch solid PVC pipe that runs underground to the main drain line or directly to the outlet.
Use a pop-up emitter at the discharge end for a clean look. The emitter opens under water pressure and closes when flow stops, keeping debris and animals out of the pipe.
Dry Wells
A dry well is an underground chamber that receives collected water and allows it to percolate into the surrounding soil. They work well in sandy or loamy soils where the percolation rate is high. In clay soils, dry wells fill up and overflow before the water can absorb.
Size the dry well to handle the expected volume. A standard residential dry well (36 inches in diameter, 36 inches deep) holds about 50 gallons. For larger volumes, use multiple dry wells in series or a larger chamber system.
Wrap the dry well in filter fabric and surround it with gravel, just like a French drain.
Grading and Surface Drainage
Not every drainage problem needs a French drain. Sometimes the fix is moving dirt.
Regrading
If the yard slopes toward the house or has obvious low spots, regrading can solve the problem without any pipe work. Bring in fill dirt, compact it in lifts, and establish positive drainage away from the structure.
The International Residential Code calls for a minimum 6-inch fall in the first 10 feet from the foundation. Beyond that, maintain at least a 2 percent slope (about 1/4 inch per foot) toward the property’s natural drainage outlet.
Swales
A swale is a shallow, wide channel that directs surface water without pipe. Swales work well for moving water across a yard to a drainage outlet. They can be grassed (for a natural look) or lined with stone for higher flows.
Design swales with a minimum 1 percent slope along their length. The cross-section should be broad and shallow (parabolic shape) rather than deep and narrow to prevent erosion. On steeper properties where the soil itself is unstable, you may need soil nail walls or MSE retaining structures before any drainage work can begin.
Common Drainage Installation Mistakes
Insufficient Slope
A French drain with inadequate slope collects water but does not move it. The pipe fills up, the gravel saturates, and the drain becomes nothing more than an underground puddle. Verify slope at every stage of installation.
Skipping Filter Fabric
Without fabric, soil migrates into the gravel within a few years, clogging the system. Replacing a clogged French drain means digging the whole thing up and starting over. The fabric costs a few dollars per linear foot and adds years to the system’s life.
Using Dirty Gravel
Crusher run, road base, and unwashed gravel contain fine particles that clog fabric and fill the voids between stones. Always specify washed stone for drainage applications.
Discharging Against Setback Rules
Many jurisdictions have rules about where you can discharge stormwater. Dumping water onto a neighbor’s property, across a sidewalk, or into a sanitary sewer can result in fines and required removal. Check local codes and HOA rules before setting the outlet location.
Forgetting About Freeze/Thaw
In cold climates, shallow drainage systems can freeze. Water trapped in pipes expands and can crack PVC fittings. Install drain outlets so they can drain completely (no standing water in the system) and consider using corrugated pipe in freeze-prone areas because it flexes without cracking.
Tracking Drainage Projects
Drainage jobs involve excavation, pipe work, gravel delivery, fabric installation, grading, and restoration. On larger properties, you may have multiple drain runs, catch basins, downspout connections, and a complex outlet system. Keeping all of that organized, estimated, and tracked takes more than a notepad.
Projul’s project management tools let you break a drainage job into phases, assign tasks to crew members, track material quantities and costs, and log daily progress with photos. When the homeowner asks why the job ran a day over estimate, your records show that you hit an unmarked water line at 14 inches and had to reroute.
For contractors looking to add drainage work to their services or tighten up their existing process, check out Projul’s pricing or request a demo to see how it works for field crews.
French Drain Sizing Calculations
Getting the size right on a French drain is not guesswork. The pipe diameter, gravel bed dimensions, and slope all tie back to how much water you need to move. Undersizing the drain means it overflows during heavy rain, which is exactly when the homeowner needs it most. Oversizing wastes material and labor dollars.
Calculating Drainage Area
Start by figuring out how much water the drain needs to handle. You need two numbers: the drainage area (in square feet) and the local rainfall intensity (in inches per hour for a 10-year storm event). Your county or city engineering department publishes rainfall intensity data. Most residential designs use the 10-year, 1-hour storm as the baseline.
The Rational Method gives you the peak flow rate:
Q = C x I x A / 96.23
Where:
- Q = flow rate in gallons per minute (GPM)
- C = runoff coefficient (0.35 for lawns on clay soil, 0.90 for rooftops and concrete)
- I = rainfall intensity in inches per hour
- A = drainage area in square feet
For example, a 2,000 square foot lawn area on clay soil in an area that gets 3 inches per hour during a 10-year storm:
Q = 0.35 x 3 x 2,000 / 96.23 = 21.8 GPM
If you are also picking up a 1,500 square foot roof:
Q = 0.90 x 3 x 1,500 / 96.23 = 42.0 GPM
Total system flow: about 64 GPM.
Pipe Diameter Selection
Once you have the flow rate, match it to the pipe capacity. Pipe capacity depends on diameter and slope. Here are the approximate capacities for smooth-wall (PVC) pipe at common slopes:
4-inch pipe:
- At 1% slope: 40 to 45 GPM
- At 2% slope: 55 to 65 GPM
6-inch pipe:
- At 1% slope: 120 to 130 GPM
- At 2% slope: 170 to 185 GPM
Corrugated HDPE pipe carries about 20 to 25% less than smooth PVC at the same diameter and slope because the corrugations create friction.
For the example above (64 GPM), a 4-inch PVC pipe at 2% slope is borderline. You would be safer with 6-inch pipe or you could split the system into two 4-inch runs. In practice, most residential French drains use 4-inch pipe because the drainage areas are small enough. When you are picking up multiple downspouts plus a large yard area, step up to 6-inch.
Gravel Bed Depth and Width
The gravel bed itself stores and transmits water, not just the pipe. A wider and deeper gravel bed increases the system’s capacity significantly.
For a standard residential French drain:
- Minimum gravel depth below pipe: 2 inches
- Minimum gravel depth above pipe: 2 inches
- Recommended total gravel depth: 8 to 12 inches (for a 4-inch pipe, that means the trench is 12 to 16 inches deep in the gravel zone)
- Trench width: 12 inches minimum, 18 inches for higher-capacity systems
The gravel bed acts as a reservoir. Clean 3/4-inch to 1.5-inch washed stone has a void ratio of about 40%, meaning 40% of the gravel volume is open space that holds water. A 12-inch wide by 12-inch deep gravel bed holds about 2.2 gallons per linear foot of trench just in the gravel voids, on top of what the pipe carries.
Slope Requirements
The golden rule: minimum 1% slope (1 inch of fall per 8 feet of run). That is the absolute minimum. You want 1% to 2% for most residential work.
Here is what that looks like in the field:
- 50-foot run at 1% = 6 inches of total fall
- 50-foot run at 2% = 12 inches of total fall
- 100-foot run at 1% = 12 inches of total fall
Before you commit to a trench layout, verify that you have enough elevation difference between the starting point and the outlet. If you only have 4 inches of fall over 50 feet, that is 0.67% slope, and the drain will not perform well. You either need to start the trench shallower, find a lower outlet, or rethink the route.
For longer runs (over 100 feet), consider adding cleanout access points every 50 to 75 feet. A cleanout is a vertical pipe (capped at the surface) that connects to the main drain line, letting you flush the system with a garden hose if sediment builds up over time.
Common French Drain Installation Failures and How to Prevent Them
Even experienced contractors make mistakes on French drains. The frustrating part is that most failures do not show up for a year or two, long after the crew has moved on. By then, the homeowner is calling you back or leaving reviews. Here are the failures that kill French drains and how to avoid them.
Failure: Reverse Slope or Bellies in the Pipe
What happens: The trench bottom is not graded consistently, leaving dips or flat spots. Water collects in the low points instead of flowing to the outlet. Sediment settles in these bellies, further reducing flow.
How to prevent it: Check the trench bottom grade with a laser level or string line at every stage. Check it after you dig. Check it after you place the gravel base. Check it after you set the pipe. If the trench bottom has a dip, fix it with gravel before you lay pipe. Never rely on “close enough.”
Failure: Filter Fabric Gaps or Tears
What happens: Soil finds its way into the gravel through gaps where fabric sections do not overlap enough, or through tears from rocks or rough handling. Once soil enters the gravel, it starts filling voids and the drain slowly clogs.
How to prevent it: Overlap fabric sections by at least 12 inches. When folding fabric over the top of the gravel, overlap the edges by 6 inches minimum. Handle fabric carefully around sharp stones. If you tear a section, do not leave it. Pull it out and replace it. A $5 piece of fabric prevents a $5,000 re-dig.
Failure: Wrong Gravel
What happens: The crew uses whatever aggregate is cheapest or most available. Road base, crusher run, or unwashed stone contains fines (stone dust and clay particles) that immediately clog the filter fabric and fill the voids between stones. The drain loses capacity within the first year.
How to prevent it: Specify washed 3/4-inch to 1.5-inch stone on the material order. When the truck shows up, look at the stone. If it is dusty, muddy, or has visible fines, reject the load. This is one of those details that separates a drain that lasts 25 years from one that fails in 3.
Failure: Outlet Obstruction or Submersion
What happens: The outlet pipe gets buried by mulch, blocked by landscaping, clogged with debris, or sits below the water level of the receiving area. If the water cannot get out, the system backs up no matter how well the rest of the drain is built.
How to prevent it: Install a pop-up emitter or a solid outlet pipe with an animal guard at the discharge point. Mark the outlet location on the as-built drawing and tell the homeowner where it is. Set the outlet above the normal water level of the receiving area (ditch, swale, or storm inlet). On maintenance visits, check the outlet first.
Failure: Connecting Downspouts to Perforated Pipe
What happens: Roof downspouts dump high-volume, fast-moving water into perforated pipe runs. The water exits through the perforations before it reaches the intended discharge point, saturating the soil right around the house instead of carrying it away.
How to prevent it: Always transition from perforated pipe to solid pipe before connecting downspouts. Better yet, run downspout connections as completely separate solid pipe lines that merge with the French drain only at the outlet or at a catch basin. This keeps the high-volume roof water in the pipe where it belongs.
Failure: Not Accounting for Root Intrusion
What happens: Tree roots find the moisture in and around French drains and grow into the pipe through perforations or joints. Over time, the roots block the pipe entirely. This is especially common with willows, maples, poplars, and other water-seeking species.
How to prevent it: Route French drains away from large trees whenever possible. Keep at least 10 feet of clearance from known aggressive root species. If you have to run near trees, use solid pipe through that section and consider root barrier fabric along the trench wall closest to the tree. On existing installations near trees, recommend annual flushing through cleanout points.
Failure: Inadequate Compaction of Backfill
What happens: The backfill over the French drain settles over time, creating a trench-shaped depression across the yard. Water collects in this depression, overloads the drain from above, and causes erosion along the trench line.
How to prevent it: Backfill in 6-inch lifts and compact each lift. Use the excavated material or clean fill soil. Mound the backfill 1 to 2 inches above grade to account for future settling. If you are restoring a lawn, install erosion control fabric or straw blankets until grass establishes.
French Drain vs Other Drainage Solutions
French drains are the go-to for a lot of contractors, but they are not always the right answer. Depending on the site conditions, budget, and what the water is doing, another solution might work better, cost less, or last longer. Here is a straight comparison.
French Drain vs Channel Drain
French drains collect subsurface water and surface water that percolates through the soil. They are buried, invisible once installed, and handle slow, steady water flow well.
Channel drains (trench drains) sit at the surface and collect sheet flow from paved areas. They have a grate that is visible and flush with the surface.
When to use a channel drain instead:
- At the base of a sloped driveway where water sheets across concrete
- Along a garage threshold to keep water out of the garage
- At the edge of a pool deck or patio
- Anywhere you are collecting fast-moving surface water off a hard surface
When to use a French drain instead:
- Waterlogged lawn or garden areas
- Subsurface water moving toward a foundation
- Areas where a visible grate is not acceptable
Cost comparison:
- French drain: $25 to $75 per linear foot installed (depending on depth and conditions)
- Channel drain: $30 to $100 per linear foot installed (higher because of concrete cutting and grate materials)
Channel drains are more expensive per foot, but you often need shorter runs because you are targeting specific collection points. A 20-foot channel drain at the bottom of a driveway might solve a problem that would require 80 feet of French drain to address from a subsurface approach.
French Drain vs Dry Well
French drains collect and move water laterally to an outlet point.
Dry wells collect water in a buried chamber and let it percolate into the surrounding soil vertically.
When to use a dry well instead:
- When there is no good outlet for a gravity drain (no storm sewer, no slope to daylight)
- On sandy or well-draining soils where percolation rates are high
- For capturing roof downspout runoff on flat lots
- Where local codes require on-site stormwater retention
When to use a French drain instead:
- On clay or poorly draining soils (dry wells just fill up and overflow)
- When you have adequate slope to an outlet
- For intercepting groundwater flow (dry wells do not intercept, they only absorb)
Cost comparison:
- French drain: $25 to $75 per linear foot
- Dry well (prefab chamber, 50-gallon): $200 to $500 installed per unit
- Dry well (stone-filled pit, larger): $500 to $1,500 installed per unit
Dry wells work great in the right soil. In clay, they are a waste of money. Always do a perc test before specifying a dry well. Dig a hole 12 inches wide by 12 inches deep, fill it with water, and time how long it takes to drain. If it takes more than 4 hours, the soil is too tight for a dry well.
French Drain vs Sump Pump System
French drains rely on gravity to move water. No power, no moving parts, no maintenance beyond occasional cleanout flushing.
Sump pump systems use a pump to lift water from a low collection point and push it to a discharge location. They require electricity, a sump pit, a check valve, and a discharge line.
When to use a sump pump instead:
- When there is no gravity outlet (the drain has nowhere to flow downhill)
- In basements or crawl spaces where the floor is below the exterior grade
- When the water table is above the foundation floor level
- As a backup for a gravity system in high-risk situations
When to use a French drain instead:
- Whenever you have adequate slope to an outlet (gravity beats electricity every time)
- For exterior yard drainage where a gravity outlet is available
- When the homeowner does not want to depend on a pump during storms (power outages are common during heavy storms)
Cost comparison:
- French drain (100-foot run): $2,500 to $7,500
- Sump pump system (pit, pump, discharge line): $1,500 to $4,000
- Battery backup sump pump: $500 to $1,500 additional
Sump pumps are a necessary evil in certain situations, but every experienced drainage contractor knows the rule: gravity does not break down. If you can get the water out with slope alone, that is always the better long-term solution.
French Drain vs Regrading
French drains address water that is at or below the surface, intercepting it underground and routing it to an outlet.
Regrading changes the surface contour of the yard to direct water away from structures using surface flow alone.
When to use regrading instead:
- When the drainage problem is caused by surface grading that slopes toward the house
- When the soil drains reasonably well once water moves away from the low spot
- When the fix is straightforward (add fill dirt, regrade, resod)
When to use a French drain instead:
- When the water table is high and water comes from below, not just the surface
- When impervious surfaces create concentrated runoff that surface grading alone cannot handle
- When the homeowner cannot change the surface grade significantly (mature landscaping, hardscape, etc.)
Cost comparison:
- Regrading (small area, under 1,000 sq ft): $500 to $2,000
- Regrading (full yard): $2,000 to $8,000
- French drain (50-foot run): $1,250 to $3,750
Regrading is often the cheapest fix and sometimes the only fix you need. Always evaluate whether surface grading alone solves the problem before proposing a French drain. Your customer will appreciate the honesty, and you avoid over-engineering a simple problem.
Estimating French Drain and Drainage Projects
Accurate estimates win profitable jobs. Underbid a drainage project and you eat the cost on gravel and labor. Overbid it and you lose the contract. The key is knowing your actual costs per linear foot and adjusting for site-specific conditions.
Material Takeoff
For a standard residential French drain (4-inch pipe, 12-inch wide trench, 12 inches of gravel depth), here is what you need per linear foot:
| Material | Quantity per Linear Foot | Typical Cost |
|---|---|---|
| 4-inch perforated PVC pipe | 1 foot | $1.00 to $2.00 |
| 4-inch solid PVC pipe (outlet run) | Varies by layout | $1.50 to $2.50 |
| Washed 3/4-inch stone | 0.037 cubic yards (1 cu ft) | $1.50 to $3.00 |
| Non-woven geotextile fabric | 4 to 5 linear feet (wraps trench) | $0.50 to $1.00 |
| Fittings (couplings, elbows, tees) | Varies | $2.00 to $5.00 per fitting |
| Catch basin (if needed) | Per unit | $40 to $150 each |
| Pop-up emitter | Per unit | $8 to $15 each |
Gravel is your biggest material cost. A 100-foot French drain with a 12-inch wide by 12-inch deep gravel bed needs about 3.7 cubic yards of washed stone. At $45 to $65 per cubic yard delivered, that is $165 to $240 just in stone.
For the full material cost on a 100-foot residential French drain, expect $400 to $800 depending on your local prices, pipe type, and how many fittings and catch basins you need.
Labor Hours per Linear Foot
Labor is where drainage projects get expensive. Here are realistic production rates for a two-person crew:
Hand digging (trenching shovel):
- 8 to 12 linear feet per hour in sandy or loamy soil
- 4 to 8 linear feet per hour in clay or rocky soil
- Best for short runs under 50 feet or tight-access areas
Walk-behind trencher:
- 30 to 50 linear feet per hour in good soil
- 15 to 25 linear feet per hour in clay or rocky soil
- Rental cost: $200 to $350 per day
Mini excavator:
- 40 to 80 linear feet per hour (including trench shaping)
- Best for longer runs, deeper trenches, and when you also need to regrade
- Rental cost: $300 to $500 per day
After the trench is dug, figure 15 to 25 linear feet per hour for fabric, gravel, pipe, and backfill with a two-person crew. That includes placing fabric, shoveling gravel, setting pipe, checking grade, filling more gravel, folding fabric, and backfilling.
For a 100-foot residential French drain with machine trenching, plan on:
- Trenching: 2 to 4 hours
- Fabric, pipe, gravel, backfill: 4 to 7 hours
- Total: 6 to 11 hours for a two-person crew
Typical Pricing
Most contractors in the residential drainage market price by the linear foot. Here are typical ranges:
- Basic French drain (4-inch pipe, standard depth): $25 to $50 per linear foot
- Deep French drain (18 to 24 inches, foundation work): $40 to $75 per linear foot
- French drain with catch basins and downspout ties: $50 to $85 per linear foot
- Channel drain in concrete: $50 to $100 per linear foot
These prices include materials, labor, and a reasonable margin. Adjust up for difficult access (fenced yards, narrow side yards), rocky soil, long material carry distances, or areas with high disposal costs for excavated soil.
Building Your Estimate
A solid drainage estimate breaks the job into line items so the customer sees exactly what they are paying for and you can track actual costs against your bid. Here is a sample structure:
- Mobilization and site prep: Equipment delivery, material staging, utility marking verification
- Excavation: Linear feet of trench at specified depth and width
- Materials: Pipe (by type and footage), gravel (by cubic yard), fabric (by roll), fittings (itemized)
- Installation labor: Fabric, pipe, gravel, connections, backfill
- Surface restoration: Topsoil, seed, sod, or decorative stone
- Cleanup and demobilization: Debris removal, equipment pickup
Using construction estimating software helps you build these estimates faster and track how your actual costs compare to your bids over time. When you know that your real cost on a French drain is $32 per foot and you are bidding at $45, you know your margin. When a job comes in at $38 per foot actual, you can figure out why and adjust future bids.
Tracking Costs Across Jobs
The contractors who make money on drainage work are the ones who track every job. They know their cost per linear foot for different soil types, depths, and access conditions. They know how much gravel they actually use versus what they estimated. They know which crew members hit production targets and which ones need more training.
This kind of tracking is hard to do on paper or in a spreadsheet. Projul’s estimating and job costing tools let you build templates for common drainage jobs, track actual material and labor costs against your estimates, and see your profitability by job type. Over time, your estimates get tighter, your margins get healthier, and you stop losing money on surprises.
Final Thoughts
Yard drainage is problem-solving work. Every property is different, and the solution depends on soil type, topography, water sources, utility locations, and local codes. The fundamentals stay the same though: identify where the water comes from, figure out where it should go, and build a system that moves it there reliably for decades.
French drains are not complicated, but they require attention to detail. Clean gravel, proper fabric, consistent slope, and a well-planned outlet make the difference between a drain that works for 25 years and one that clogs in 5.
Do the site assessment, plan the system, install it right, and track your costs. That is how you build a drainage business worth running.
If you handle landscaping or drainage projects and need help structuring your bids, grab our free landscaping estimate template to get started.
Frequently Asked Questions
How deep should a French drain be for residential yard drainage?
What is the correct slope for a French drain pipe?
Should I use perforated or solid pipe for a French drain?
What size gravel works best for French drains?
Do French drains need filter fabric?
How long do French drains typically last?
Can a French drain discharge into the storm sewer?
How do contractors price French drain installation?
Related Articles

Concrete Tilt-Up Construction: A Contractor's Complete Field Guide
Tilt-up construction accounts for roughly 15 percent of all industrial and commercial buildings in North America. This...
Read More →
How to Implement Construction Software Without Losing Your Mind
Most construction software rollouts fail. Not because the software is bad, but because the rollout was rushed. Here are...
Read More →
How Selections Can Pay for Themselves in Three Easy Steps
Most contractors lose thousands each year on wrong material orders, slow client decisions, and missed upsell chances....
Read More →