Concrete Formwork Best Practices for Contractors
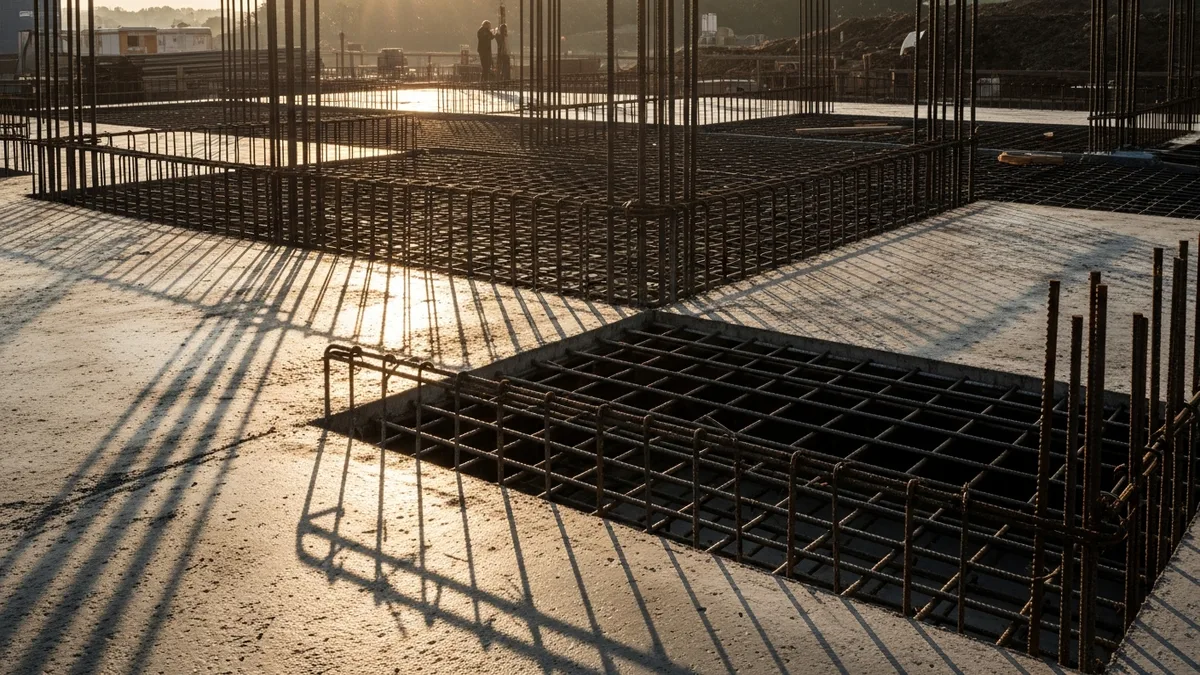
Formwork is one of those things that separates the contractors who make money on concrete jobs from the ones who lose their shirts. It can account for 35 to 60 percent of your total concrete cost on a typical project, and when it goes wrong, the consequences range from ugly surface finishes to full-on structural collapses.
Whether you’re pouring basement walls, columns, raised slabs, or footings, the way you select, design, build, and maintain your formwork directly affects your schedule, your budget, and the safety of every person on your site. This guide walks through the practical stuff that matters on the job, not textbook theory.
Form Types: Choosing the Right Material for the Job
Not every form system fits every project. The three main materials you’ll see on job sites are wood, aluminum, and steel, and each one has a sweet spot.
Wood Formwork
Wood is the most common formwork material in residential and light commercial work, and there’s a good reason for that. It’s cheap, it’s easy to work with, and every carpenter on your crew already knows how to cut and assemble it.
A typical wood form system uses plywood sheathing (usually 3/4-inch HDO or MDO plywood) backed by dimensional lumber walers and studs. You can build just about any shape with wood, which makes it the go-to choice for custom pours, irregular shapes, and one-off architectural elements.
The downsides? Wood absorbs moisture and swells, which means it degrades with each pour cycle. You’ll get maybe 5 to 10 reuses out of a plywood panel if you take care of it. Labor costs are also higher because wood forms take longer to assemble and strip compared to panel systems.
When to use wood: Custom shapes, small residential pours, one-time architectural elements, and projects where rental costs for metal systems don’t pencil out.
Aluminum Formwork
Aluminum panel systems have taken over a big chunk of the residential and mid-rise market in the last 15 years. Companies like Symons, Doka, and PERI make modular panels that pin or clip together, and a trained crew can set and strip them significantly faster than site-built wood forms.
Aluminum is light enough that two workers can handle most panels without a crane. The panels come with built-in walers and tie holes, so your setup time drops compared to building wood forms from scratch. A good aluminum system will give you 500-plus pours before panels need replacing.
The upfront cost is high, so most contractors rent aluminum systems rather than buying them. Make sure you factor rental duration into your project schedule because holding panels longer than planned can blow your budget.
When to use aluminum: Repetitive wall pours (subdivisions, apartment buildings), basement walls, any project where you’ll pour the same shape multiple times.
Steel Formwork
Steel forms are the heavy hitters. You’ll see them on large commercial projects, infrastructure work, bridges, and high-rise construction. Steel panels are the most durable option, lasting 1,000 or more pour cycles, and they produce the smoothest concrete finish because the panels don’t flex under pressure.
The trade-off is weight. Steel forms almost always require crane assistance, which means you need to plan your lifts and have rigging crews on site. They’re also the most expensive to buy, though rental is common on larger projects.
When to use steel: Large commercial pours, infrastructure and bridge work, high-rise construction, and any situation where surface finish quality is critical and crane access isn’t a problem.
Specialty Systems
Beyond the big three, you’ll run into insulated concrete forms (ICFs), stay-in-place forms, and fiberglass forms on certain projects. ICFs are popular in residential energy-efficient construction since the foam stays in place and acts as insulation. Stay-in-place metal deck forms are standard for raised concrete slabs in steel-frame buildings. Some contractors are also moving toward prefabricated formwork and assemblies that are built off-site and delivered ready to install, which can cut setup time significantly.
The key takeaway: match your form system to the project requirements, pour count, crew capabilities, and available equipment. The cheapest material isn’t always the cheapest system when you factor in labor and schedule.
Form Design and Engineering: Getting the Math Right
This is where a lot of contractors get into trouble. Formwork isn’t just carpentry; it’s temporary structural engineering, and the loads involved are serious.
Understanding Concrete Pressure
Fresh concrete acts like a fluid. When you pour a wall, the concrete exerts lateral pressure on the forms that increases with depth. A standard 10-foot wall pour with concrete placed at 5 feet per hour can generate lateral pressures exceeding 800 pounds per square foot at the base.
The pressure depends on several factors: pour rate (how fast you’re filling), concrete temperature (colder concrete stays fluid longer and generates higher pressure), concrete slump, and whether you’re using chemical retarders. ACI 347 provides the standard formulas for calculating formwork pressure, and your form design needs to handle those loads with a safety factor.
Tie Spacing and Waler Design
Form ties hold your wall forms together against concrete pressure, and the spacing between ties is one of the most critical design decisions you’ll make. Closer spacing means more ties (more cost, more holes to patch) but lower stress on each tie and the plywood between them.
A typical residential wall might use snap ties on 24-inch centers horizontally and vertically. But you can’t just assume that spacing works for every pour. Taller walls, faster pour rates, and high-slump concrete all increase the load on each tie. Run the numbers or have your form supplier run them for you.
Walers (the horizontal members that distribute tie loads across the form face) need to be sized for the tributary area they carry. Double 2x4 walers work for a lot of residential work, but step up to 2x6 or even steel channels on taller commercial pours.
Don’t Skip the Engineering
On any pour over 8 feet tall, any raised slab, or any unusual geometry, get a formwork engineer involved. Many form system manufacturers offer free engineering support when you rent their equipment. Take advantage of it. For multi-story work specifically, our elevated slab formwork guide covers shoring layouts, reshoring sequences, and load calculations in detail.
Formwork failures almost always trace back to one of two things: somebody didn’t do the engineering calculations, or somebody on the crew deviated from the engineered design. Neither excuse holds up when someone gets hurt. If you need help organizing engineering documents and submittals, a project management system can keep everything in one place.
Stripping Schedules: When to Pull the Forms
Stripping forms too early is one of the fastest ways to ruin a pour or cause a structural failure. Strip too late, and you’re burning money on rental costs and holding up the schedule. Getting the timing right requires understanding how concrete gains strength.
General Guidelines
Here are some commonly used minimum stripping times, but always defer to your project engineer’s specifications:
- Vertical forms (walls, columns): 24 to 48 hours for non-load-bearing applications. The concrete needs enough strength to hold its own shape without the forms.
- Slab soffits (with reshoring): 7 to 14 days depending on span, load, and concrete mix.
- Beam and girder soffits: 14 to 21 days, sometimes longer for long spans.
- Post-tensioned slabs: Follow the PT engineer’s stressing schedule. Never strip before stressing is complete.
Field Verification
Calendar days aren’t the whole picture. Concrete strength gain depends on temperature, mix design, and curing conditions. On critical pours, use field-cured cylinder breaks or maturity meters to verify that the concrete has actually reached the required stripping strength.
Contractors across the country trust Projul to run their businesses. Read their reviews.
In cold weather, concrete gains strength much more slowly. A slab that would be safe to strip at 7 days in summer might need 14 or more days in winter. Tracking your project schedule around weather conditions keeps you from guessing and helps your crew plan ahead.
Stripping Sequence
The order in which you strip forms matters, especially on raised slabs. Always strip from the center of the span outward, and never remove all shores at once. A gradual, planned stripping sequence prevents shock loading and gives the concrete time to pick up load incrementally.
Document your stripping plan and make sure every crew member understands the sequence before work starts. A good quality control process includes form stripping as a hold point with inspection sign-off.
Form Reuse and Maintenance: Getting More Pours Per Dollar
The economics of formwork improve dramatically when you can reuse forms multiple times. But reuse requires discipline around cleaning, repair, and storage.
Cleaning After Every Pour
The single most important maintenance step is cleaning forms immediately after stripping. Concrete residue left on form faces hardens and pits the surface, reducing both the lifespan of the form and the quality of subsequent pours.
For plywood forms, scrape off residue with a plastic scraper (metal scrapers gouge the surface), then wipe down with a damp cloth. For metal panels, use a stiff brush and water. Never use a hammer to knock off stuck concrete since you’ll dent the panel and those dents will telegraph through every future pour.
Release Agents
Apply form release agent before every single pour. No exceptions. Release agents serve two purposes: they make stripping easier (which protects both the concrete surface and the form) and they extend form life by preventing concrete from bonding to the form face.
Use the right type of release agent for your form material. Petroleum-based oils work well on wood. Chemical-reactive release agents are better for metal forms and produce a cleaner concrete surface. Whatever you use, apply it in a thin, even coat. Too much release agent causes surface discoloration and bug holes in the concrete.
Inspection and Repair
Before every reuse, inspect forms for:
- Warped or delaminated plywood
- Bent or dented metal panels
- Damaged tie holes (elongated or torn out)
- Cracked or split lumber
- Missing or damaged hardware (pins, clips, wedges)
Catching a damaged form before you pour is a lot cheaper than dealing with a blowout or a bad finish after. Build form inspection into your pre-pour checklist. If you’re tracking job costs, you’ll want to account for form maintenance and replacement as a line item so you know your true cost per pour.
Storage
Store plywood forms flat on a level surface to prevent warping. Keep them out of direct sun and rain. Metal panels should be stacked on dunnage and stored in a dry area. Organizing your form inventory by size and type saves time during setup on the next job.
Shoring and Reshoring: Supporting the Structure During Construction
Shoring is the backbone of improved concrete construction. Get it wrong, and the results can be catastrophic. This section focuses on the principles every field superintendent needs to understand.
Shoring Basics
Shores are the vertical supports that hold up formwork and wet concrete until the slab or beam reaches enough strength to carry its own weight plus construction loads. The most common types are:
- Post shores (single props): Adjustable steel or aluminum posts used for slab heights up to about 20 feet. Simple, fast to set, and widely available.
- Frame shores: Welded steel frames that stack for taller applications. Common in commercial and multi-story work.
- Tower shores: Heavy-duty modular systems for high loads and tall clearances. Used on infrastructure and industrial projects.
The critical thing with any shoring system is that it needs to sit on a solid foundation. Shores bearing on soft soil, uncompacted fill, or undersized mudsills are a failure waiting to happen. Calculate the point load at each shore base and make sure the bearing surface can handle it.
Reshoring
Here’s where multi-story construction gets tricky. When you strip the forms and shores from a freshly poured slab to move them up to the next floor, that slab suddenly has to support the full weight of the concrete above plus construction loads, but it hasn’t reached full design strength yet.
Reshoring solves this by reinstalling shores (called reshores) under the recently stripped slab. These reshores transfer construction loads down through multiple floor levels so no single slab is overloaded.
The number of reshored levels depends on the structural engineer’s analysis, but two to three levels of reshoring is common on multi-story cast-in-place buildings. Your crew management approach needs to account for the reshoring crew as a distinct work activity since it’s often on the critical path.
Common Shoring Mistakes
- Not checking shore capacity: Every shore has a rated load capacity that decreases with unbraced height. Check the manufacturer’s load tables.
- Leaning shores: Shores must be plumb. A shore that’s even a few degrees off plumb loses a surprising amount of capacity and can buckle.
- Inadequate bracing: Horizontal and diagonal bracing prevents shores from racking. Skipping bracing because “it looks stable” is playing with fire.
- Removing shores too early: See the stripping schedule section above. This one gets people killed.
Common Formwork Failures and How to Avoid Them
Formwork failures range from minor surface defects to full structural collapses. Understanding the most common failure modes helps you prevent them.
Blowouts
A blowout happens when concrete pressure exceeds the capacity of the form system and concrete bursts through. The usual causes are:
- Ties spaced too far apart or undersized for the actual pressure
- Pouring too fast (the single most common cause of blowouts on wall pours)
- Missing or improperly installed ties
- Deteriorated plywood that can’t span between ties
Prevention: Calculate your maximum pour rate based on tie capacity and communicate it clearly to the pump operator. Post the maximum fill rate at the pour location where everyone can see it.
Slab Collapses
Improved slab failures during construction are among the deadliest events on a concrete job site. They typically result from:
- Shoring placed on inadequate foundations
- Shore legs not properly braced
- Construction loads exceeding the design (stacking materials on fresh slabs)
- Premature shore removal
Prevention: Follow the engineered shoring layout exactly. Don’t let anyone stack materials on recently poured slabs without checking with the engineer. And never, under any circumstances, remove shores ahead of the approved schedule. Building a solid safety management program that covers formwork operations specifically is not optional on concrete jobs. The right safety software can help you track inspections, incidents, and compliance across all your concrete projects.
Surface Defects
Not every formwork problem is a structural failure. Surface defects like honeycombing, bug holes, cold joints, and form lines all trace back to formwork issues:
- Honeycombing: Concrete didn’t consolidate against the form face. Often caused by insufficient vibration or form joints that allowed paste to leak out.
- Bug holes: Trapped air against the form surface. Caused by over-oiling forms, insufficient vibration, or using impermeable form materials without adequate vibration.
- Form lines: Visible joints between form panels. Caused by misaligned panels, steps between adjacent panels, or dried concrete in panel joints.
For a deeper understanding of concrete finishing after the forms come off, check out our guide on concrete finishing techniques. And if you want to go back to the basics of mix design and placement, our concrete fundamentals post covers the groundwork.
Preventing Failures: The Checklist Approach
The best protection against formwork failures is a systematic pre-pour inspection. Before every pour, walk the forms and check:
- All ties installed per the engineered layout
- Walers tight and properly aligned
- Shores plumb, braced, and bearing on adequate foundations
- Form faces clean and oiled
- Correct form dimensions verified against drawings
- Cleanout ports open at the base of wall forms
- Chamfer strips and blockouts installed per plan
- Pour rate posted and communicated to pump crew
Treat this checklist as a non-negotiable hold point. No inspection, no pour.
Wrapping Up
Good formwork practice comes down to planning, engineering, and discipline on the job site. Pick the right form system for your project, do the engineering calculations (or get someone who will), follow your stripping schedules, take care of your forms, and never cut corners on shoring. The contractors who treat formwork as a skilled trade rather than an afterthought are the ones who finish jobs on time, on budget, and without incident reports.
Ready to see how Projul can work for your crew? Schedule a free demo and we will walk you through it.
If you’re looking for a way to keep your concrete crews, schedules, and job costs organized across multiple pours and projects, Projul’s construction management platform was built for contractors who’d rather spend time building than shuffling paperwork. Give it a look.
Frequently Asked Questions
What is the most cost-effective formwork material for residential construction?
How long should concrete cure before stripping forms?
How many times can you reuse concrete forms?
What causes concrete formwork to fail?
What is the difference between shoring and reshoring?
Related Articles

Concrete Tilt-Up Construction: A Contractor's Complete Field Guide
Tilt-up construction accounts for roughly 15 percent of all industrial and commercial buildings in North America. This...
Read More →
How to Implement Construction Software Without Losing Your Mind
Most construction software rollouts fail. Not because the software is bad, but because the rollout was rushed. Here are...
Read More →
How Selections Can Pay for Themselves in Three Easy Steps
Most contractors lose thousands each year on wrong material orders, slow client decisions, and missed upsell chances....
Read More →