Parking Structure Design and Maintenance Guide
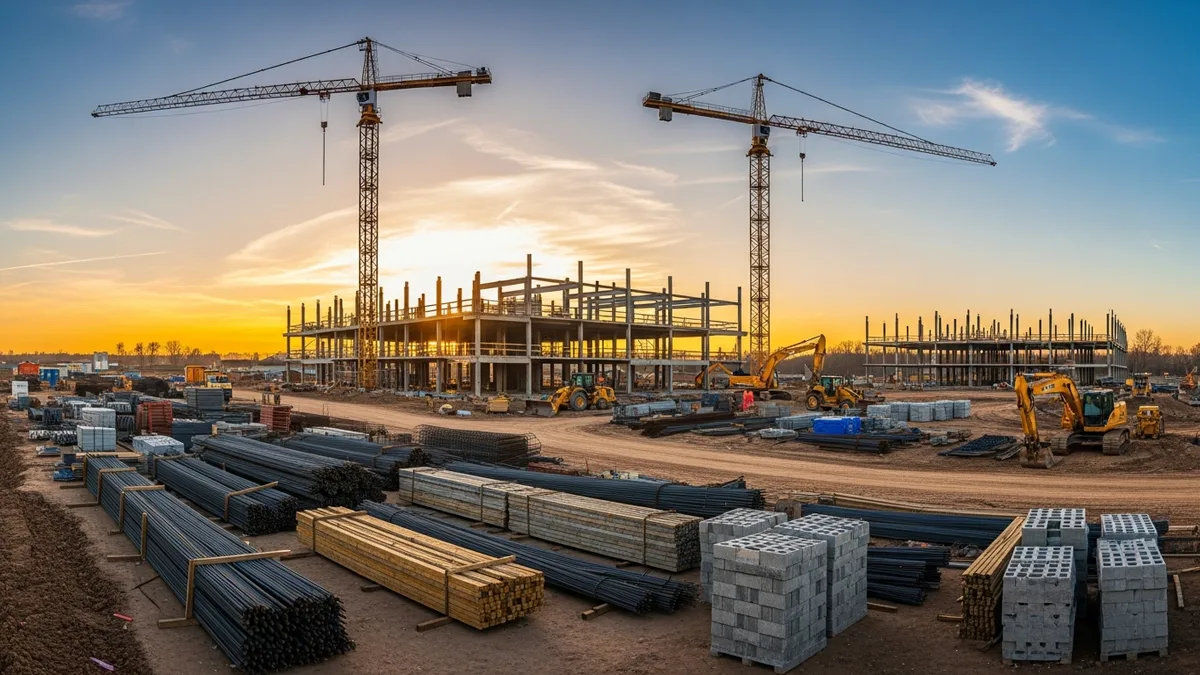
Parking structures look simple from the outside. Concrete floors, some ramps, a few stairwells, and paint on the columns so people don’t scrape their doors. But anyone who has actually built one knows the truth: these are complex, high-exposure structures that punish sloppy work harder than almost any other building type.
Think about what a parking garage deals with every single day. Thousands of vehicles dripping oil, coolant, and road salt onto the deck. Rain and snowmelt pooling on surfaces that were supposed to drain. Freeze-thaw cycles working on every crack. Carbon dioxide from exhaust slowly eating into the concrete. And all of this happening on a structure where the primary structural element, the floor slab, is also the roof of the level below it.
Getting the design right, placing the concrete properly, installing the waterproofing correctly, and then actually maintaining the thing after it’s built are what separate a parking structure that lasts 60 years from one that needs major rehab at 20.
This guide walks through the key considerations for contractors working on parking structure projects, from initial structural design decisions through long-term maintenance planning.
Structural Design Fundamentals for Parking Structures
The structural system you choose for a parking structure affects everything downstream: construction cost, schedule, usable space, and long-term durability. There are a few common approaches, and each one comes with trade-offs.
Cast-in-place post-tensioned concrete is the most popular system for new parking structures in the United States. Post-tensioning lets you span 55 to 62 feet between columns, which gives you the column-free bays that make parking layouts work. The slabs are typically 6.5 to 8 inches thick depending on span and loading. If you’re not familiar with post-tensioning principles, our post-tensioned concrete slab guide breaks down the process in detail.
Precast concrete is another common choice, especially when speed matters. Precast double-tee members are manufactured off-site and erected quickly, which can save weeks on the schedule compared to cast-in-place. The trade-off is that you have more joints to seal and maintain, and the connections between precast members are potential weak points for water infiltration over time.
Structural steel with concrete-on-metal-deck is less common for standalone garages but shows up in mixed-use buildings where parking occupies the lower floors. Steel framing is lighter and faster to erect, but the composite deck system is more vulnerable to corrosion if the waterproofing fails. If you are working with steel framing, understanding the different structural steel connection types will help you coordinate with the fabricator and erector.
Regardless of the system, a few design basics apply to every parking structure:
- Floor slopes need to be a minimum of 1.5% to move water toward drains. Flat spots are where problems start. Many experienced designers spec 2% to give themselves a margin because construction tolerances eat into that number.
- Column spacing directly determines your parking efficiency. The goal is 60-foot clear spans in the long direction with bays around 27 to 30 feet in the short direction. This gives you a three-bay layout: parking, drive aisle, parking.
- Floor-to-floor height is typically 10 to 11 feet to allow for mechanical systems, lighting, signage, and adequate clearance. Minimum clear height for passenger vehicles is 7 feet, but 8 feet 2 inches is more common to accommodate SUVs and trucks.
- Ramp grades should not exceed 6.5% for comfort and safety. Transition slopes at the top and bottom of ramps need to be half the ramp grade or less to prevent vehicles from bottoming out.
One thing I see contractors miss on their first parking structure project: the structural engineer’s drawings are just the starting point. The slab thickness, reinforcement layout, and post-tensioning profile all need to work together with the drainage plan, the waterproofing system, and the joint layout. If those disciplines aren’t coordinated during design, you’ll be dealing with conflicts in the field.
Concrete Placement and Quality Control
Placing concrete in a parking structure is not the same as pouring a ground-level slab. You’re working at elevation, often with post-tensioning tendons in the way, and the quality requirements are stricter because these slabs have to resist water penetration for decades.
The concrete mix design is where durability starts. For parking structure decks, you’re typically looking at:
- Compressive strength: 4,000 to 5,000 PSI at 28 days
- Water-to-cement ratio: 0.40 or lower (this is the single most important durability factor)
- Air entrainment: 5 to 7% in freeze-thaw environments
- Supplementary materials: Silica fume, fly ash, or slag cement to reduce permeability
- Slump: 4 to 6 inches for conventional placement, higher for pump mixes
Getting the w/c ratio right is critical. Every bit of extra water you add to make the concrete easier to place also makes the finished slab more porous. More porous means more water and chloride penetration, which means faster corrosion of the reinforcing steel. If your crews are adding water at the pump to improve flow, you’re building in a problem that won’t show up for 5 to 10 years but will cost a fortune to fix.
For a deep dive on mix design and testing, check out our concrete mix design and testing guide. The principles there apply directly to parking structure work, just with tighter tolerances.
Placement sequencing matters more in parking structures than in most other concrete work. Post-tensioned slabs need to be poured in specific sequences to allow stressing operations. Your pour strips, closure strips, and construction joints all need to be planned before the first truck shows up. Coordinate with the post-tensioning subcontractor early because their stressing schedule will dictate your pour schedule.
Curing is not optional and not something you can cut short. Parking structure slabs need a minimum of 7 days of wet curing. Curing compounds are an alternative, but wet curing with soaker hoses or wet burlap produces a denser, less permeable surface. In hot weather, start curing immediately after finishing. In cold weather, protect the concrete with insulated blankets and maintain temperatures above 50°F for at least 48 hours.
Surface finishing on parking decks should produce a medium broom finish for traction without creating deep grooves that trap water. The finish needs to be consistent across the entire slab. High spots and birdbaths (low spots that hold water) are unacceptable on a parking deck. Use straightedges and check grades constantly during finishing.
Quality control testing should include slump tests on every load, air content checks, and a full set of cylinders for strength testing. For parking structures, many specs also require rapid chloride permeability testing (ASTM C1202) to verify that the in-place concrete meets the durability requirements.
Waterproofing Systems and Drainage Design
If there’s one thing that determines how long a parking structure stays in service, it’s how well it keeps water away from the reinforcing steel. Waterproofing and drainage are not afterthoughts. They’re core building systems that need the same attention as the structural frame.
Traffic-bearing membrane systems are the standard waterproofing approach for parking structure decks. These are thick, flexible coatings applied directly to the concrete surface that can withstand vehicle traffic. The most common types are:
- Polyurethane membranes: Applied in multiple coats with a broadcast aggregate layer for traction. Total thickness is typically 40 to 60 mils. These are the workhorse of the industry.
- Epoxy/urethane hybrid systems: More abrasion-resistant than straight polyurethane but less flexible. Good for high-traffic areas like drive aisles and ramp surfaces.
- Sheet membrane systems: Pre-manufactured sheets adhered to the deck. More consistent thickness than liquid-applied systems but harder to detail around drains, columns, and curbs.
Curious what other contractors think? Check out Projul reviews from real users.
The membrane is only as good as the surface preparation underneath it. Shot-blasting the concrete to open the pore structure and create a profile is standard. Any cracks wider than hairline need to be routed and sealed before the membrane goes down. Moisture testing of the concrete is required because most membrane systems will not bond properly to wet concrete.
Our waterproofing guide for below-grade foundations covers many of the same principles that apply to parking structure deck waterproofing, especially around material selection and surface prep.
Drainage design works hand-in-hand with waterproofing. Every drop of water that lands on a parking deck needs a clear path to a drain. That means:
- Floor drains spaced so that no point on the deck is more than 75 feet from a drain
- Trench drains at the base of ramps and at transitions between sloped and flat areas
- Scuppers or overflow drains at the perimeter as a secondary system
- Drain lines sized for the anticipated flow, including a safety factor for partial blockage
The site drainage and water management guide has good background on drainage principles. For parking structures, the added wrinkle is that your drainage system is embedded in or attached to the structure itself, so failures are harder and more expensive to fix than site drainage issues.
Expansion joints and control joints are another critical part of the waterproofing strategy. Joints are the most vulnerable points in any parking structure. They move, they’re hard to seal permanently, and they’re exactly where water wants to go. Use high-quality joint sealants rated for the expected movement, and plan for regular inspection and replacement. Most joint sealants in parking structures need replacement every 5 to 8 years.
Safety Planning During Construction
Building a parking structure involves working at height, managing heavy precast members or concrete pumping operations, coordinating multiple trades in tight spaces, and dealing with the fall hazards that come with open-sided improved slabs. Safety planning for these projects needs to be specific and thorough.
Fall protection is the biggest concern. During construction, parking structure decks are open on the edges with drops of 10 feet or more between levels. Perimeter cables or guardrail systems need to go up as soon as each level is complete. Floor openings for stairwells, elevator shafts, and mechanical chases need covers or guardrails that stay in place until permanent railings are installed.
Post-tensioning safety is something that general contractors on their first parking structure project sometimes underestimate. Stressed tendons store an enormous amount of energy. Accidentally cutting a stressed tendon during coring or sawing operations can be fatal. Before any cutting, drilling, or coring on a post-tensioned slab, ground-penetrating radar (GPR) must be used to locate all tendons. Mark them clearly and enforce a no-cutting zone.
Concrete pumping operations on multi-level structures require careful planning for pump truck positioning, boom clearances, and pipeline routing. The weight of a full concrete pipeline is significant, and the forces during pumping can be unpredictable. Make sure your shoring is designed to handle the construction loads, not just the final dead and live loads.
For a deeper look at safety program structure, our construction safety management guide covers how to build a site-specific safety plan. For parking structure projects specifically, make sure your plan addresses:
- Fall protection for every open edge and floor penetration
- Tendon location protocols before any cutting or coring
- Crane and rigging plans for precast erection (if applicable)
- Traffic management if the structure is adjacent to occupied areas
- Concrete pump positioning and pipeline failure response
Inspections during construction should follow a documented checklist that covers rebar placement, tendon profiles, embed locations, drainage piping, and formwork/shoring adequacy before every pour. Catching a misplaced tendon before the pour saves tens of thousands of dollars compared to finding it after. Our construction inspection checklist guide can help you build a system that works for complex projects like these.
Long-Term Maintenance Planning
Here’s the reality that a lot of owners don’t want to hear: a parking structure starts deteriorating the day it opens. Unlike an enclosed building with a roof and walls protecting the structure, a parking garage has its primary structural elements directly exposed to weather, chemicals, and vehicle traffic. Maintenance isn’t optional. It’s a condition of the structure surviving.
A good maintenance program for a parking structure includes several layers:
Routine maintenance (monthly to quarterly):
- Clear all drains and remove debris from drain grates
- Check expansion joint seals for damage or separation
- Sweep accumulated dirt and debris, especially in corners and against curbs where moisture sits
- Check for and repair any new cracks in the traffic membrane
- Inspect stairwells, elevators, and lighting
Annual maintenance:
- Power wash all decks to remove salt buildup, oil stains, and debris
- Inspect all joint sealants and replace any that have failed
- Check traffic membrane for wear, especially in drive aisles and turning areas
- Document any new concrete cracking, spalling, or staining (rust stains indicate rebar corrosion below)
- Test the drainage system by running water and checking for proper flow
Periodic major maintenance (every 3 to 7 years):
- Full condition assessment by a structural engineer, including delamination survey, chloride testing, and corrosion potential mapping
- Reapplication of traffic membrane on wearing surfaces
- Crack injection and spall repair based on the condition assessment
- Joint sealant full replacement
- Restriping and signage updates
The cost of deferred maintenance is staggering. A parking structure that gets regular maintenance might need $2 to $4 per square foot per year in upkeep. The same structure with 10 years of neglected maintenance might face a $30 to $50 per square foot rehabilitation bill, or worse, partial demolition and reconstruction. The math is simple, but convincing building owners to spend money on a structure that “looks fine” from the ground level is one of the hardest parts of maintenance consulting.
Documentation is critical. Every inspection, every repair, every membrane application needs to be logged with dates, locations, materials used, and photos. When an owner or property manager asks for a condition report 15 years after construction, having that maintenance history is the difference between a rational assessment and guesswork.
Corrosion Protection and Rebar Durability Strategies
Reinforcing steel corrosion is the single biggest threat to parking structure longevity. Understanding how corrosion works and what you can do during construction to slow it down is worth more than any maintenance program after the fact. Prevention is always cheaper than repair.
How corrosion happens in parking structures. Concrete naturally protects embedded steel because of its high alkalinity, typically a pH around 12.5 to 13. At that pH, a thin passive oxide layer forms on the steel surface and prevents corrosion. Two things break down that protection: chloride intrusion and carbonation. Chloride ions from deicing salts penetrate through the concrete cover and, once they reach a critical concentration at the rebar level (roughly 1.0 to 1.5 pounds per cubic yard of concrete), they destroy the passive layer and corrosion begins. Carbonation is a slower process where atmospheric carbon dioxide reacts with the calcium hydroxide in concrete, lowering the pH over time. In a parking structure full of vehicle exhaust, carbonation rates are higher than in a typical building.
Once corrosion starts, it feeds on itself. Corroding steel expands to several times its original volume, which cracks and spalls the concrete cover. That exposes more steel to moisture and chlorides, accelerating the process. Left unchecked, a small area of corrosion can spread across an entire bay in just a few years.
Concrete cover thickness is your first line of defense. Most codes require a minimum of 1.5 inches of cover over the top mat of reinforcing steel in a parking structure deck. Many designers spec 2 inches for the top mat on exposed decks, and that extra half-inch buys years of additional protection. During construction, verifying cover with a cover meter before the pour is one of the most important QC steps you can take. If your rebar chairs are crushed, tipped, or spaced too far apart, the steel sags and your cover drops below spec. That’s a problem you’ll never see again until the spalls start showing up a decade later.
Corrosion-resistant reinforcement is becoming more common in parking structures, especially in northern climates where salt exposure is heavy. Options include:
- Epoxy-coated rebar (ECR): The most widely used corrosion-resistant option. A factory-applied fusion-bonded epoxy coating creates a barrier between the steel and the concrete. The coating needs to be handled carefully during shipping, storage, and placement because nicks and scratches compromise the protection. Patch any damaged areas with field-applied epoxy before the pour.
- Galvanized rebar: Hot-dip galvanized reinforcement provides sacrificial protection. The zinc coating corrodes preferentially, protecting the underlying steel. It costs more than ECR but is more tolerant of handling damage.
- Stainless steel rebar: The most expensive option but also the most durable. Stainless steel rebar is virtually immune to chloride-induced corrosion. It’s often used selectively in the most vulnerable locations like the top mat of the top deck and around expansion joints rather than throughout the entire structure. A hybrid approach with stainless steel in the top mat and black or epoxy-coated steel in the bottom mat can balance cost and durability.
- GFRP (glass fiber reinforced polymer) rebar: A newer option that eliminates the corrosion problem entirely because there’s no metal to corrode. GFRP has different structural properties than steel (higher tensile strength but lower modulus of elasticity), so the structural design needs to account for larger deflections and different crack control requirements.
Corrosion inhibitors are chemical admixtures added to the concrete mix that raise the chloride threshold needed to initiate corrosion. Calcium nitrite-based inhibitors are the most common and have decades of field performance data behind them. They add $5 to $15 per cubic yard to the concrete cost but can extend the time to corrosion initiation by 10 to 15 years. For a parking structure that uses thousands of cubic yards of concrete, it’s a meaningful upfront cost, but the payback in deferred maintenance is significant.
Cathodic protection is an active corrosion control system typically installed during major rehabilitation rather than initial construction, but it’s worth knowing about. Impressed current cathodic protection (ICCP) systems use a low-voltage DC current to counteract the electrochemical corrosion process. A titanium mesh anode is installed on the concrete surface under a concrete overlay, and a rectifier provides the current. These systems can halt corrosion in already-contaminated concrete, which makes them valuable for extending the life of a structure that’s too important to demolish but has significant chloride contamination.
For contractors, the takeaway is this: corrosion protection decisions made during design and construction have a bigger impact on the structure’s 50-year life cycle cost than almost anything else. Push back when value engineering tries to cut epoxy coating or reduce concrete cover. Those savings are measured in thousands during construction and paid back in millions during repair.
Rehabilitation and Repair Methods for Aging Structures
Not every parking structure project is new construction. A huge portion of the work in this market involves rehabilitating existing structures that are 20, 30, or 40 years old and showing their age. Knowing how to assess damage, select the right repair methods, and sequence the work is a valuable skill set for any concrete contractor.
Condition assessment comes first. Before you can scope a repair project, you need a clear picture of what’s actually wrong. A thorough condition assessment includes:
- Visual survey: Walk every bay, every level, every stairwell. Document cracks (width, length, and pattern), spalls, delaminations, rust staining, efflorescence (white deposits on the underside of slabs indicating water movement), joint sealant condition, membrane condition, and drain functionality. Photograph everything. A systematic grid-based approach works better than wandering around with a clipboard.
- Delamination survey: Use a chain drag or hammer sounding to identify areas where the concrete cover has debonded from the substrate but hasn’t spalled yet. These delaminated areas are much larger than the visible spalls and represent the true scope of concrete removal needed. On a badly deteriorated structure, delaminated areas can be three to five times the visible spall area.
- Chloride sampling: Core the concrete at multiple locations and depths, then test for chloride ion concentration. This tells you how deep the contamination goes and helps predict where corrosion will show up next. Typically you want samples at 0.5-inch depth increments down to the rebar level.
- Corrosion potential mapping: A half-cell potential survey using a copper-copper sulfate electrode identifies areas where active corrosion is occurring, even if there’s no visible damage yet. This is especially useful for prioritizing repair areas and deciding whether corrosion inhibitors or cathodic protection are needed.
- Concrete strength testing: Cores for compressive strength testing verify that the existing concrete can support repair materials and ongoing loads. Carbonation depth testing using phenolphthalein indicator is quick and cheap.
Common repair methods for parking structure concrete include:
Partial-depth concrete repair is the bread and butter of parking structure rehabilitation. You remove the deteriorated concrete down to sound material (or at least 0.75 inches below the reinforcing steel), clean and coat the exposed rebar with a zinc-rich primer or epoxy, and place a repair mortar or concrete patch. For small areas, hand-applied polymer-modified mortars work well. For larger areas (over 5 square feet), formed repairs with low-shrinkage concrete or a flowable micro-concrete give better results. The key is proper preparation: saw-cut the perimeter of the repair area to a minimum depth of 0.75 inches to create a clean edge, remove all deteriorated concrete with chipping hammers (not jackhammers, which can damage the surrounding concrete and disturb post-tensioning tendons), and make sure the substrate is clean, sound, and at the right moisture condition for the repair material you’re using.
Full-depth repair is needed when deterioration extends through the entire slab thickness or when the bottom mat of reinforcing steel is compromised. This involves shoring the area below, removing the full slab section, splicing or adding new reinforcement, and placing new concrete. Full-depth repairs in post-tensioned structures are particularly tricky because you have to avoid damaging any live tendons. This work absolutely requires GPR scanning and often a structural engineer on-site during demolition.
Crack injection using epoxy or polyurethane materials restores structural integrity to cracked concrete and seals it against water infiltration. Epoxy injection (low-viscosity, typically 50 to 200 cps) works for dormant cracks, bonding the crack faces back together with a material stronger than the concrete itself. Polyurethane injection works better for active (moving) cracks because the cured material stays flexible. Choosing the wrong injection material for the crack type is a common mistake that leads to re-cracking and call-backs.
Overlay systems provide a new wearing surface and can add corrosion protection. Options include polymer-modified concrete overlays (typically 1.5 to 2 inches thick), thin polymer overlays (0.25 to 0.375 inches), and waterproofing membrane systems applied over the repaired concrete surface. The choice depends on the condition of the existing concrete, the available headroom (adding 2 inches of overlay across a full deck can affect clearances), and the owner’s budget and timeline.
Carbon fiber reinforced polymer (CFRP) strengthening is a relatively newer technique for adding structural capacity to deficient members. Thin carbon fiber strips or fabric are bonded to the underside of beams or slabs with epoxy. CFRP can restore or increase the flexural and shear capacity of members that have lost section due to corrosion. It’s lightweight, fast to install, and doesn’t reduce overhead clearance the way a concrete jacket would. For beams with significant corrosion-related section loss, CFRP can be the difference between keeping the structure in service and posting load restrictions.
Sequencing rehabilitation work takes careful planning. You typically can’t shut down an entire parking structure for repairs, so the work happens in phases with traffic control plans that keep portions of the structure operational. Night and weekend work is common. If you’re managing a project like this, having solid scheduling tools that handle phased work and resource conflicts will save you serious coordination headaches.
EV Charging Infrastructure and Future-Proofing
Electric vehicle adoption is changing what building owners and developers expect from new parking structures. Even if EV charging stations aren’t part of the initial build, most new parking structures are now being designed as “EV-ready,” meaning the electrical infrastructure is roughed in during construction so chargers can be added later without tearing things apart.
What “EV-ready” means in practice. At minimum, it means running conduit from the electrical room to designated parking spaces and sizing the electrical service to handle future charging loads. A Level 2 charger (240V, 40A) draws about 7.7 to 9.6 kW. If an owner wants to eventually support 50 chargers, that’s roughly 400 to 480 kW of additional electrical load. That’s not trivial. It might require a larger transformer, a dedicated switchgear section, and heavier feeders than a traditional parking structure would need.
The cost difference between roughing in conduit and electrical capacity during construction versus retrofitting later is enormous. Running conduit through a concrete slab during construction costs a fraction of what it takes to core, trench, and patch an existing slab to add the same conduit after the fact. For a typical 500-space parking structure, the incremental cost to make 10% of spaces EV-ready during construction might be $50,000 to $80,000. Retrofitting those same 50 spaces later could easily run $200,000 to $400,000 depending on the structural modifications needed.
Electrical coordination for EV infrastructure needs to happen during the design phase, not as an afterthought during construction. The electrical engineer needs to know how many chargers the owner wants now, how many they want to be ready for in the future, and where those spaces will be located. Charger locations affect conduit routing, panel locations, and ventilation requirements (although this is more of a concern for enclosed garages with DC fast chargers that generate heat).
Structural considerations for EV charging are minimal but worth noting. Charger pedestals need a concrete pad or they can be bollard-mounted. Conduit embedded in the slab needs to be coordinated with the reinforcing steel and post-tensioning layout. Transformer pads for dedicated EV transformers need structural support if located on an upper level. Nothing complicated, but it needs to be on the drawings.
Code requirements are evolving quickly. Several states and municipalities now require a percentage of parking spaces in new structures to be EV-ready. California’s CALGreen code, for example, requires conduit to at least 20% of parking spaces in new commercial projects. Similar requirements are being adopted across the country. Check local codes early in the design phase so you’re not caught off guard during plan review.
For contractors, the practical impact is more conduit installation, heavier electrical rooms, and additional coordination between the electrical and structural trades. If you’re already tracking trade coordination and scheduling across multiple subs, a system like Projul’s project management tools helps keep everyone on the same page, especially when adding trades or scope that weren’t part of the original plan.
Budgeting and Cost Control on Parking Structure Projects
Parking structures are big-dollar projects, and the margin between a profitable job and a money-losing one often comes down to how well you estimated the specialty scopes and how tightly you controlled costs during construction. These are not jobs where you can wing the budget and make it up on change orders.
Typical cost ranges for parking structures vary widely by region, structural system, and finish level, but as a rough benchmark:
- Cast-in-place post-tensioned: $45 to $70 per square foot of gross building area
- Precast concrete: $40 to $65 per square foot
- Structural steel with composite deck: $50 to $80 per square foot
- Mixed-use podium (parking below occupied space): $65 to $100+ per square foot
These numbers include the structure, waterproofing, MEP, finishes, and site work but exclude land, design fees, and soft costs. The range is wide because a basic 300-space surface garage in a low-cost market is a fundamentally different project than an 800-space, 6-level structure with architectural precast facades in a downtown core.
Line items that catch contractors off guard on their first parking structure bid:
- Post-tensioning: This is a specialty subcontract, and the costs can be hard to estimate if you haven’t done it before. Get at least two bids from experienced PT contractors and make sure they include stressing, grouting (for bonded systems), and the engineering coordination.
- Traffic-bearing waterproofing: As mentioned earlier, $3 to $6 per square foot for the membrane system. On a 200,000 square foot structure, that’s $600,000 to $1.2 million. Don’t bury this in a general “coatings” line item.
- Expansion joints: Manufactured expansion joint systems for parking structures cost $50 to $200 per linear foot installed, depending on the joint width and traffic rating. A typical structure might have 500 to 1,000 linear feet of expansion joints.
- Shoring and formwork duration: Post-tensioned slabs typically need shoring to remain in place longer than conventional reinforced slabs because you can’t stress the tendons until the concrete reaches a minimum strength (usually 3,000 PSI). That means your forms and shores are tied up longer on each level, which affects your schedule and your rental costs.
- Winter protection: In cold climates, concrete protection (heated enclosures, insulated blankets, ground thaw) on a multi-level structure is a significant cost that’s easy to underestimate. Budget $3 to $8 per square foot of protected area depending on the severity of the winter and the protection method.
Cost tracking during construction needs to be granular. A parking structure has enough repetition (each level is similar) that you can use early levels as a baseline to predict costs on later levels. If Level 2 cost more than your estimate, figure out why before you start Level 3. Was it a productivity issue? A material waste problem? A design change? Real-time cost tracking that breaks down labor, material, and subcontractor costs by level and by scope gives you the data to make adjustments before the overruns compound.
For contractors who want to see how their estimates stack up against actual costs as the job progresses, Projul’s budgeting and job costing tools give you that visibility without waiting for the monthly accounting report. When you’re running a $15 million parking structure job, finding out you’re over budget 60 days after the fact is not useful. Knowing it within a week gives you time to fix the problem.
Change order management on parking structures tends to revolve around a few recurring themes: unforeseen conditions in the existing structure (for rehab projects), design changes driven by tenant or end-user requirements, code-related changes discovered during plan review, and scope additions like EV infrastructure or security systems that weren’t in the original program. Document everything in real time, price changes promptly, and don’t let unresolved changes stack up. A backlog of unsigned change orders is a cash flow and relationship problem waiting to happen.
Common Mistakes and How to Avoid Them
After covering the major systems, let’s talk about the mistakes that show up again and again on parking structure projects. If you’re new to this building type, this list will save you money and headaches.
Mistake #1: Inadequate slope on the deck. Flat spots on a parking structure deck are where deterioration starts. Water pools, it sits, it works its way into cracks, and it attacks the steel underneath. The fix is simple: verify slopes during construction with a level or laser before and after the pour. If you find a birdbath after the concrete is hard, address it with a leveling overlay before the waterproofing goes down. Don’t membrane over a puddle.
Mistake #2: Ignoring the waterproofing scope during bidding. Traffic-bearing membrane systems are expensive, typically $3 to $6 per square foot for material and labor. Contractors who haven’t built a parking structure before sometimes underestimate this scope or treat it as a minor line item. The waterproofing system protects a multi-million-dollar structure. Budget it properly, hire experienced applicators, and don’t value-engineer it down to the cheapest option.
Mistake #3: Poor joint detailing. Expansion joints and construction joints in parking structures move. They move with temperature changes, they move with post-tensioning forces, and they move with traffic loading. If the joint details don’t accommodate that movement, the sealant will fail within a year or two and water will pour through to the level below. Work with the waterproofing manufacturer’s rep to get the joint details right.
Mistake #4: Skipping the maintenance manual. When you hand a parking structure over to the owner, include a detailed maintenance manual that specifies what needs to happen, how often, and what to look for. Most building owners have no idea how to maintain a parking structure. If they don’t know that the membrane needs recoating in 7 years, they won’t budget for it, and the structure will suffer. It takes a few hours to put together and it’s one of the most valuable things you can leave behind.
Mistake #5: Not coordinating MEP with structural. Parking structures have lighting, ventilation, fire protection, security cameras, and sometimes EV charging infrastructure. All of those systems need to be coordinated with the structural framing, especially in post-tensioned structures where you cannot drill into the slab without hitting a tendon. Resolve conflicts in the model or on paper, not in the field with a concrete saw.
Mistake #6: Adding water to the concrete mix on-site. This one applies to all concrete work, but the consequences in a parking structure are more severe because the deck is the waterproofing substrate. Extra water means higher permeability, lower strength, more shrinkage cracking, and a surface that won’t hold a membrane bond as well. If the concrete arriving on-site is too stiff to place, reject the load or work with the batch plant on the mix design. Do not add water at the pump.
Parking structures are rewarding projects for contractors who do the homework and respect the details. They’re big-dollar jobs with long schedules and real complexity. But the contractors who build a reputation for doing this work well tend to get repeat business, because owners and developers remember who built the garage that’s still performing 20 years later and who built the one that needed a $3 million rehab at year 12.
Ready to stop guessing and start managing? Schedule a demo to see Projul in action.
Managing complex, multi-phase projects like parking structures is a lot easier when your project management system can actually handle the scheduling, budgeting, and documentation demands. If you’re still running this kind of work on spreadsheets and email chains, take a look at what construction project management software can do for your operation.
Frequently Asked Questions
How long does a well-built parking structure typically last?
What is the most common cause of parking structure deterioration?
What type of concrete is used in parking structure decks?
How often should a parking structure be inspected?
What is post-tensioning and why is it used in parking structures?
Related Articles

Construction Apprenticeship vs Trade School: Which Path Is Better?
Apprenticeships and trade schools both lead to careers in the trades, but they take very different routes to get there....
Read More →
Construction Mechanical Piping and Process Piping Guide
Mechanical piping and process piping are two different animals, even though they both involve welding pipe and running...
Read More →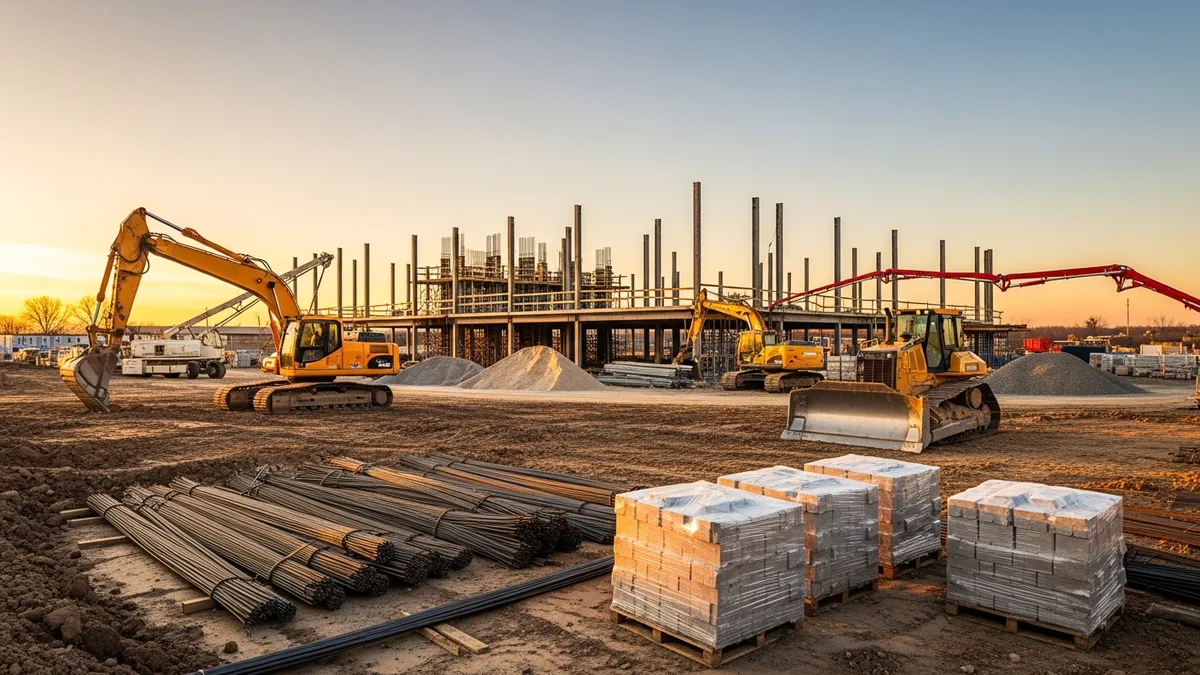
Construction Expansion Joint Design and Installation Guide
Expansion joints are one of the most overlooked details in construction, and getting them wrong leads to cracked slabs,...
Read More →