Construction Mobilization Planning Checklist
You won the bid. The contract is signed. The client is excited. Now comes the part that separates contractors who run smooth jobs from contractors who spend the first two weeks putting out fires: mobilization.
Mobilization is not glamorous. Nobody posts about it on social media. But it is the single most important phase for setting the tone of an entire project. Get it right, and your crew hits the ground running. Get it wrong, and you are playing catch-up for weeks.
This guide breaks down what mobilization actually involves, how to build a checklist that covers your bases, the right way to stage equipment, how to onboard crews for new projects, and the first-week mistakes that trip up even experienced contractors.
What Is Construction Project Mobilization?
Mobilization is everything that happens between signing the contract and breaking ground. It is the phase where you move from paperwork to action, getting people, equipment, materials, and plans to the job site so construction can actually begin.
Think of it this way: if the project is a road trip, mobilization is packing the car, checking the tires, loading the GPS, and making sure everyone knows where they are going before you pull out of the driveway.
Here is what mobilization typically includes:
- Site preparation and access. Clearing the site, establishing entry and exit routes, setting up fencing and security, and installing temporary signage.
- Equipment delivery and staging. Getting the right machines and tools to the right spots on site, fueled up and ready to run.
- Material procurement and delivery. Ordering materials with enough lead time and coordinating delivery schedules so nothing shows up before you have a place to put it.
- Temporary facilities. Job trailers, portable restrooms, temporary power, water, and communication lines.
- Permits and inspections. Making sure every required permit is pulled and posted before anyone picks up a hammer.
- Crew and subcontractor coordination. Assigning teams, confirming start dates, and making sure every person on site knows the plan.
- Safety planning. Site-specific safety plans, emergency procedures, PPE requirements, and OSHA compliance.
Mobilization is not a single task. It is a collection of dozens of tasks that all need to land at the right time. That is why it needs its own plan, its own timeline, and its own accountability structure.
If you are still managing projects with spreadsheets and phone calls, mobilization is where that approach falls apart fastest. A tool like Projul’s project management features can help you track every mobilization task in one place so nothing slips through the cracks.
Building Your Mobilization Checklist
Every contractor needs a mobilization checklist. Not a mental list. Not a sticky note. A real, written checklist that you can hand to your project manager and say, “Make sure every one of these boxes is checked before we start.”
Here is a framework you can adapt to your operation:
Permits and Legal
- All required permits pulled and posted on site
- Utility locates completed and marked
- Insurance certificates on file for all subs
- Signed contracts from every subcontractor
- Notice to proceed issued
Site Setup
- Site access routes established and communicated
- Fencing, barriers, and security in place
- Temporary signage installed (company, safety, directional)
- Job trailer or field office delivered and set up
- Portable restrooms placed
- Temporary power connected
- Temporary water connected
- Dumpsters and waste management arranged
Equipment and Materials
- Equipment delivery schedule confirmed with vendors
- Staging areas identified and marked on site plan
- Fuel and maintenance supplies on hand
- Initial material deliveries scheduled
- Storage areas secured for materials and tools
- Tool inventory completed and assigned
Crew and Subcontractors
- Crew assignments finalized
- Start dates confirmed with all subcontractors
- Contact list distributed to all team leads
- Site-specific orientation scheduled
- PPE requirements communicated
- Parking and site access instructions sent to all workers
Communication and Documentation
- Project schedule distributed to all stakeholders
- Daily reporting process established
- Photo documentation protocol set up
- Change order process reviewed with field team
- Client communication plan in place
This is not a one-size-fits-all list. A demolition project has different mobilization needs than a ground-up commercial build. The point is to have a starting template that you refine for each project.
The contractors who do this well build their checklist into their scheduling software so every task has an owner and a due date. That way, when something gets missed, you know who dropped the ball and can fix it before it costs you a day on site.
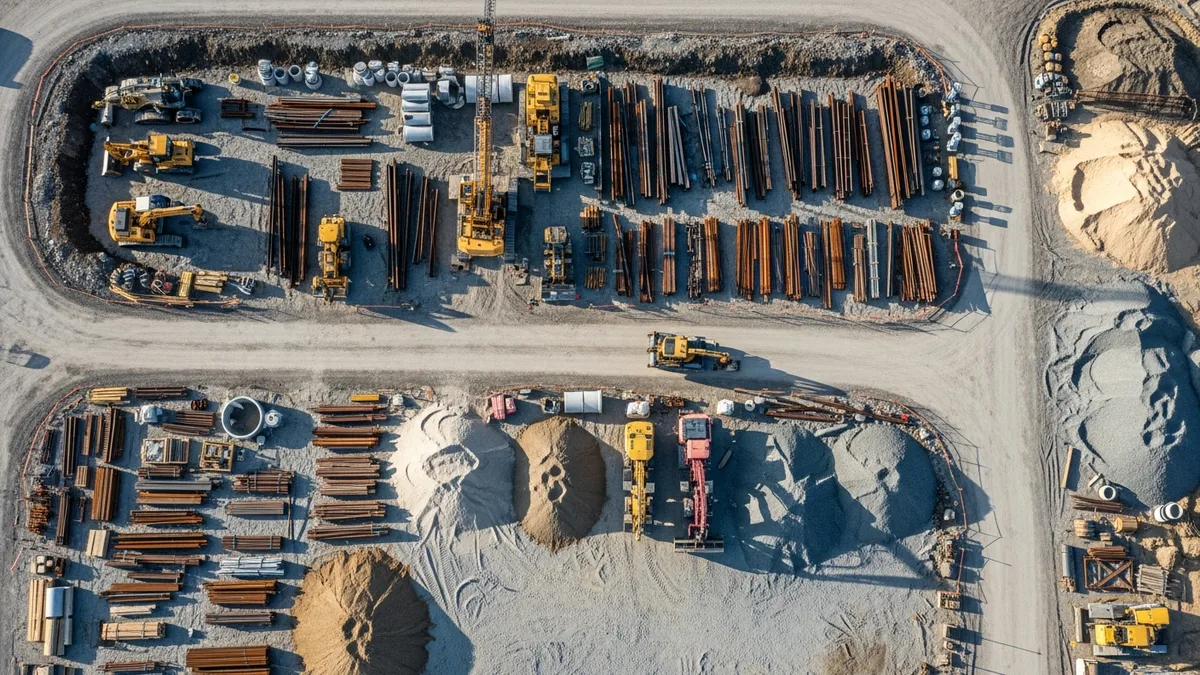
Equipment Staging Done Right
Equipment staging is one of those things that sounds simple until you do it wrong. And doing it wrong can cost you real money in lost productivity, re-mobilization fees, and damaged equipment.
Here is how to think about equipment staging:
Plan the Layout Before Anything Arrives
Before the first piece of equipment shows up, you need a staging plan. Walk the site. Look at your site plan. Figure out where each piece of equipment needs to be based on the sequence of work, not just where it is convenient to park it.
Ask yourself:
- Where will the excavator need to work first, and is there a clear path to get it there?
- Where should material deliveries be staged so they are close to where they will be used but not blocking equipment paths?
- Is there enough room for equipment to maneuver safely around stored materials and temporary facilities?
- Where do the dumpsters go so trucks can access them without crossing active work zones?
Sketch this out on a site plan and share it with your superintendent and equipment operators before delivery day.
Schedule Deliveries in Sequence
Do not have everything show up on the same day. Stagger deliveries based on when each piece of equipment is actually needed. Equipment that sits idle on site for a week before it is used is equipment you are paying for without getting any return.
If you are renting, this is especially important. Every day a machine sits idle is money out of your pocket. Coordinate delivery and pickup dates tightly with your equipment management plan so you are not paying for downtime.
Fuel, Maintenance, and Operator Access
Make sure every piece of equipment arrives with a full tank or a charged battery. Have your maintenance supplies on site, including hydraulic fluid, grease, filters, and basic repair tools. And confirm that every operator has the certifications and training required for the machines they will be running.
This is also a good time to review your approach to renting versus owning equipment. If you are mobilizing for a short project, renting may save you the headache of transport and long-term maintenance costs.
Crew Onboarding for New Projects
Onboarding does not just happen when you hire someone new. Every new project needs its own onboarding process for the crew assigned to it, even if those people have worked for you for years.
Curious what other contractors think? Check out Projul reviews from real users.
Why? Because every site is different. The hazards are different. The access routes are different. The client expectations are different. And if your crew shows up on day one without knowing these things, you are starting behind.
Hold a Project Kickoff Meeting
Before anyone steps on site, gather the whole team for a kickoff meeting. This does not need to be a three-hour corporate presentation. Thirty minutes to an hour is plenty. Cover:
- Project overview. What are we building? Who is the client? What is the timeline?
- Site logistics. Where do we park? Where is the field office? Where are the restrooms? What are the access routes?
- Schedule. What is the sequence of work? What are the critical milestones?
- Safety. What are the site-specific hazards? What PPE is required? Where is the first aid station? Who is the safety lead?
- Communication. How do we report issues? Who do we call if something goes wrong? How are daily updates handled?
- Roles and responsibilities. Who is running each phase? Who do the subs report to?
Print out the project schedule, the site plan, and the emergency contact list. Hand them to every team lead. Do not assume people will look things up on their phones.
Subcontractor Orientation
Your subs need the same orientation your own crew gets. Do not skip this because “they are experienced.” They may be experienced in general, but they do not know your site, your safety requirements, or your reporting expectations.
Require every subcontractor to attend an orientation before they start work. Cover site rules, safety protocols, schedule expectations, and your change order process. This is also the time to collect and verify insurance certificates and signed contracts if you have not already.
Good crew management during mobilization means fewer surprises once work begins. The time you invest in onboarding pays back tenfold in fewer mistakes, fewer safety incidents, and fewer “I didn’t know” conversations.
Document Everything
From day one, establish your documentation process. Daily logs, progress photos, time tracking, and material usage should all be captured consistently. If you wait until week two to start documenting, you have already lost data you might need later for billing, disputes, or change orders.
Set up your job costing tracking from the first hour of the first day. When costs get away from you early, they rarely come back.
Common First-Week Mistakes (and How to Avoid Them)
The first week sets the tone for the entire project. Here are the mistakes that cost contractors the most time and money during mobilization and early construction.
Mistake 1: Starting Without All Permits in Hand
This one is painfully common. The permit is “almost ready” or “should be approved any day now,” so you mobilize anyway. Then the inspector shows up and shuts you down. Now you have a crew sitting idle, equipment burning rental fees, and a client who is losing confidence.
The fix: Do not mobilize until every required permit is issued, printed, and posted on site. No exceptions. Build permit lead time into your project schedule from the start.
Mistake 2: No Clear Chain of Command
When three different people are giving directions and nobody knows who is actually in charge, chaos follows. Subs do not know who to report to. Decisions get made and then reversed. Work gets done out of sequence.
The fix: Publish an org chart for the project. It does not need to be fancy. A one-page document that shows who reports to who and who has decision-making authority is enough. Distribute it at the kickoff meeting.
Mistake 3: Underestimating Setup Time
Contractors routinely schedule productive work to begin on the same day as mobilization. That never works. Setting up temporary facilities, unloading equipment, and getting organized takes longer than you think, especially on a new site you have not worked on before.
The fix: Block out at least one to two full days for setup before scheduling any production work. For larger projects, block a full week. Your construction schedule should show mobilization as its own phase with its own timeline.
Mistake 4: Skipping the Safety Orientation
“We will cover safety tomorrow” turns into “we will cover it next week” turns into a near-miss or an injury. Safety orientation needs to happen before any work begins. Period.
The fix: Make safety orientation a gate. Nobody picks up a tool, climbs a ladder, or operates a machine until they have completed the site-specific safety briefing. Log attendance and keep the records on file.
Mistake 5: Poor Material Coordination
Materials show up before the site is ready to receive them. Or they do not show up at all because nobody confirmed the delivery date. Or they show up at the wrong location because the driver did not have clear directions.
The fix: Assign one person to own material logistics for the first week. They confirm every delivery date, provide site directions to every driver, and designate staging areas for every shipment. Over-communication beats under-communication every time.
Mistake 6: Ignoring the Budget During Mobilization
Mobilization costs money. Equipment transport, temporary facilities, site prep, and crew time all add up. If you are not tracking these costs from day one, you are starting the project with a blind spot in your budget.
The fix: Set up cost tracking before mobilization begins. Every expense during this phase should be logged against the project budget so you have an accurate picture of where you stand before production work even starts.
Site Logistics Planning
Site logistics planning is the backbone of a successful mobilization. It covers everything about how the physical site will function during construction, from traffic flow to storage zones to worker access. Skipping this step means your crew wastes time every single day figuring out where things go instead of building.
Developing a Site Logistics Plan
A site logistics plan is a drawing or document that shows where everything goes on site during each phase of construction. It is not the same as the architectural site plan. It is an operational map that answers the question: how does this site actually work as a construction workspace?
Your site logistics plan should include:
- Access and egress routes. Where do workers enter and exit? Where do delivery trucks come in and turn around? Are there one-way routes to prevent congestion?
- Equipment positioning. Where is each major piece of equipment located? How does it move between work zones?
- Material laydown areas. Where do materials get staged when they arrive? Are laydown areas organized by trade or by phase?
- Temporary facilities. Where are the trailers, restrooms, break areas, and first aid stations?
- Waste management zones. Where are dumpsters, recycling bins, and hazardous material storage?
- Parking. Where do workers park? Is parking separated from delivery and equipment routes?
- Pedestrian pathways. How do workers move safely between parking, the field office, and their work areas without crossing equipment routes?
- Crane swing radius and exclusion zones. If you have a crane on site, where can it swing and where are the no-go zones?
For larger projects, you may need multiple versions of this plan for different phases. The logistics layout during foundation work will look different from the layout during vertical construction or interior fit-out.
Traffic Management
Traffic management sounds like something for highway projects, but every job site with more than a handful of workers needs to think about it. When you have concrete trucks, material deliveries, equipment movements, and worker vehicles all sharing the same space, things get dangerous fast.
Set up clear traffic routes from day one. Use signage, cones, and barriers to separate pedestrian traffic from vehicle traffic. Designate a specific area for delivery trucks to stage while they wait to be unloaded. If your site is in an urban area, coordinate with the local traffic authority about lane closures, delivery windows, and haul routes.
A good scheduling tool helps here because you can schedule deliveries in specific time windows to avoid having three trucks show up at the same time on a site with only one access point.
Laydown Area Organization
How you organize your laydown areas directly affects productivity. If your crew spends twenty minutes every morning hunting for materials, that is twenty minutes of lost production multiplied by every worker on site, every day.
Organize laydown areas by trade or by phase of work. Label everything clearly. Keep high-use materials closest to the work area and long-lead items further back where they will not be in the way. Assign someone to manage the laydown area and keep it organized as deliveries come in and materials get consumed.
Protect materials from weather and theft. Cover lumber and drywall. Lock up expensive fixtures and finish materials. Make sure your insurance covers stored materials on site and document what is there with photos in case you need to file a claim.
Temporary Utilities and Services
Temporary utilities are easy to overlook during mobilization, but trying to work without power or water is a non-starter. Plan and schedule these well in advance because utility companies often need weeks of lead time.
Your temporary utility checklist should cover:
- Electrical. Temporary power panel sized for your equipment needs. Include enough outlets for tool charging and field office power.
- Water. Temporary water supply for dust control, concrete work, cleaning, and worker hydration.
- Internet and phone. Cell signal is not always reliable on job sites. A portable Wi-Fi hotspot or hardwired internet connection for the field office keeps your team connected.
- Lighting. If work starts early or runs late, temporary lighting keeps the site safe and productive.
- Sanitation. Portable restrooms and hand wash stations. Plan the count based on the number of workers on site per OSHA requirements.
Get temporary utilities scheduled and confirmed during mobilization so they are live before the first day of production work.
Equipment Mobilization Checklists
The general mobilization checklist from earlier covers equipment at a high level, but equipment mobilization deserves its own detailed checklist. Equipment is usually the biggest cost center during mobilization, and mistakes here are expensive.
Pre-Transport Checklist
Before any piece of equipment leaves the yard or the rental lot, verify:
- Condition inspection. Walk around the machine. Check for leaks, damage, tire condition, track wear, and fluid levels. Document everything with photos.
- Hours and maintenance status. Is the machine due for service? Do not send equipment to a job site if it is going to need maintenance in the first week.
- Attachments and accessories. Are all the buckets, blades, forks, or other attachments included? Are quick-connect couplers compatible?
- Safety features. Backup alarms, fire extinguishers, seat belts, ROPS, and mirrors all working?
- Operator manuals and service records. These should travel with the machine to the job site.
- Transport permits. Oversized or overweight loads may need special permits and escort vehicles.
- Insurance. Verify that the machine is covered during transport and on the job site.
Delivery Day Checklist
When equipment arrives on site:
- Verify the right machine showed up. Check serial numbers against your order if you are renting.
- Inspect for transport damage. Compare to your pre-transport photos.
- Confirm delivery location. Is the machine being dropped exactly where your site logistics plan says it should go?
- Test startup and basic functions. Fire it up. Run through the basic operations. Do not wait until the operator needs it to find out something is wrong.
- Sign delivery receipts with notes. If there is any damage or discrepancy, note it on the receipt before signing.
- Secure the machine. Lock it, remove keys, and ensure it is stable on level ground if it will sit overnight.
Rental Equipment Coordination
If you are renting equipment, coordination with the rental company is critical during mobilization. Confirm the following at least one week before delivery:
- Exact delivery date and time window
- Machine specs match what you requested (size, capacity, attachments)
- Rental rate and billing start date (does billing start at delivery or first use?)
- Pickup date and process for early returns
- Breakdown support and response time
- Fuel return policy (full tank return or wet-hour billing?)
Track all rental equipment on a single spreadsheet or inside your project management software so you know exactly what is on site, what it costs per day, and when it is scheduled to leave.
Equipment Tracking During the Project
Once equipment is on site, you need to track utilization. Machines that sit idle for days are burning money. Use daily logs or digital tools to track which machines are running, which are idle, and which can be returned early.
Geo-fenced time tracking is not just for workers. Some contractors use it to track when equipment enters and leaves the job site, which helps verify rental invoices and optimize fleet allocation across multiple projects.
Subcontractor Coordination During Mobilization
Subcontractors make up the majority of the workforce on most commercial and many residential projects. How well you coordinate with your subs during mobilization directly determines how smoothly the first few weeks of work go.
Pre-Mobilization Communication
Do not wait until the week before mobilization to talk to your subs. The moment you have a signed contract, start communicating with every subcontractor who will be on the project.
Key items to communicate early:
- Project schedule and their specific start dates. Give subs at least two to four weeks of notice before their start date, more for specialty trades that need to order materials.
- Scope of work confirmation. Make sure the sub’s understanding of their scope matches your contract documents. Misunderstandings discovered during mobilization cause delays and disputes.
- Site-specific requirements. Parking, access routes, safety orientation schedules, badging requirements, working hours, noise restrictions, and any other site rules.
- Submittal and procurement timelines. If the sub needs to submit shop drawings or order long-lead materials, those timelines should be locked in well before mobilization begins.
- Insurance and documentation. Collect certificates of insurance, signed subcontracts, W-9s, and any required licenses or certifications before the sub steps on site.
Staggering Subcontractor Mobilization
Not every sub needs to mobilize on day one. In fact, having too many trades on site at the beginning creates congestion and confusion. Stagger subcontractor mobilization based on the construction sequence.
For a typical commercial project, the mobilization sequence might look like:
- Week one. General contractor crew for site prep, temporary facilities, and layout.
- Week two. Earthwork and utilities subcontractors.
- Week three or four. Foundation subcontractors.
- Later. Structural steel, framing, mechanical, electrical, and plumbing based on the schedule.
Each sub should know not just their start date but also the status of the work that precedes them. If the earthwork sub is running behind, the foundation sub needs to know immediately so they can adjust their crew and material schedules.
Subcontractor Kickoff Meetings
Hold a separate kickoff meeting with each major subcontractor before they start work. This is different from the general project kickoff. The sub kickoff is focused on their specific scope, schedule, coordination points with other trades, and any issues they see with the plans.
Cover these topics in every sub kickoff:
- Scope walkthrough with plans and specifications
- Schedule expectations and milestone dates
- Work area assignments and access routes
- Quality standards and inspection requirements
- Safety requirements and reporting procedures
- Daily communication protocols (who to call, how to report issues)
- Payment terms and progress billing process
Document the meeting with notes and distribute them to everyone who attended. This creates a record of what was agreed to, which is invaluable when disputes arise later.
Managing Overlapping Trades
When multiple subs are working in the same area, coordination becomes critical. The electrician cannot run conduit if the framer has not finished the wall. The plumber cannot rough in pipes if the slab has not been poured.
Use your project schedule to identify coordination points where trades overlap or depend on each other. Hold weekly coordination meetings during the first few weeks of construction to work through conflicts before they become problems on site.
A construction scheduling platform with dependencies and visual timelines makes it much easier to see where trades intersect and where delays in one scope will cascade into others. This is one of those areas where a whiteboard and sticky notes simply cannot keep up with the complexity.
Holding Subcontractors Accountable
Set clear expectations during mobilization and hold subs to them from day one. If a sub shows up late, does not attend the safety orientation, or fails to provide required documentation, address it immediately. Patterns that start during mobilization tend to continue throughout the project.
Track subcontractor performance during mobilization just like you track it during construction. Document attendance, compliance with site rules, quality of work, and responsiveness to coordination requests. This data helps you make better decisions about which subs to hire on future projects.
Demobilization Planning
Most contractors spend all their energy planning mobilization and almost none planning demobilization. That is a mistake. A disorganized demobilization wastes money, damages client relationships, and can even create legal and environmental liabilities.
What Is Demobilization?
Demobilization is the reverse of mobilization. It is the process of removing equipment, materials, temporary facilities, and personnel from the job site after construction is complete or after your scope of work is finished.
Demobilization includes:
- Removing all equipment and arranging transport or rental returns
- Clearing leftover materials and debris
- Dismantling and removing temporary facilities (trailers, fencing, temporary power)
- Restoring site access routes and any areas disturbed by construction operations
- Final cleaning of the work area
- Completing and handing over all project documentation
- Releasing subcontractors and confirming final payments
- Conducting final inspections and punch list completion
Why Demobilization Needs a Plan
Without a plan, demobilization tends to drag on. Equipment sits on site for days after it is needed because nobody scheduled the pickup. The job trailer stays for an extra month because nobody called the rental company. Leftover materials pile up because nobody assigned someone to deal with them.
All of this costs money. Rental fees keep accruing. The client gets frustrated because their site is not clean. And your crew moves on to the next project while loose ends from the old one pile up.
Building a Demobilization Checklist
Just like mobilization, demobilization needs a checklist. Here is a starting framework:
Equipment
- Schedule equipment pickup or transport two weeks before the estimated completion date
- Conduct final inspections on all equipment before it leaves the site
- Document hours, condition, and any damage for rental returns
- Confirm rental billing end dates match actual pickup dates
Materials
- Inventory remaining materials and determine what can be returned, transferred to another project, or disposed of
- Arrange for return of unused materials to suppliers for credit
- Dispose of waste materials according to local regulations
- Remove all hazardous materials with proper documentation
Temporary Facilities
- Schedule removal of job trailers, portable restrooms, dumpsters, and storage containers
- Disconnect and remove temporary power, water, and communication lines
- Remove all temporary fencing, signage, and barriers
Site Restoration
- Grade and restore any areas disturbed by temporary roads, staging areas, or laydown zones
- Repair any damage to surrounding property, sidewalks, or roads caused by construction operations
- Complete final site cleaning to the standard specified in the contract
Documentation
- Complete all daily logs and close out project files
- Compile as-built drawings, warranties, and operation manuals for the client
- Process final invoices and verify all subcontractor payments
- Conduct a final cost review using your job costing tools to compare actual costs against the budget
Team
- Release subcontractors with written confirmation of scope completion
- Reassign your crew to their next projects
- Hold a project closeout meeting to capture lessons learned
Timing Demobilization
Start planning demobilization at least four weeks before the expected project completion date. Do not wait until the last day to start making phone calls about equipment pickup and trailer removal.
Create a demobilization timeline that works backward from the final completion date. If equipment pickup requires one week of notice, schedule that call three weeks before completion to give yourself buffer. If temporary utilities need to stay active until final inspections are complete, coordinate the disconnection date with your inspection schedule.
The Hidden Costs of Poor Demobilization
Poor demobilization eats into your profit margin in ways that are easy to miss. Here are the most common hidden costs:
- Extended rental fees. Equipment and temporary facilities that stay on site even one extra week can add thousands to your costs.
- Client dissatisfaction. A messy site after construction is finished leaves a bad last impression, even if the build quality is excellent. This affects referrals and repeat business.
- Environmental fines. Leaving waste, fuel, or hazardous materials on site can result in fines and cleanup costs.
- Unreturned material credits. Materials you could have returned for credit end up in the dumpster because nobody tracked them.
- Lost tools and equipment. Tools and small equipment that do not get inventoried and collected during demobilization end up missing.
Track demobilization costs just like you track mobilization costs. Add them to your project budget from the beginning so there are no surprises at closeout.
Making Mobilization a Repeatable Process
The best contractors do not treat mobilization as a one-off scramble for every project. They build it into a repeatable system that gets better over time.
Here is how to do that:
Create a Master Template
Take the checklist from earlier in this guide and turn it into your company’s master mobilization template. After every project, review what went well and what got missed. Update the template. Over time, it becomes a living document that captures everything your team has learned.
Assign Ownership Early
The day a contract is signed, assign a mobilization lead. This person is responsible for working through the checklist, coordinating with vendors and subs, and reporting progress to the project manager. If mobilization does not have an owner, it does not get done right.
Use Technology to Stay Organized
A checklist on paper is better than no checklist at all. But a checklist inside your project management software is better still. When every mobilization task has an owner, a due date, and a status, nothing gets lost in the shuffle.
Projul lets you build task templates that you can apply to every new project. That means your mobilization checklist is already loaded and assigned before you even think about it. No rebuilding from scratch every time.
Debrief After Every Mobilization
After the first week of every project, hold a quick debrief with your team. What went smoothly? What caused delays? What do we need to add to the checklist for next time?
These debriefs do not need to be long. Fifteen minutes over coffee is enough. But they are the difference between a team that keeps making the same mistakes and a team that gets sharper with every project.
Build in Buffer Time
No matter how good your plan is, something will go sideways. A delivery will be late. A permit will take an extra day. Weather will not cooperate. Build buffer time into your mobilization schedule so these hiccups do not cascade into delays on your production schedule.
A good rule of thumb: add 20 to 25 percent buffer to whatever you think mobilization will take. If you finish early, great. If you need the extra time, you will be glad you planned for it.
Mobilization is where projects are won or lost before a single wall goes up or a foundation gets poured. The contractors who plan this phase with the same rigor they plan the rest of the build are the ones who finish on time, on budget, and with their reputation intact.
Start with a solid checklist. Stage your equipment with intention. Onboard every crew member and sub like they are new to the company, because they are new to the project. Track your costs from hour one. And treat every mobilization as a chance to get better at the process.
Curious how this looks in practice? Schedule a demo and we will show you.
The first week is not just the beginning of the project. It is the foundation for everything that follows. Make it count.
Frequently Asked Questions
What does mobilization mean in construction?
How long does construction mobilization usually take?
What should be on a construction mobilization checklist?
Who is responsible for mobilization on a construction project?
How can I avoid delays during the first week of a construction project?
Related Articles

Concrete Tilt-Up Construction: A Contractor's Complete Field Guide
Tilt-up construction accounts for roughly 15 percent of all industrial and commercial buildings in North America. This...
Read More →
How to Implement Construction Software Without Losing Your Mind
Most construction software rollouts fail. Not because the software is bad, but because the rollout was rushed. Here are...
Read More →
How Selections Can Pay for Themselves in Three Easy Steps
Most contractors lose thousands each year on wrong material orders, slow client decisions, and missed upsell chances....
Read More →